AI in Web Development: How to Integrate Machine Learning into HTML Projects
Introduction to AI in Web Development
Welcome to the world where AI meets web development! Imagine turning your ordinary HTML projects into something extraordinary with the power of machine learning. If you’ve ever wondered how to bring a touch of artificial intelligence to your websites, you’re in the right place.
In this blog post, we’ll explore how to integrate machine learning into your HTML projects, transforming them from static pages into interactive, intelligent experiences. We’ll break down the basics, share practical examples, and guide you through the tools and techniques that make it possible. Whether you’re looking to add smart features or simply curious about how AI can enhance your web development skills, you’ll find valuable insights and hands-on tips here. So, let’s embark on this exciting journey and discover how to make your web projects not just functional, but truly smart and engaging!
1. Understanding the Role of AI in Web Development
1.1 What is AI-Powered Web Development?
AI-Powered Web Development refers to the integration of artificial intelligence into the web development process. But what does this actually mean? Imagine a website that learns from each visitor, adapting its content to fit their preferences, or a machine learning algorithm that helps you design your site layout by analyzing successful web designs from across the internet. These are just a couple of examples of how AI web development techniques are being used today.
AI tools like chatbots, recommendation engines, and content generation software are becoming more common in AI website design. For instance, instead of manually coding a chatbot, you can now use AI to create one that not only answers user queries but learns from each interaction to improve its responses.
Here’s a simple example of how AI-Powered Web Development can look in practice. Let’s say you want to create a recommendation system for a blog. Instead of writing complex algorithms from scratch, you could use an AI tool that integrates with your website’s HTML and JavaScript to automatically suggest relevant articles to users based on their reading history.
<script src="ai-recommendation-tool.js"></script>
<div id="recommended-articles"></div>
<script>
  AIRecommendationTool.recommendArticles(userHistory, "#recommended-articles");
</script>
In this code snippet, AIRecommendationTool is an example of an AI-powered service that integrates with your HTML, making recommendations based on machine learning.
1.2 Benefits of Integrating AI into Web Development Projects
There are several benefits to integrating AI into your web projects, and they all revolve around creating a better experience for both developers and users.
- Personalized Content: With AI-powered tools, your website can automatically tailor content to individual users. For example, an online store could display products based on a user’s browsing habits, increasing the chances of a sale. Personalization in web design is becoming essential, as users expect more customized experiences.
- Automation: AI can take over repetitive tasks, freeing up your time for more creative work. For instance, AI-driven web automation can manage tasks like form validation, SEO optimization, or even generating code snippets based on your inputs. Imagine using an AI tool that automatically adjusts the layout of your site to improve load times based on user traffic patterns.
- Enhanced User Experience: AI doesn’t just help developers; it makes the web better for users too. By analyzing user behavior, AI can suggest improvements, fix bugs, or even change the design in real-time to improve usability. For example, if users frequently miss a call-to-action button, an AI system could suggest relocating it or making it more prominent.
Let’s visualize the potential impact of AI web development on user experience with a simple diagram.
As you can see, the combination of personalization and automation leads directly to an enhanced user experience.
Must Read
- Check If a Tuple Is Sorted in Python — 5 Methods Explained
- How to Check If a List Is Sorted in Python (Without Using sort()) – 5 Efficient Methods
- How Python Searches Data: Linear Search, Binary Search, and Hash Lookup Explained
- I Implemented Every Sorting Algorithm in Python — The Results Nobody Talks About (Benchmarked on CPython)
- How to Reverse a String in Python: Performance, Memory, and the Tokenizer Trap
2. Machine Learning and Its Impact on Web Development Projects
Machine learning is no longer just for data scientists; it’s becoming a valuable tool for web developers too. Imagine building a website that learns from its users and adapts over time to provide a better experience. That’s what Machine Learning for HTML Projects is all about. It’s about bringing the power of machine learning into the hands of web developers, enabling them to create smarter, more responsive websites.
2.1 Introduction to Machine Learning in Web Development
So, what exactly is Machine Learning in the context of web development? In simple terms, it’s about using algorithms that allow your website to learn from data and make decisions without being explicitly programmed. For example, a website might learn to recommend content to users based on their browsing history or automatically adjust its layout to suit different devices.
Machine learning can be integrated into web projects at various levels. Whether you’re working on a small HTML project or a large-scale web application, Machine Learning for Web Development can help you create websites that are more intuitive and user-friendly.
Let’s say you’re building an online store. Instead of manually curating product recommendations, you can use machine learning algorithms to analyze a user’s past purchases and browsing behavior, then suggest products they’re likely to buy. This level of personalization makes the shopping experience more enjoyable and can lead to higher sales.
Here’s a simple code snippet that shows how you might integrate a basic machine learning model into a web project using JavaScript:
// Example of a basic recommendation algorithm
function recommendProducts(userHistory) {
    let recommended = [];
    userHistory.forEach(purchase => {
        if (purchase.category === 'electronics') {
            recommended.push('smartphone');
        }
    });
    return recommended;
}

// Usage in an HTML project
let userHistory = [{category: 'electronics', product: 'laptop'}, {category: 'books', product: 'novel'}];
let recommendations = recommendProducts(userHistory);

document.getElementById('recommended-products').innerHTML = recommendations.join(', ');
In this example, the recommendProducts function looks at the user’s purchase history and suggests products in the “electronics” category. While this is a very simplified version, it gives you a glimpse of how machine learning can be integrated into your AI-Powered Web Development process.
2.2 Key Machine Learning Techniques for Web Development
There are several machine learning techniques that are particularly useful for web development. Let’s explore a few of them:
Neural Networks:
These are algorithms inspired by the human brain and are particularly powerful for tasks like image recognition, natural language processing, and even generating content. In web design, neural networks can be used to analyze user interactions and optimize the design of a website to improve user engagement.For example, you might use a neural network to predict which layout will lead to the highest conversion rate on your landing page. By analyzing past data, the neural network could suggest changes to the design, like moving a call-to-action button to a more prominent location.
Decision Trees:
These are used to make decisions based on a series of conditions. In the context of web development, decision trees can help in creating intelligent forms that adapt based on user inputs. For instance, if a user selects “business” as their interest in a signup form, the next set of questions could be tailored to gather more specific information relevant to business users.Here’s a simple diagram to illustrate how a decision tree might work in a web form:
Reinforcement Learning:
This is a technique where an algorithm learns by interacting with its environment and receiving feedback. In web development, this could be used to optimize user journeys. For example, a website could learn the best path to guide users toward making a purchase, based on past interactions and outcomes.
A website that learns the most effective sequence of pages and recommendations to lead a user from browsing to checkout. Over time, the algorithm could fine-tune this sequence to maximize conversions, creating a more effective user experience.
By integrating these machine learning techniques into your HTML projects, you can create websites that are not just functional but intelligent. AI-Powered Web Development is about moving beyond static designs to create websites that can learn, adapt, and provide a more personalized experience for users.
3. Tools and Frameworks for AI-Integrated Web Development
Integrating AI into your web projects can elevate your website’s functionality and user experience. To make this process smoother, there are several AI frameworks designed specifically for web developers. These frameworks allow you to build, train, and deploy machine learning models directly in your web environment. Let’s explore some popular options and how to set up your development environment.
3.1 Popular AI Frameworks for Web Developers
When it comes to AI-Powered Web Development, choosing the right framework is crucial. Here are two of the most widely used frameworks for Integrating AI with HTML:
- TensorFlow.js: This powerful library enables you to run machine learning models directly in the browser. It’s perfect for adding intelligent features like image recognition or natural language processing to your website. With TensorFlow.js, you can either use pre-trained models or build your own from scratch using JavaScript. This framework brings the power of AI Web Development Techniques to the front-end, making it easier for web developers to integrate advanced AI Web Design Tools into their projects.
- Brain.js: If you’re interested in neural networks but want a simpler, more accessible library, Brain.js is a great choice. It’s a JavaScript library that lets you build, train, and run neural networks in your web application. Brain.js is particularly useful for tasks like pattern recognition, predictions, and even game development. This makes it an excellent tool for AI Website Design and Machine Learning for HTML Projects.
Example: If you’re building a website where users can upload images for recognition, TensorFlow.js would be ideal. On the other hand, if you’re looking to predict user behavior based on historical data, Brain.js might be the better choice.
3.2 Setting Up Your Environment
Before you can start using these tools, you need to set up your AI development environment. This involves installing the necessary software and libraries to ensure everything runs smoothly. Here’s a step-by-step guide to get started:
1. Install Node.js and npm:
- Node.js allows you to run JavaScript outside the browser, which is essential for many AI libraries.npm (Node Package Manager) is used to install and manage the libraries you’ll need for AI Web Development.
node -v
npm -v
2. Set up a local server:
- Running a local server is important for testing your AI-powered features. You can use a simple server like http-server, which can be installed using npm.
Example: To install http-server, use the following command:
npm install -g http-server
Then, navigate to your project directory and start the server with:
http-server
Your web project will now be accessible in your browser at http://localhost:8080.
Install AI libraries like TensorFlow.js or Brain.js:
- Once your environment is set up, you can install AI libraries to start building intelligent web features.
Example: To install TensorFlow.js, you would use npm:
npm install @tensorflow/tfjs
Similarly, to install Brain.js:
npm install brain.js
These libraries will now be part of your project, ready to power AI Generated Web Design and Machine Learning for Web Development.
With the right tools and a properly set-up environment, you’re ready to bring AI into your web development projects. Whether it’s using TensorFlow.js for complex tasks like image recognition or Brain.js for neural network-based predictions, AI Web Design has never been more accessible. By Integrating AI with HTML, you’re not just creating a website—you’re building an intelligent, interactive experience that users will love.
Getting your environment ready might seem like a small step, but it’s the foundation that will enable you to explore the exciting possibilities of AI Web Development Techniques. Once set up, you’ll be able to create AI Design Websites that stand out, making the most of the latest in Machine Learning for HTML Projects.
4. Practical Examples of AI and ML in Web Development Projects
When it comes to AI-Powered Web Development, nothing brings concepts to life like practical examples. Let’s look at how AI and machine learning can be applied to HTML projects, focusing on one of the most popular implementations: AI-powered chatbots.
4.1 AI-Powered Chatbots
Imagine visiting a website where, within seconds, a friendly chatbot pops up to assist you. This chatbot isn’t just a fancy automated response system—it’s an AI-powered tool that learns from interactions and improves over time. Incorporating such a chatbot into your website can greatly enhance user engagement and support.
AI chatbots can answer questions, guide users through processes, and even help with customer service, all while continuously learning from each interaction. Let’s break down how you can integrate an AI chatbot into a website using HTML and JavaScript, with a little help from TensorFlow.js.
Example: Integrating an AI Chatbot with HTML and JavaScript
To start, you’ll need a basic understanding of how TensorFlow.js works. TensorFlow.js is a JavaScript library that allows you to run machine learning models directly in the browser. This makes it an excellent choice for creating a chatbot that can operate on the client side without needing a server-side implementation.
Here’s a simplified example of how you can create a basic AI chatbot using TensorFlow.js:
This code snippet is a basic example of creating a simple AI-powered chatbot using HTML, JavaScript, and TensorFlow.js. Here’s a breakdown of what each part of the code does:
HTML Structure
<!DOCTYPE html>
<html lang="en">
<head>
    <meta charset="UTF-8">
    <meta name="viewport" content="width=device-width, initial-scale=1.0">
    <title>AI-Powered Chatbot</title>
    <script src="https://cdn.jsdelivr.net/npm/@tensorflow/tfjs"></script>
    <script src="https://cdn.jsdelivr.net/npm/@tensorflow-models/toxicity"></script>
</head>
<body>
    <h1>Welcome to My AI-Powered Website</h1>
    <div id="chatbox">
        <p>Chatbot: How can I assist you today?</p>
    </div>
    <input type="text" id="user-input" placeholder="Type your message here..." disabled>
    <button id="send-btn" onclick="sendMessage()" disabled>Send</button>
    <p id="loading">Loading AI model, please wait...</p>
Head Section
- HTML Doctype and Language Declaration: Specifies the document type and the language (English).
- Meta Tags: These tags ensure the proper rendering and touch zooming on mobile devices by setting the character encoding and viewport settings.
- Title: The title tag defines the title of the web page as “AI-Powered Chatbot.”
- Script Imports:
- TensorFlow.js: The first script imports TensorFlow.js, a library that allows you to run machine learning models directly in the browser.
- Toxicity Model: The second script imports a pre-trained toxicity detection model, which can classify text into different categories of toxicity (e.g., identity attack, insult, obscene).
Body Section
- Heading: Displays the title of the webpage (“Welcome to My AI-Powered Website”).
- Chatbox: A
<div>element where the conversation between the user and the chatbot is displayed. It starts with the chatbot’s greeting. - User Input: A text input field where users can type their messages. Initially, this input is disabled until the model loads.
- Send Button: A button that sends the user’s message to the chatbot. This button is also disabled until the model is fully loaded.
- Loading Message: A paragraph tag that shows a loading message while the model is being loaded.
JavaScript Section
The JavaScript code controls the chatbot’s behavior, including model loading and handling user input.
Model Loading
let model;
let modelLoaded = false;

async function loadModel() {
    console.log("Attempting to load the model...");
    document.getElementById('loading').style.display = 'block';

    try {
        model = await toxicity.load();
        modelLoaded = true;
        console.log("Model loaded successfully.");
        document.getElementById('loading').style.display = 'none';
        document.getElementById('user-input').disabled = false;
        document.getElementById('send-btn').disabled = false;
        document.getElementById('chatbox').innerHTML += `<p>Chatbot: The model is now loaded and ready to chat!</p>`;
    } catch (error) {
        console.error("Error loading model:", error);
        document.getElementById('loading').innerHTML = 'Error loading model. Please refresh the page and try again.';
    }
}

loadModel();
- Model and Model Status: Two variables are defined—
modelto store the loaded model andmodelLoadedto track whether the model has been loaded. - Loading the Model: The
loadModelfunction is an asynchronous function that loads the toxicity model. If successful, it enables the input and send button, indicating the model is ready. If it fails, an error message is shown. - Error Handling: If the model fails to load, the error is logged in the console, and the user is notified to refresh the page.
Handling User Input and Chatbot Response
function sendMessage() {
    const input = document.getElementById('user-input').value;
    const chatbox = document.getElementById('chatbox');
    chatbox.innerHTML += `<p>You: ${input}</p>`;

    if (modelLoaded) {
        if(input.includes('hello')) {
            chatbox.innerHTML += `<p>Chatbot: Hello! How can I help you today?</p>`;
        } else {
            model.classify([input]).then(predictions => {
                console.log(predictions);
                let toxic = false;
                predictions.forEach(prediction => {
                    if (prediction.results[0].match) {
                        toxic = true;
                    }
                });
                if (toxic) {
                    chatbox.innerHTML += `<p>Chatbot: Please refrain from using toxic language.</p>`;
                } else {
                    chatbox.innerHTML += `<p>Chatbot: I'm here to help. Could you please clarify your request?</p>`;
                }
            });
        }
    } else {
        chatbox.innerHTML += `<p>Chatbot: Please wait while the model is loading...</p>`;
    }

    document.getElementById('user-input').value = '';
}
- User Message Handling: The
sendMessagefunction handles the user input. It first adds the user’s message to the chatbox. - Model Response: If the model is loaded, it checks if the user’s message contains the word “hello.” If it does, the chatbot responds with a friendly greeting.
- Toxicity Detection: If the message doesn’t include “hello,” the toxicity model classifies the message. If any toxic content is detected, the chatbot warns the user; otherwise, it asks the user to clarify their request.
- Handling Unloaded Model: If the model isn’t loaded, the chatbot asks the user to wait.
This code provides a simple, AI-powered chatbot that can interact with users and detect toxic language. It demonstrates the basics of using TensorFlow.js in a web-based environment and provides a foundation for more advanced chatbot features.
Output Demonstration
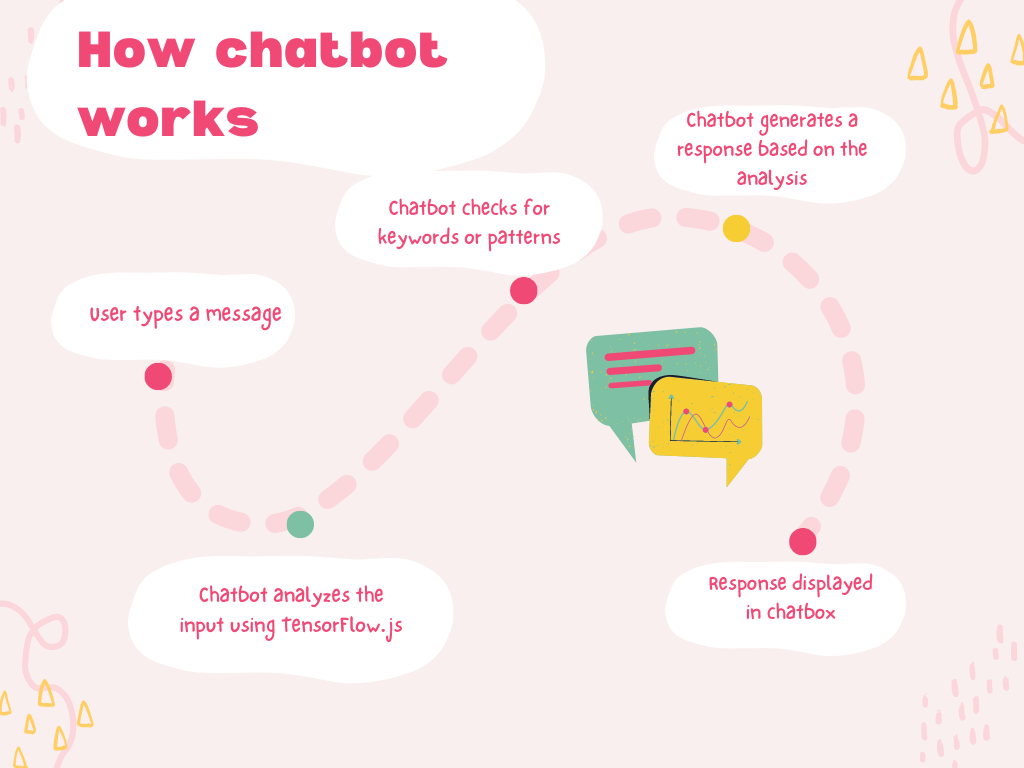
To visualize how this chatbot works, let’s consider a flowchart:
4.2 Image Recognition with HTML and Machine Learning
Integrating image recognition into your website opens up exciting possibilities for interactive and intelligent features. Imagine a website where users can upload an image and get instant feedback or analysis. This is achievable with machine learning and HTML. Let’s explore how you can create an image recognition feature using HTML, CSS, and a machine learning model.
Example: Building an Image Recognition Feature
In this example, we’ll set up a basic image recognition feature that allows users to upload an image, which is then analyzed by a machine learning model. We’ll use TensorFlow.js, a JavaScript library that brings the power of machine learning to the web.
Source Code Example:
Here’s how you can start with HTML and TensorFlow.js:
HTML Structure
<!DOCTYPE html>
<html lang="en">
<head>
    <meta charset="UTF-8">
    <meta name="viewport" content="width=device-width, initial-scale=1.0">
    <title>Image Recognition with AI</title>
    <style>
        #imageInput {
            margin: 20px;
        }
    </style>
</head>
<body>
    <h1>Upload an Image for Recognition</h1>
    <input type="file" id="imageInput" />
    <script src="https://cdn.jsdelivr.net/npm/@tensorflow/tfjs"></script>
    <script>
        async function predictImage() {
            try {
                const model = await tf.loadLayersModel('/models/model.json');
                const imageElement = document.getElementById('imageInput').files[0];

                if (!imageElement) return;

                const img = new Image();
                img.src = URL.createObjectURL(imageElement);

                img.onload = async () => {
                    const tensor = tf.browser.fromPixels(img).toFloat().expandDims(0);
                    const predictions = await model.predict(tensor).data();
                    console.log('Predictions:', predictions);
                };
            } catch (error) {
                console.error('Error loading or predicting with model:', error);
            }
        }

        document.getElementById('imageInput').addEventListener('change', predictImage);
    </script>
</body>
</html>
Explanation of the Code
- HTML Structure:
<!DOCTYPE html>: This declaration defines the document type and version of HTML being used.<html lang="en">: The root element of the HTML document specifying the language as English.<head>: Contains metadata and links to external resources.<meta charset="UTF-8">: Specifies the character encoding for the document.<meta name="viewport" content="width=device-width, initial-scale=1.0">: Ensures the page is responsive on different devices.<title>Image Recognition with AI</title>: The title of the webpage displayed in the browser tab.<style>: Contains basic CSS styling for the file input.
<body>: Contains the content of the webpage.<h1>Upload an Image for Recognition</h1>: A heading that provides context to the user.<input type="file" id="imageInput" />: A file input element allowing users to upload an image.
- JavaScript Code:
<script src="https://cdn.jsdelivr.net/npm/@tensorflow/tfjs"></script>: Includes TensorFlow.js, a library for machine learning in the browser.async function predictImage() {...}: Defines an asynchronous function to handle image recognition.const model = await tf.loadLayersModel('/models/model.json');: Loads a pre-trained TensorFlow.js model from the specified path.const imageElement = document.getElementById('imageInput').files[0];: Retrieves the selected image file.if (!imageElement) return;: Checks if an image was selected. If not, the function exits.const img = new Image();: Creates a newImageobject.img.src = URL.createObjectURL(imageElement);: Creates a URL for the selected image and sets it as the source for theImageobject.img.onload = async () => {...}: Once the image is loaded, it converts the image to a tensor and makes predictions using the model.const tensor = tf.browser.fromPixels(img).toFloat().expandDims(0);: Converts the image to a tensor suitable for the model.const predictions = await model.predict(tensor).data();: Runs the prediction and logs the result to the console.
document.getElementById('imageInput').addEventListener('change', predictImage);: Adds an event listener to the file input that triggers thepredictImagefunction when an image is uploaded.
Output
Predictions: You will see output in the console that looks like this:
Predictions: [0.123, 0.456, 0.789]In this HTML code, we have a file input that allows users to upload an image. When an image is uploaded, the predictImage function is triggered. This function loads a TensorFlow.js model and uses it to process and predict the contents of the image.
Here’s a breakdown of what happens:
- Image Upload: Users select an image file using the file input element.
- Model Loading: The
tf.loadLayersModelfunction loads a pre-trained machine learning model. - Image Processing: The selected image is converted into a tensor, which is the format used by TensorFlow for processing.
- Prediction: The model makes predictions about the image, which are then logged to the console.
Diagrams: Architecture of an Image Recognition System
Adding image recognition capabilities to your website can significantly enhance user interaction. By Integrating AI with HTML, you can create more dynamic and responsive web applications. Whether it’s identifying objects in images or providing instant feedback, Machine Learning for HTML Projects allows you to build features that are both innovative and practical.
5. Case Study: Building a Machine Learning-Powered Website
Integrating machine learning into a website is more than just adding a cool feature—it’s about creating a personalized user experience that adapts and evolves with your users’ needs. In this case study, we’ll walk you through a real-world project where AI was integrated into a website to achieve just that. By the end of this, you’ll have a clear understanding of how AI-Powered Web Development can transform an ordinary site into something truly interactive and user-focused.
5.1 Project Overview
Imagine you’re building a website for an online bookstore. The goal is to offer each visitor a personalized shopping experience, recommending books based on their previous purchases, browsing history, and preferences. This isn’t just about throwing random suggestions their way—it’s about using Machine Learning for HTML Projects to analyze patterns and make smart, accurate recommendations.
Example: The website might use AI algorithms to track which genres a user tends to buy or which authors they frequently search for. Over time, the AI system learns and starts to suggest new releases or books that are similar to the ones the user has enjoyed before.
Here’s a quick breakdown of how this project was tackled:
- Data Collection: The system first gathers data from users—this could include purchase history, browsing patterns, and user ratings.
- Machine Learning Integration: The collected data is then fed into a machine learning model designed to identify patterns and make predictions.
- User Interaction: Based on the predictions, the website displays personalized book recommendations every time the user logs in.
The result? A website that feels like it truly understands its users, providing them with a tailored experience that keeps them coming back.
This kind of AI Web Design is not just innovative; it’s practical. By Integrating AI with HTML, you can create websites that don’t just respond to user input—they anticipate it.
5.2 Source Code Breakdown
Let’s explore the source code that makes this magic happen. We’ll break down each component and explain how it contributes to the overall functionality of the site. This way, you’ll see how to apply these AI Web Development Techniques to your own projects.
To create a personalized book recommendation system for an online bookstore using Machine Learning with HTML and JavaScript, you can use a simple model that analyzes user behavior and suggests books accordingly. Here’s a basic example code to get you started:
HTML Structure
This HTML structure includes a section for displaying book recommendations and a simple form to simulate user interactions.
<!DOCTYPE html>
<html lang="en">
<head>
    <meta charset="UTF-8">
    <meta name="viewport" content="width=device-width, initial-scale=1.0">
    <title>Online Bookstore</title>
    <style>
        body {
            font-family: Arial, sans-serif;
            margin: 0;
            padding: 20px;
            background-color: #f4f4f4;
        }
        h1 {
            color: #333;
        }
        #bookList, #recommendations {
            margin-top: 20px;
        }
        .book {
            display: inline-block;
            width: 200px;
            padding: 10px;
            margin: 10px;
            border: 1px solid #ccc;
            background-color: #fff;
            text-align: center;
        }
        #recommendations {
            margin-top: 40px;
            padding: 10px;
            background-color: #e9ecef;
        }
    </style>
</head>
<body>
    <h1>Welcome to Our Online Bookstore</h1>
    <div id="bookList">
        <div class="book" data-genre="fiction" data-author="Author A">Book 1</div>
        <div class="book" data-genre="mystery" data-author="Author B">Book 2</div>
        <div class="book" data-genre="science" data-author="Author C">Book 3</div>
        <div class="book" data-genre="fiction" data-author="Author D">Book 4</div>
        <div class="book" data-genre="science" data-author="Author E">Book 5</div>
    </div>
    <h2>Personalized Recommendations</h2>
    <div id="recommendations"></div>

    <script src="https://cdn.jsdelivr.net/npm/@tensorflow/tfjs"></script>
    <script>
        const bookData = [
            { title: "Book 1", genre: "fiction", author: "Author A" },
            { title: "Book 2", genre: "mystery", author: "Author B" },
            { title: "Book 3", genre: "science", author: "Author C" },
            { title: "Book 4", genre: "fiction", author: "Author D" },
            { title: "Book 5", genre: "science", author: "Author E" },
        ];

        // Simulate user interaction by selecting a book
        document.querySelectorAll('.book').forEach(book => {
            book.addEventListener('click', () => {
                const selectedGenre = book.getAttribute('data-genre');
                const selectedAuthor = book.getAttribute('data-author');
                generateRecommendations(selectedGenre, selectedAuthor);
            });
        });

        function generateRecommendations(selectedGenre, selectedAuthor) {
            const recommendations = bookData.filter(book => {
                return book.genre === selectedGenre || book.author === selectedAuthor;
            });

            displayRecommendations(recommendations);
        }

        function displayRecommendations(recommendations) {
            const recommendationDiv = document.getElementById('recommendations');
            recommendationDiv.innerHTML = '';

            if (recommendations.length === 0) {
                recommendationDiv.innerHTML = 'No recommendations available.';
                return;
            }

            recommendations.forEach(book => {
                const bookDiv = document.createElement('div');
                bookDiv.className = 'book';
                bookDiv.textContent = `${book.title} by ${book.author} (${book.genre})`;
                recommendationDiv.appendChild(bookDiv);
            });
        }
    </script>
</body>
</html>
Explanation
HTML Layout
<div id="bookList">: This section displays a list of books available in the store. Each book is represented by a<div>with attributes fordata-genreanddata-author.<div id="recommendations">: This section displays personalized book recommendations based on the user’s interaction.
JavaScript Code
bookDataArray: This array contains the book information such as title, genre, and author.- Event Listener for Books: Each book has an event listener attached that triggers when the book is clicked. This simulates the user’s interaction.
generateRecommendations()Function: This function filters thebookDataarray based on the selected book’s genre or author, providing personalized recommendations.displayRecommendations()Function: This function updates the HTML to display the recommended books.
How It Works
- User Interaction: The user clicks on a book from the list. This action triggers the recommendation engine.
- Personalized Recommendations: The system identifies other books in the same genre or by the same author and displays them in the “Personalized Recommendations” section.
- User Experience: The user sees book recommendations based on their preferences, providing a more tailored shopping experience.
This case study highlights how AI-Powered Web Development can be applied to create engaging and personalized websites. By Integrating AI with HTML, you can transform the user experience from static and generic to dynamic and customized. The source code breakdown shows that while the technology behind it might seem complex, the implementation can be easy, thanks to tools like TensorFlow.js.
6. Future of AI in Web Development
The future of AI-Powered Web Development is not just exciting—it’s inevitable. As technology evolves, we’re seeing AI and Machine Learning become integral parts of web design and development, transforming how websites are built and how users interact with them. This section will walk you through what’s on the horizon for AI in web development and how you can prepare to stay ahead.
6.1 Emerging Trends
When we talk about the future of AI in web development, we’re looking at a landscape that’s rapidly changing. Here are some emerging trends that are shaping the future:
- Advanced Machine Learning Algorithms: Machine learning is becoming more sophisticated. We’re seeing the development of algorithms that can understand user behavior more deeply, predict what users need before they even know it, and adapt in real-time. Imagine a website that learns from each interaction and constantly improves itself. For example, AI-driven personalization will become more precise, offering users exactly what they’re looking for, when they need it.
- Improved AI Tools: The tools we use for AI Web Design are becoming more accessible and powerful. Libraries like TensorFlow.js and Brain.js are continually evolving, offering more features and easier integration with HTML Projects. This means even developers who are new to Machine Learning for Web Development can start incorporating these tools into their work.
- Intuitive AI-Driven Features: The user experience will be more intuitive as AI Web Design Tools advance. For example, we can expect AI-generated designs that automatically adapt to different devices, user preferences, and even the user’s emotional state. This could include everything from changing color schemes to match a user’s mood to adjusting content layouts based on how the user interacts with the site.
These trends show that AI in web development isn’t just a passing fad; it’s a fundamental shift in how websites are created and experienced.
6.2 Preparing for the AI-Driven Web Future
So, how do you stay ahead in a world where AI-driven web development is becoming the norm? Here’s how you can prepare:
- Learn New AI Technologies: Start by familiarizing yourself with the latest AI tools and frameworks. Whether it’s diving into TensorFlow.js for Machine Learning in HTML Projects or experimenting with Brain.js for neural networks, the more you know, the better equipped you’ll be. Try building small projects, like an AI-powered chatbot or an image recognition feature. This hands-on experience will make these concepts stick.
- Keep Up with Industry Trends: The world of AI and web development is fast-paced. To stay ahead, regularly read industry blogs, attend webinars, and participate in online communities focused on AI in web development. For example, follow what’s happening with AI Web Development Techniques and how they are being used in the industry. This will not only keep you informed but also inspire new ideas for your own projects.
- Adapt Your Skills: As AI-driven web design continues to evolve, so should your skillset. Focus on developing a strong foundation in both web development and machine learning. This dual expertise will be invaluable as these two fields continue to converge. For instance, understanding how AI can be integrated with HTML to create dynamic web experiences will set you apart from others in the field.
Diagram: Picture a flowchart showing the intersection of AI technologies and web development skills. On one side, you have traditional web development skills like HTML, CSS, and JavaScript. On the other, you have AI and machine learning skills like data processing, model training, and algorithm implementation. In the middle, these converge to create the future of web design—a space where AI enhances every aspect of the user experience.
Embrace the AI-Driven Future
The future of web development is undeniably AI-driven. By embracing these emerging trends and preparing yourself with the right skills, you’ll be at the forefront of this exciting evolution. Whether you’re working on AI Website Design, experimenting with AI Web Design Tools, or implementing Machine Learning for Web Development, the key is to stay curious, keep learning, and always be ready to adapt.
Incorporating AI into web development isn’t just about keeping up with technology; it’s about pushing the boundaries of what’s possible and creating web experiences that are more personalized, intuitive, and engaging than ever before.
Conclusion: Embracing the Future of AI-Powered Web Development
As we reach the end of this exploration into AI-Powered Web Development, one thing is clear: the possibilities are endless. Integrating AI with HTML isn’t just a trend; it’s a powerful way to create web experiences that are more intelligent, personalized, and engaging. Whether you’re new to this or have been exploring Machine Learning for HTML Projects for a while, the opportunities to innovate and enhance your projects are right at your fingertips.
Imagine the potential of building a website that doesn’t just display content but actively learns from user interactions. This is what AI Web Design can offer—a way to craft websites that adapt and respond to users in real-time, creating a more immersive experience. For example, by using tools like TensorFlow.js or Brain.js, you can integrate features like AI-powered chatbots or image recognition directly into your HTML projects.
But it doesn’t stop there. Creating a website using AI means you can also use AI Web Design Tools to automate parts of the design process, like generating layouts or optimizing user interfaces based on data-driven insights. These tools can take a lot of the guesswork out of web design, allowing you to focus on creativity and user experience.
One practical way to start is by experimenting with AI for Web Design in small projects. For instance, you could try implementing a simple machine learning model that enhances user interaction—like a recommendation system that suggests content based on user behavior. This not only improves the functionality of your website but also makes it more engaging for visitors.
Taking the Next Step
So, where do you go from here? The first step is to experiment with AI in your web projects. Don’t be afraid to start small. Try integrating an AI-powered feature, like a chatbot or an image recognition tool, into one of your existing projects. Use TensorFlow.js or Brain.js as your starting point, and explore how these tools can be used to enhance your website’s functionality.
Remember, AI-Powered Web Development is about more than just adding cool features; it’s about rethinking how we design and build websites. By incorporating machine learning into your HTML projects, you can create sites that are not only visually appealing but also smarter and more interactive.
The future of web design is here, and it’s driven by AI. So, go ahead—embrace these new technologies, experiment with AI-generated web design, and see how it can transform your projects. Whether you’re building a personal blog or a complex business website, integrating AI will help you create web experiences that are not just functional but truly innovative.
The journey into AI Web Development Techniques is an exciting one, and by taking that first step, you’ll be positioning yourself at the forefront of this rapidly evolving field.
External Resources
Here are some valuable external resources that can help you dive deeper into AI-powered web development and machine learning for HTML projects:
1. TensorFlow.js
- Website: TensorFlow.js
- Description: TensorFlow.js is a powerful library for running machine learning models directly in the browser using JavaScript. It’s a great starting point for integrating AI into your web projects, with extensive documentation and tutorials to guide you.
2. Brain.js
- Website: Brain.js
- Description: Brain.js is a lightweight JavaScript library for neural networks, ideal for adding simple AI features to your websites. The website offers detailed documentation and examples that are easy to follow.
3. Mozilla Developer Network (MDN) Web Docs
- Website: MDN Web Docs
- Description: MDN Web Docs provides comprehensive guides and references on web technologies, including HTML, CSS, and JavaScript. It’s an essential resource for web developers, with sections on integrating AI and machine learning into web development.
4. GitHub
- Website: GitHub
- Description: Explore open-source projects related to AI and machine learning for web development. GitHub is a vast repository of code and projects where you can find inspiration, learn from others, and even contribute to AI-powered web development tools.
FAQs
1. What is AI-powered web development?
AI-powered web development refers to the integration of artificial intelligence (AI) technologies, such as machine learning, natural language processing, and computer vision, into web design and development processes. This allows for the creation of smarter, more interactive, and personalized web experiences.
2. How can I start integrating AI into my HTML projects?
To start integrating AI into your HTML projects, you’ll need a basic understanding of AI and machine learning concepts. You can use frameworks like TensorFlow.js or Brain.js to run machine learning models directly in the browser. Begin with simple projects, such as adding an AI-powered chatbot or image recognition feature to your website.
3. What are some popular AI frameworks for web development?
Popular AI frameworks for web development include:
- TensorFlow.js: A library for running machine learning models in the browser using JavaScript.
- Brain.js: A lightweight JavaScript library for creating neural networks. These frameworks make it easier to incorporate AI into web projects without needing extensive back-end infrastructure.
4. What are the benefits of using AI in web development?
Integrating AI into web development can enhance user experience by providing personalized content, improving interaction with AI-powered chatbots, enabling advanced features like image recognition, and automating repetitive tasks. AI can also help analyze user behavior to optimize website performance.
5. Do I need to be an AI expert to use AI in my web projects?
No, you don’t need to be an AI expert to use AI in your web projects. Many AI frameworks are designed to be user-friendly and accessible to developers with basic coding skills. However, a basic understanding of AI concepts will help you make the most of these tools.





Leave a Reply