

Edge AI for Real-Time Data Processing
Introduction
You know how apps like Google Assistant or Siri answer your questions? Or how some cameras can recognize faces? Most of the time, these things work by sending your data (like your voice or photo) to the cloud—which means a far-away computer processes it and then sends back the result.
The problem is:
- It can be slow, especially if the internet is bad.
- And it won’t work at all without an internet connection.
What’s Different with Edge AI?
Edge AI means the AI is done right on the device—like your phone, a drone, or a security camera. The device doesn’t need to send the data to the cloud. It can think and respond on its own, almost instantly.
This is really useful when devices need to act fast—like a drone avoiding a tree, or a factory machine checking for a defect on a product. They can’t wait for cloud servers to respond.
But Wait… AI Models Are Big, Right?
Yes! Normal AI models are too big for tiny devices. That’s where something called TinyML comes in. It’s a way to make AI models very small, so they can run on low-power devices like:
- Smartwatches
- Fitness trackers
- IoT sensors (those little smart gadgets in homes and factories)
Even though these devices are small, they can still do smart things—like recognize your voice or detect unusual patterns—without needing the internet.
So in this blog, I’ll explain:
- And how new tech is fixing those problems
- How Edge AI works
- Why it’s important
- Where it’s being used right now
- The problems we still face
What is Edge AI?
So, What Is Edge AI?
Alright, now that we’ve set the stage, let’s get into what Edge AI actually means.
Edge AI is all about running AI models directly on the device—whether that’s your smartphone, a security camera, a smartwatch, or a tiny IoT sensor. Instead of sending data to the cloud for processing, the device takes care of it right there on the spot.
So, when your device sees something, hears something, or senses something—it can respond instantly, without asking the cloud for help. Everything happens locally. That’s what makes it faster, more efficient, and often more private too
Key Benefits of Edge AI
Let’s Explore Why Edge AI Is a Big Deal
Let’s break down some of the biggest benefits:
Instant Responses (Low Latency)
With Edge AI, data is processed right away on the device. There’s no lag from sending data back and forth to the cloud. This is super important in situations where every second counts—like:
- A self-driving car avoiding a crash
- A security camera catching a break-in
- Or a factory machine stopping when something goes wrong
These devices need to act immediately, and Edge AI helps them do just that.
Uses Less Internet (Low Bandwidth)
Old-school AI needs to send tons of data to the cloud and back. That uses a lot of internet bandwidth and can slow things down, especially if your connection isn’t great.
With Edge AI, everything stays on the device. That means:
- Less data sent
- Lower internet costs
- And things just work faster and smoother, especially in places with poor connectivity
It’s super useful for smart homes, healthcare gadgets, and industrial sensors.
Keeps Your Data Private (Better Privacy)
Here’s something we all care about—privacy.
Since Edge AI processes data on the device, your information doesn’t get sent to external servers. This makes it much safer for things like:
- Face or fingerprint recognition
- Health monitoring devices
- Personal AI assistants
Your sensitive info stays on your device, not floating around on the internet.
Saves Battery (Energy Efficient)
Sending data to the cloud and waiting for a response uses a lot of power. That’s not ideal for devices that run on tiny batteries.
Edge AI uses tiny, optimized models that run smoothly on low-power chips. So your:
- Smartwatch
- Fitness tracker
- Or smart sensor
…can stay powered for longer, without needing a charge every few hours.
Pretty cool, right? Edge AI isn’t just a small upgrade—it’s a whole new way to run intelligent systems without relying on the cloud.
How Edge AI Works
Okay, so we’ve talked about what Edge AI is and why it’s such a game-changer. Now let’s see how it all works behind the scenes.
The key thing to remember is this: Edge AI doesn’t rely on the cloud. Everything—from collecting data to taking action—happens right on the device. It brings together three things:
- AI (to make smart decisions)
- Edge computing (to do the work locally)
- And specialized hardware (that’s built for low-power AI tasks)
Let me walk you through the step-by-step process, using real examples so it all makes sense.
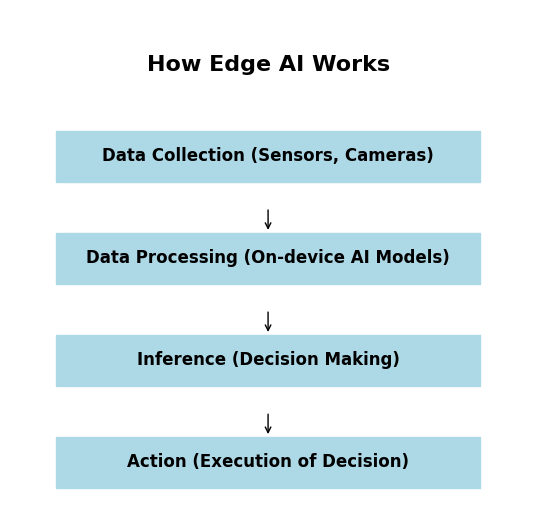
⚙️ Steps in Edge AI Processing
Data Collection from Sensors
First, the device collects real-world data using built-in sensors—like:
- Cameras
- Microphones
- Motion detectors
- Temperature or pressure sensors
Example: A smart security camera captures live video of your front door.
Preprocessing the Data Locally
Before the AI model can do anything, the device cleans up the data. It filters out noise, reduces the size of the data, and gets it ready for analysis.
Example: A voice assistant removes background noise so it can clearly hear your command.
Running AI Models on the Device
Now the magic happens. The device runs a machine learning model that’s been specially optimized for edge devices. These models are smaller and faster, so they can run without needing much power.
Some popular tools for this are:
- TensorFlow Lite
- Edge Impulse
- PyTorch Mobile
Example: A self-driving car recognizes a stop sign and a pedestrian crossing the road—all within milliseconds.
Making Decisions in Real Time
Making Decisions in Real Time
Once the data is analyzed, the device makes a decision instantly, based on what it learned from the AI model.
Example: A smart thermostat senses you’ve entered the room and decides to adjust the temperature.
Action Execution Without Cloud Delay
Finally, the device takes action—right away. No waiting, no lag, and no need to ask the cloud what to do.
Example: Your phone unlocks immediately when it recognizes your face—no internet needed.
And that’s it! The whole loop—from sensing to doing—happens on the device itself. That’s what makes Edge AI so powerful, especially in situations where speed, privacy, and reliability really matter.
Key Technologies Behind Edge AI
Now that we’ve talked about how Edge AI works, let’s explore the key technologies that make it all happen. Think of these technologies like the tools that help Edge AI run smoothly on devices like your phone, a smart camera, or even a tiny sensor. I’m going to explain each one so you can understand exactly how they work together.
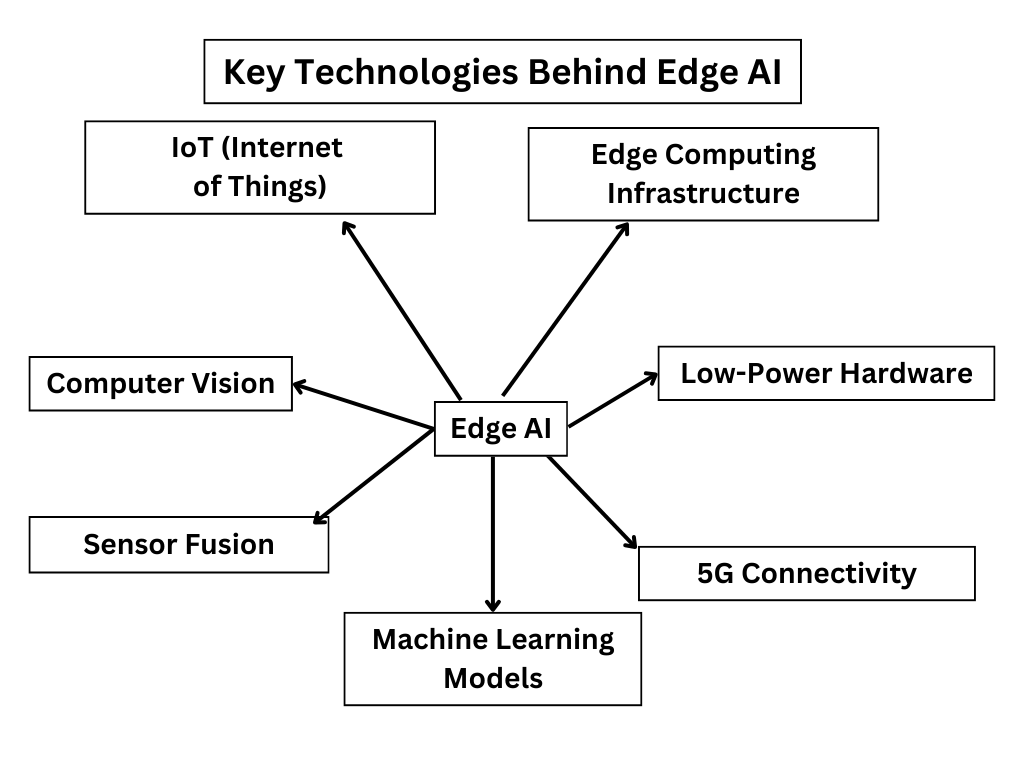
1. TinyML (Tiny Machine Learning)
TinyML allows AI models to run on small, low-power devices like smartwatches, fitness trackers, or IoT sensors. These models are carefully compressed so they can work efficiently without needing much memory or energy. (We’ll cover this in more detail later.)
2. AI Accelerators (TPUs, NPUs, GPUs)
Now that we know AI models can run on small devices, how do we make sure these devices can handle AI tasks quickly? The answer is specialized hardware—which are chips designed to run AI models as efficiently as possible. Here are some of the main types:
- TPUs (Tensor Processing Units): These are chips designed by Google to speed up AI computations, especially when dealing with large amounts of data.
- NPUs (Neural Processing Units): These are chips made specifically to run neural networks, which are the models AI uses to make predictions or decisions.
- GPUs (Graphics Processing Units): While GPUs were originally built to handle graphics (for things like video games), they are also great for running AI models, because they can process many tasks at once.
These AI accelerators work by processing the AI models much faster than a regular computer chip, so Edge AI devices can make decisions quickly, even when they don’t have access to the cloud.
3. Edge Computing
The core idea behind Edge Computing is processing data closer to where it’s generated, rather than sending it off to cloud servers. This means that devices don’t need to rely on the internet to function—they can analyze the data right there on the device itself.
For example, let’s say you have a smart security camera. If the camera only relied on the cloud to process images, it would take longer for the system to detect a person. But with Edge Computing, the camera can process the image right away, decide whether it’s a person, and send an alert immediately. This means:
- Faster decisions, which is critical for things like self-driving cars, drones, or security cameras.
- Less data sent to the cloud, which saves on bandwidth and data costs.
- Improved privacy, because the data stays on the device and doesn’t need to be uploaded to the cloud.
This is important because, in Edge AI, the device works by itself, even if there’s no internet connection or if the cloud service is slow.
Putting It All Together
These three technologies—TinyML, AI Accelerators, and Edge Computing—work together to make Edge AI possible. They allow devices to be smarter, faster, and more private, by letting them process and analyze data locally instead of relying on distant cloud servers.
With these technologies, everyday devices—like your phone, your smartwatch, or even industrial machines—can make decisions instantly and independently, without needing to send data to the cloud.
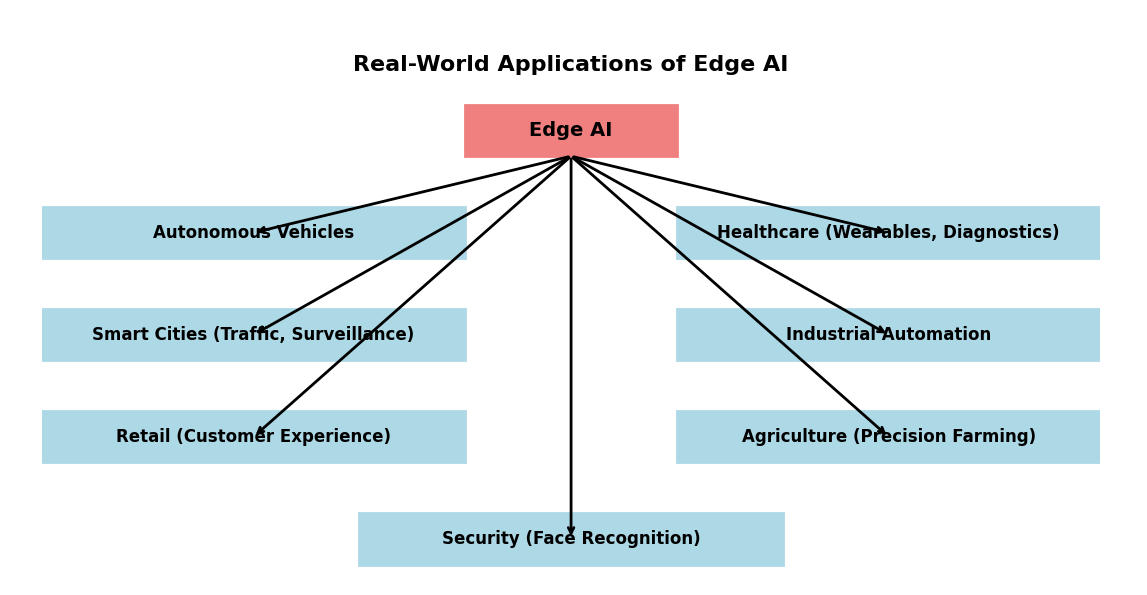
Real-World Applications of Edge AI
Now that we’ve seen how Edge AI works and what powers it, let’s look at how it’s used in real life. These examples will show how AI is helping devices work smarter—without needing the cloud.
A. AI on Smartphones
Let’s start with smartphones—something you use every day.
Modern phones (like iPhones or Google Pixel) now come with something called an NPU – that stands for Neural Processing Unit. It’s a tiny chip inside the phone that’s designed just to handle AI tasks quickly and efficiently.
Here’s what this allows your phone to do:
- Take better photos instantly
The moment you press the shutter, Edge AI kicks in. It adjusts brightness, sharpness, background blur—all right there on your phone. No need to send it to the cloud. - Use voice assistants without lag
Siri or Google Assistant can now respond faster, because some commands are handled locally on the device, without sending everything to the internet. - Translate languages even when offline
With tools like Google Translate, your phone can translate spoken words in real time, even if there’s no internet. That’s Edge AI helping behind the scenes.
B. AI on Drones
Next—drones. These flying machines need to make fast decisions while moving.
With Edge AI, drones don’t need to constantly ask a cloud server what to do. They analyze their surroundings on their own.
Here’s how:
- Avoiding obstacles
If a drone sees a tree or building in its path, it can react immediately—no waiting for cloud instructions. - Security and surveillance
In border security or police operations, drones can scan faces and recognize people in real time using AI models on the device. - Helping in agriculture
Some drones are used on farms. They scan crops and look for signs of plant disease. This is often done using TinyML models running directly on the drone.
C. AI on IoT Sensors
Now think about IoT devices—smart home gadgets, factory machines, wearable health trackers. These all collect data constantly.
Here’s the problem: sending all that data to the cloud is slow and expensive. Edge AI fixes that by letting the sensor do the thinking.
For example:
- Smart thermostats (like Nest) learn your daily routine and adjust the temperature automatically—right from the device.
- Smartwatches monitor your heart in real time. If your heart rate suddenly spikes or drops, they detect the change instantly and alert you. No cloud server involved.
- Factory sensors on machines can “feel” when a motor is acting up. Edge AI lets them predict when something’s going to break and send a warning before it happens.
Why This Matters
Edge AI is not just about speed. It’s also about:
- Working without internet
- Protecting your privacy
- Saving energy
- Reducing cost and delay
And that’s why it’s showing up in so many places—from your wrist to the skies.
What is TinyML?
TinyML (Tiny Machine Learning) is a branch of AI that allows machine learning models to run on tiny, low-power devices like microcontrollers (MCUs). These devices have limited memory, processing power, and energy but can still perform AI tasks like speech recognition, object detection, and sensor data analysis. Unlike traditional AI, which needs powerful computers or cloud servers, TinyML works on small, battery-powered devices such as Raspberry Pi, Arduino, and ESP32.
TinyML is changing the way how we used AI in IoT (Internet of Things), smart devices, and remote applications. It brings AI to places where internet access is limited, making it useful for healthcare wearables, environmental monitoring, and industrial automation.
Why TinyML Matters?
1. It Uses Very Little Power
TinyML works on battery-powered devices, like your fitness tracker or a smart sensor. These devices don’t need to use much power—sometimes less than 1 milliwatt, which is very tiny! This means they can work for a long time without needing to be charged.
2. Works Without Internet
Normally, when a device needs to process data, it sends that data to the cloud (like a big computer on the internet) for processing. But TinyML does everything right on the device, so it doesn’t need the internet. This is great if you are in a place where the internet isn’t available, like a farm, the woods, or even space!
3. Smarter Devices Everywhere
TinyML makes everyday objects smarter. It lets things like sensors, wearables, and IoT devices make decisions by themselves. For example, a smart thermometer can adjust the temperature without needing to connect to the internet. That’s what makes TinyML awesome!
Popular TinyML Frameworks
If you want to build your own TinyML projects, you’ll need some tools to help you. Here are some popular ones:
1. TensorFlow Lite for Microcontrollers (TFLM)
This is a simplified version of TensorFlow, a tool that helps computers learn. TFLM is made for small devices like Arduino or Raspberry Pi. It lets you run AI models (like speech recognition or motion detection) on these small devices.
2. Edge Impulse
Edge Impulse is a tool that makes it easy to create AI models for tiny devices, even if you don’t know how to code. It has a drag-and-drop interface, so you just move things around to build your project. It supports devices like Raspberry Pi and Arduino.
3. PyTorch Mobile
PyTorch is a tool for machine learning, and PyTorch Mobile is a version that runs on smartphones. This tool helps you create real-time applications like object detection or face recognition, all on your phone or tablet!
How to Use TinyML in Real-World Applications
TinyML is making a huge impact across various industries by enabling AI-powered decision-making on ultra-low-power devices. Let’s take a look at how TinyML is being used in the real world!
Healthcare and Wearable Devices
TinyML has transformed healthcare, allowing for real-time patient monitoring, early disease detection, and personalized treatment plans. Here’s how it’s being used in wearable devices:
TinyML in Smartwatches and Fitness Trackers
TinyML helps wearables like smartwatches and fitness trackers to monitor health data. These devices collect information using heart rate sensors, accelerometers, and oxygen level detectors.
- Example: A TinyML-powered smartwatch can detect arrhythmia (irregular heartbeat) and send an alert to the user.
- Another Example: A fitness tracker analyzes your movement patterns to detect early signs of neurological disorders like Parkinson’s disease.
TinyML in Hearing Aids
TinyML is also enhancing the functionality of hearing aids by processing speech recognition and background noise filtering in real time.
- Example: A TinyML-powered hearing aid can filter out background noise, making it easier for users to hear in crowded environments.
- TinyML can also learn and adapt to the user’s preferred sound levels for different situations, improving the hearing experience.
Smart Homes and IoT Devices
TinyML is also improving smart homes by enabling automation and energy efficiency through AI-powered devices.
TinyML in Smart Thermostats
Smart thermostats powered by TinyML optimize heating and cooling by using temperature, humidity, and occupancy sensors.
- Example: A TinyML-powered thermostat learns the user’s routine and predicts when to turn on or turn off the heating or cooling based on the schedule.
- It adjusts the temperature automatically, ensuring comfort while conserving energy.
TinyML in Home Security
TinyML is also improving home security by enabling features like facial recognition and motion detection.
- Example: A smart doorbell can recognize family members and notify homeowners only when it detects strangers.
- Example: A TinyML-based intrusion detection system can identify unusual activity and send instant alerts to the homeowner.
Environmental Monitoring and Agriculture
TinyML is playing a key role in environmental monitoring and precision farming, improving sustainability and efficiency.
TinyML in Air Quality Sensors
TinyML-powered air quality sensors can monitor pollution levels in real time, ensuring healthy indoor environments.
- Example: A TinyML-powered sensor detects harmful gases like CO2 and NO2 in the air, which can be used in schools, offices, or homes to maintain healthy air quality.
TinyML in Smart Farming
TinyML is being used in precision farming to optimize agricultural practices and improve crop yields. By using sensors to monitor temperature, soil moisture, and crop health, it helps farmers make better decisions.
- Example: A TinyML-powered irrigation system decides the best time to water crops based on real-time data from the soil moisture sensors.
- Example: AI-powered pest detection helps farmers identify and respond to insect infestations before they cause significant damage to crops.
Best Hardware for TinyML
To run TinyML models, you need power-efficient microcontrollers (MCUs) that support machine learning inference. Here are the top TinyML hardware options:
Arduino Nano 33 BLE Sense
This one’s like the perfect starter kit. It’s small, it’s easy to use, and it already has sensors built-in. So you don’t have to go out and buy a bunch of extra parts. You get sensors for things like motion, temperature, humidity, and even light. Plus, it has Bluetooth so it can talk to other devices wirelessly.
If you’re just starting out with TinyML or want something that’s plug-and-play (everything’s already on the board), this one is great. You can use it to build projects like a motion detector that turns a light on when it senses movement.
Raspberry Pi Pico
This one’s cheap and simple, but it doesn’t come with sensors built in. It’s like a blank canvas. The good news is that it has enough power to handle TinyML tasks, and it’s super easy to connect it to external sensors (like a camera, microphone, or temperature sensor).
It’s great if you want to experiment and don’t mind hooking up your own sensors. It’s also great if you want something budget-friendly, and you’re okay with doing a little more work to set things up. Think of it like a DIY project!
ESP32
Now we’re getting into some serious power. The ESP32 is really cool because it has Wi-Fi and Bluetooth built right in. That means you can make a connected device that talks to the internet or other devices without needing extra parts.
So, imagine you’re building a smart weather station that checks the temperature, and then sends that data to your phone or the cloud. The ESP32 is perfect for that kind of thing. It has the power to run more complex machine learning models and send data back and forth.
Seeed Studio Wio Terminal
This one is a bit of an overachiever. It comes with a touchscreen, built-in sensors (motion, temperature, etc.), and Wi-Fi/Bluetooth. So it’s perfect for more interactive projects where you need to display something on the screen or allow the user to press buttons.
For example, you could create a TinyML project that shows live temperature readings on the screen, or you could use it as a control panel for a larger system. It’s like an all-in-one solution, but it’s a bit more advanced, so it’s great if you want to make your project feel more polished.
Which One Should You Choose?
- For beginners, if you just want to get started with TinyML without too much fuss, go with the Arduino Nano 33 BLE Sense. It’s easy, comes with everything you need, and you can focus on learning without adding extra parts.
- You’re on a budget and don’t mind connecting some extra sensors, the Raspberry Pi Pico is a solid choice. It’s cheap, but it’ll take a little more effort to set up.
- If you need wireless features (Wi-Fi or Bluetooth), and want to connect your device to the internet or other devices, the ESP32 is the way to go. It’s super versatile.
- If you want something fancy with a touchscreen and sensors all built-in, and you want to build something interactive, then the Seeed Studio Wio Terminal is a great choice.
Practical Coding Examples for TinyML
Hands-On Example: Deploying a TinyML Model on Edge Devices
Let’s take a simple example of running an AI-powered gesture recognition model on an Arduino Nano 33 BLE Sense using TensorFlow Lite.:
pip install tflite-micro
This library allows machine learning models to run efficiently on microcontrollers.
Step 2: Load and Run the TinyML Model on Arduino
import tensorflow as tf
import numpy as np

# Step 1: Load the pre-trained TensorFlow Lite model
# This is a .tflite file which is optimized for running on mobile and edge devices.
interpreter = tf.lite.Interpreter(model_path="gesture_model.tflite")

# Step 2: Allocate tensors
# TensorFlow Lite uses interpreters to handle models efficiently on edge devices.
interpreter.allocate_tensors()

# Step 3: Get input and output details
# The input details give us information on what kind of data (shape, dtype) the model expects.
# The output details will guide us to extract the prediction once inference is done.
input_details = interpreter.get_input_details()
output_details = interpreter.get_output_details()

# Step 4: Print input and output details (Optional but useful for debugging)
print("Input details:", input_details)
print("Output details:", output_details)
Step 5 to Step 9
# Step 5: Create sample input (accelerometer data)
# This simulates sensor data, which might be coming from an IoT device, like an accelerometer.
# Input data should match the input shape expected by the model.
input_data = np.array([[0.2, 0.3, -0.1]], dtype=np.float32)  # Example: x, y, z accelerometer readings

# Step 6: Set the input tensor with the data
# The interpreter requires the input data to be assigned to the appropriate tensor index.
# Here we are passing the accelerometer data to the model.
interpreter.set_tensor(input_details[0]['index'], input_data)

# Step 7: Invoke the interpreter to run inference
# This will process the input through the model and make a prediction based on the trained data.
interpreter.invoke()

# Step 8: Get the output from the model
# The output tensor contains the model's prediction.
# It will be an array with the model's results, such as probabilities or class labels.
output_data = interpreter.get_tensor(output_details[0]['index'])

# Step 9: Process and print the prediction
# The output could be a numerical value or an array of values depending on the model type.
# In this case, we assume it's a gesture detection model, and the output will be the prediction.
print("Gesture Prediction:", output_data)
Detailed Explanation of the Code
This code demonstrates how to load a pre-trained TensorFlow Lite model, feed input data (such as accelerometer data), run inference, and extract the predictions on edge devices. Let’s go through the code in more detail, explaining each step.
Step 1: Include Required Libraries
import tensorflow as tf
import numpy as np

# Step 1: Load the pre-trained TensorFlow Lite model
# This model is optimized to run on edge devices, which means it's lightweight and can be used in real-time applications.
interpreter = tf.lite.Interpreter(model_path="gesture_model.tflite")
- TensorFlow Lite is a lightweight version of TensorFlow designed for edge devices like smartphones, wearables, or IoT devices.The
model_path="gesture_model.tflite"specifies the path to the pre-trained TensorFlow Lite model. - This model could be trained for tasks like gesture recognition, image classification, or any other task suitable for mobile/embedded devices.
Step 2: Allocate tensors
# Step 2: Allocate tensors
# TensorFlow Lite uses interpreters to handle models efficiently on edge devices.
interpreter.allocate_tensors()
- The method
allocate_tensors()ensures that the necessary memory is allocated for the model’s tensors (inputs and outputs). - Tensors in TensorFlow Lite represent the data structures used for model input and output. These need to be allocated before inference can occur.
Step 3: Get input and output details
# Step 3: Get input and output details
# The input details give us information on what kind of data (shape, dtype) the model expects.
# The output details will guide us to extract the prediction once inference is done.
input_details = interpreter.get_input_details()
output_details = interpreter.get_output_details()
get_input_details()provides information about the input tensor such as the shape and data type (dtype).get_output_details()provides information about the output tensor which is crucial for extracting the model’s predictions after inference. This is important because it tells you what kind of output (like probabilities or classification) to expect.
python
Step 4: Print input and output details
# Step 4: Print input and output details (Optional but useful for debugging)
print("Input details:", input_details)
print("Output details:", output_details)
- Printing these details helps ensure that the input data aligns with the expected shape and data type of the model.This step is optional but very useful for debugging.
Step 5: Create sample input
# Step 5: Create sample input (accelerometer data)
# This simulates sensor data, which might be coming from an IoT device, like an accelerometer.
# Input data should match the input shape expected by the model.
input_data = np.array([[0.2, 0.3, -0.1]], dtype=np.float32)  # Example: x, y, z accelerometer readings
- In this case, the input data is simulated accelerometer data (3 values representing the x, y, and z axes).
- This data will be passed to the model for inference.
- The data type (
dtype=np.float32) is important because TensorFlow Lite expects specific data types for processing.The input shape should match the model’s expected input size.
Step 6: Set the input tensor with the data
# Step 6: Set the input tensor with the data
# The interpreter requires the input data to be assigned to the appropriate tensor index.
# Here we are passing the accelerometer data to the model.
interpreter.set_tensor(input_details[0]['index'], input_data)
set_tensor(input_details[0]['index'], input_data)assigns the input data to the model’s input tensor.input_details[0]['index']accesses the index of the input tensor from the input details obtained earlier.- The model uses this tensor index to correctly place the input data into the model’s computation graph.
Step 7: Invoke the interpreter to run inference
# Step 7: Invoke the interpreter to run inference
# This will process the input through the model and make a prediction based on the trained data.
interpreter.invoke()
interpreter.invoke()runs the inference step, where the model processes the input data and generates predictions based on the trained model.- This step is where the actual AI computation happens, and the model produces its result.
Step 8: Get the output from the model
# Step 8: Get the output from the model
# The output tensor contains the model's prediction.
# It will be an array with the model's results, such as probabilities or class labels.
output_data = interpreter.get_tensor(output_details[0]['index'])
- After inference,
get_tensor(output_details[0]['index'])retrieves the output tensor, which contains the model’s predictions. - The output could be a probability score, a classification label, or other results depending on the task the model was trained for (in this case, gesture detection).
Step 9: Process and print the prediction
# Step 9: Process and print the prediction
# The output could be a numerical value or an array of values depending on the model type.
# In this case, we assume it's a gesture detection model, and the output will be the prediction.
print("Gesture Prediction:", output_data)
- The output, stored in
output_data, is then printed to show the result of the model’s inference. - Depending on the model,
output_datacould be a numerical prediction (e.g., probability of a gesture being detected) or a label (e.g., which gesture was recognized). - In this example, it prints the gesture prediction.
Enhanced Features and Explanation:
Batch Processing (Optional):
If you are working with multiple inputs (e.g., handling multiple sensor readings), you can modify the input shape to include a batch dimension.
For example, you can process data for multiple sensors at once, like:
input_data = np.array([[0.2, 0.3, -0.1], [0.1, 0.4, -0.2]], dtype=np.float32)
Real-Time Data Processing:
- The example uses static accelerometer data, but in a real-world scenario, you would be reading data from a real sensor in real-time, continuously feeding the model to make predictions for each new sensor reading.
Output Interpretation:
- The output from the model may need additional post-processing (e.g., converting raw predictions into meaningful results like class labels, or applying a threshold to detect gestures).
- Example
if output_data[0] > 0.5:
    print("Gesture Detected!")
else:
    print("No Gesture Detected.")
Edge Device Optimization:
- This approach is particularly optimized for edge devices like smartphones, wearables, and IoT devices that have limited computational resources. TensorFlow Lite ensures that models run efficiently on these devices without consuming excessive power or memory.
This code demonstrates how to load a pre-trained TensorFlow Lite model, set up input data, invoke the model for inference, and retrieve the model’s prediction—all on an edge device. This workflow can be used for real-time applications like gesture recognition, voice commands, or object detection on small devices without the need for cloud processing.
Future Trends in Edge AI
Edge AI is growing fast, and new technologies are making it smarter, faster, and more efficient. Here are some of the biggest trends shaping the future of Edge AI:
Federated Learning: AI Training Without Sharing Data
Federated Learning is a new way to train AI models on multiple devices without sending data to a central server. Instead of collecting data in one place, the AI model learns directly on each device and only shares model updates (not raw data).
Why Federated Learning is Important?
- Better Privacy – Data stays on the device, reducing the risk of leaks.
- Faster AI Training – AI models learn from multiple sources at the same time.
- Less Network Usage – No need to send huge amounts of data to cloud servers.
Real-World Examples:
- Google’s Gboard Keyboard – Learns how users type without sending personal data.
- Healthcare AI – Hospitals train AI models on medical records without sharing patient data.
Energy-Efficient AI Chips: Smarter AI with Less Power
Running AI on small devices like drones, smart cameras, and wearables needs powerful but low-energy chips. Companies are now building special AI chips that process data faster and more efficiently.
Popular Energy-Efficient AI Chips:
- Google Edge TPU – Tiny AI chip that runs models at high speed using low power.
- NVIDIA Jetson Nano – Powerful AI hardware for robotics and autonomous devices.
- Intel Movidius VPU – Designed for computer vision and AI-powered cameras.
Why These Chips Matter?
- Longer Battery Life – Perfect for IoT devices, drones, and mobile AI applications.
- Faster AI Processing – No need to send data to the cloud, reducing delay.
- Supports Edge AI Growth – Enables AI-powered smart cameras, industrial automation, and real-time analytics.
5G + Edge AI: Super-Fast Connectivity for Real-Time AI
The combination of 5G and Edge AI will revolutionize industries by allowing devices to process and share data instantly.
How 5G Helps Edge AI?
- Lower Latency – AI applications can respond in real-time with almost zero delay.
- Faster Data Transfer – Helps AI models analyze and act on data instantly.
- Better AI for Smart Cities – Traffic lights, cameras, and sensors can communicate instantly for safer and smarter cities.
Real-World Examples:
- Autonomous Vehicles – Self-driving cars can process road data in real time to avoid accidents.
- Remote Healthcare – Doctors can use AI-powered diagnostics over 5G networks.
- Smart Manufacturing – AI-powered robots can detect faults and fix issues instantly.
What’s Next for Edge AI?
- AI-powered smartphones that can run advanced AI models without cloud support.
- AI-driven security cameras that can detect suspicious activities in real time.
- AI-powered smart assistants that work without an internet connection.
Edge AI is making AI faster, safer, and more efficient for everyone. These trends will help AI become a part of everyday life, from smart homes to autonomous cars.
Conclusion
In an increasingly connected world, the demand for real-time data processing is higher than ever. Edge AI, powered by innovations like TinyML, is stepping up to meet this need, enabling smart devices to make decisions locally, without relying on the cloud. From smartphones to IoT sensors, drones, and wearables, Edge AI brings low-latency, privacy, and energy-efficient solutions that are transforming industries across the board.
As AI models become more lightweight and efficient, we’re seeing exciting real-world applications unfold:
- Real-time gesture recognition on smartphones
- Autonomous navigation for drones
- Predictive maintenance and fault detection in industrial IoT
The integration of 5G, AI-powered chips, and edge cloud computing will continue to accelerate the growth of Edge AI, pushing it to new heights. The future is already here, with faster, smarter, and more secure systems that enable AI to operate at the edge—closer to the source of data. This not only enhances performance but also opens the door for a future where AI is embedded in everyday objects, from smart homes to smart cities.
As we look ahead, the potential for Edge AI is limitless. It’s shaping a future where autonomous systems, AI-powered devices, and real-time decision-making are part of our everyday experience. The revolution is just beginning, and TinyML and Edge AI are at the heart of this transformation.
Embrace the change, stay curious, and explore how these technologies can be harnessed to create more intelligent and efficient systems.
FAQs
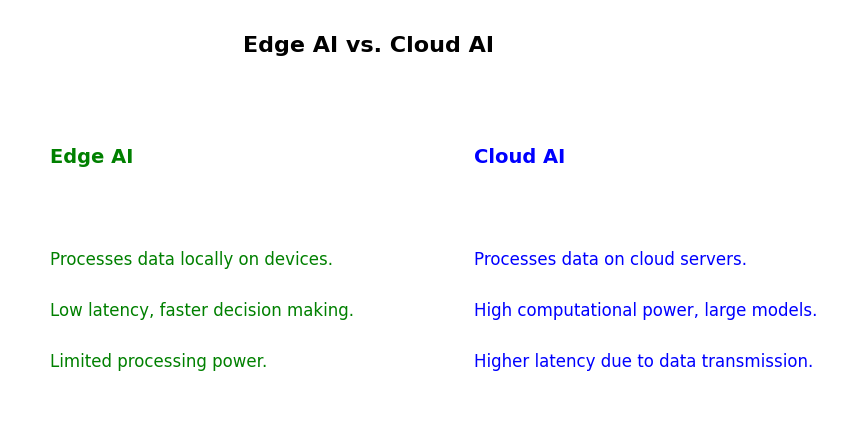
Edge AI: Processes data locally on devices (e.g., smartphones, sensors) without needing the cloud. It’s faster and works offline.
Cloud AI: Sends data to remote servers for processing. It’s powerful but relies on internet connectivity and can have delays.
Edge AI keeps data on the device instead of sending it to the cloud. This reduces the risk of data breaches and ensures sensitive information stays private.
Popular tools include:
TensorFlow Lite: For lightweight AI models.
Edge Impulse: For building and deploying TinyML models.
NVIDIA Jetson: For powerful edge computing.
AWS IoT Greengrass: For cloud-edge integration.
Yes! Edge AI processes data directly on the device, so it works perfectly fine without an internet connection. This makes it ideal for remote or offline applications.
Healthcare: Real-time patient monitoring and diagnostics.
Manufacturing: Predictive maintenance and quality control.
Autonomous Vehicles: Real-time object detection and navigation.
Retail: Personalized shopping experiences and inventory management.
Smart Cities: Traffic management and energy optimization.
External Resources
TinyML for Edge AI
- TinyML: Tiny Machine Learning
- The TinyML website features a collection of resources, including articles and tutorials on implementing machine learning on tiny devices, often at the edge.
NVIDIA Edge AI Solutions
- NVIDIA: AI at the Edge with NVIDIA
- Learn how NVIDIA’s edge AI solutions are used for real-time processing in various industries, including robotics, automotive, and healthcare.
 Function in Python")


Leave a Reply