Free Online MP4 to MP3 Converter with Python
Introduction
In today’s digital world, converting media is important for everyone. Whether for personal or professional use, turning video files into audio files is common everywhere. Among other conversion tools, the most popular one is MP4 to MP3 converter, because these formats are used commonly. In this guide, we’ll show you how to create a Free MP4 to MP3 Converter using Python. This online converter is designed to be simple, fast, and efficient. We’ll give you step-by-step instructions and detailed code explanations to help you set up your own converter.
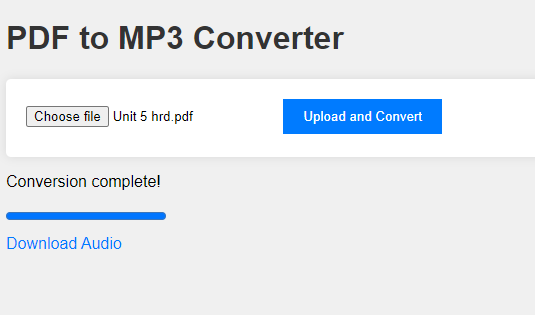
Let’s take a look at how our video to audio converter performs smoothly. By the end of this, you’ll know how to build your own web application for converting videos to audio files just like this.
Why Use Python for MP4 to MP3 Conversion?
Python is a powerful programming language, which makes it great for media conversion tasks. Its wide range of libraries and easy-to-understand syntax allow developers to build strong applications quickly. By using Python for our Free MP4 to MP3 Converter, we ensure that the tool is efficient, easy to maintain, and simple to expand.
Setting Up Your Environment
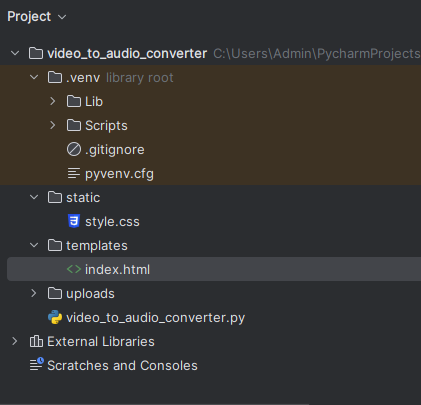
Before we start writing code, let’s prepare our setup. Make sure you have Python installed on your computer and a few extra libraries. Let’s start.
Installing Python
If you haven’t already, download and install Python from the official website. Ensure you add Python to your PATH during installation.
Installing Required Libraries
We’ll use Flask for the web application, MoviePy for video processing, and some additional libraries for handling file uploads and downloads. Install these libraries using pip:
pip install Flask moviepy
Building the MP4 to MP3 Converter
Here’s how we’ll do this: first, we need to set up the Flask application. Then, we’ll create a path to upload files, convert them, and finally, make it possible to download the converted files.
Step 1: Setting Up Flask
First, let’s create a basic Flask application. This will serve as the backbone of our Online MP4 to MP3 Converter.
This Python script sets up a Flask application, which acts as the foundation for our Online MP4 to MP3 Converter.
Setup and Dependencies
from flask import Flask, render_template, request, redirect, url_for, flash, send_from_directory
from moviepy.editor import VideoFileClip
import os- We import necessary modules: Flask for web framework functionalities, render_template for rendering HTML templates, request for handling HTTP requests, redirect and url_for for redirection, flash for displaying messages, and send_from_directory for file downloads.
- We also import VideoFileClip from moviepy.editor for video processing and os for operating system functions.
Flask App Configuration
app = Flask(__name__)
app.secret_key = 'your_secret_key'  # Change this to a secure key for sessions

# Ensure the 'uploads' directory exists
UPLOAD_FOLDER = 'uploads'
os.makedirs(UPLOAD_FOLDER, exist_ok=True)  # Create uploads directory if it doesn't exist
app.config['UPLOAD_FOLDER'] = UPLOAD_FOLDER
- We create a Flask app instance and set a secret key for session security.
- An ‘uploads’ directory is ensured to exist where uploaded files will be stored.
- Configuration for the Flask app’s upload folder is set.
Video to Audio Conversion Function
def convert_video_to_audio(video_path, audio_path, output_format):
    try:
        # Load the video file
        video_clip = VideoFileClip(video_path)

        # Extract audio from the video
        audio_clip = video_clip.audio

        # Save the audio file with specified format
        audio_clip.write_audiofile(audio_path, codec='pcm_s16le')  # Adjust codec as needed

        # Close the video and audio clips
        audio_clip.close()
        video_clip.close()

        return True
    except Exception as e:
        print(f"Error converting video to audio: {str(e)}")
        return False
convert_video_to_audiofunction attempts to convert a video file to audio using moviepy.- It loads the video file, extracts its audio, specifies an output format, saves the audio file, and closes resources.
- If an error occurs, it prints a message and returns False.
Routes and Views
@app.route('/', methods=['GET', 'POST'])
def index():
    if request.method == 'POST':
        video_file = request.files['video']

        # Check if a file was submitted
        if video_file.filename == '':
            flash('No selected file')
            return redirect(request.url)

        # Save the uploaded video file
        video_path = os.path.join(app.config['UPLOAD_FOLDER'], video_file.filename)
        video_file.save(video_path)

        # Determine the output audio format
        output_format = request.form['format']
        audio_filename = f"{os.path.splitext(video_file.filename)[0]}.{output_format}"
        audio_path = os.path.join(app.config['UPLOAD_FOLDER'], audio_filename)

        # Convert video to audio
        if convert_video_to_audio(video_path, audio_path, output_format):
            flash('Audio converted successfully!')
            return redirect(url_for('download', filename=audio_filename))
        else:
            flash('Error converting video to audio')

        # Redirect to the index page with a message
        return redirect(url_for('index'))

    # Render the index.html template
    return render_template('index.html')


@app.route('/download/<filename>')
def download(filename):
    return send_from_directory(app.config['UPLOAD_FOLDER'], filename)
index Route: Handles both GET and POST requests at the root URL.
- If a POST request is made (file submission), it checks if a video file was uploaded.
- It saves the uploaded video to the ‘uploads’ directory and determines the desired output audio format.
- The video is converted to audio using
convert_video_to_audio. - If successful, a success message is flashed, and the user is redirected to download the converted audio file.
- If conversion fails, an error message is flashed, and the user is redirected back to the index page.
- GET requests render the ‘index.html’ template.
download Route: Allows users to download converted audio files.
- It retrieves the requested file from the ‘uploads’ directory and sends it for download.
App Execution
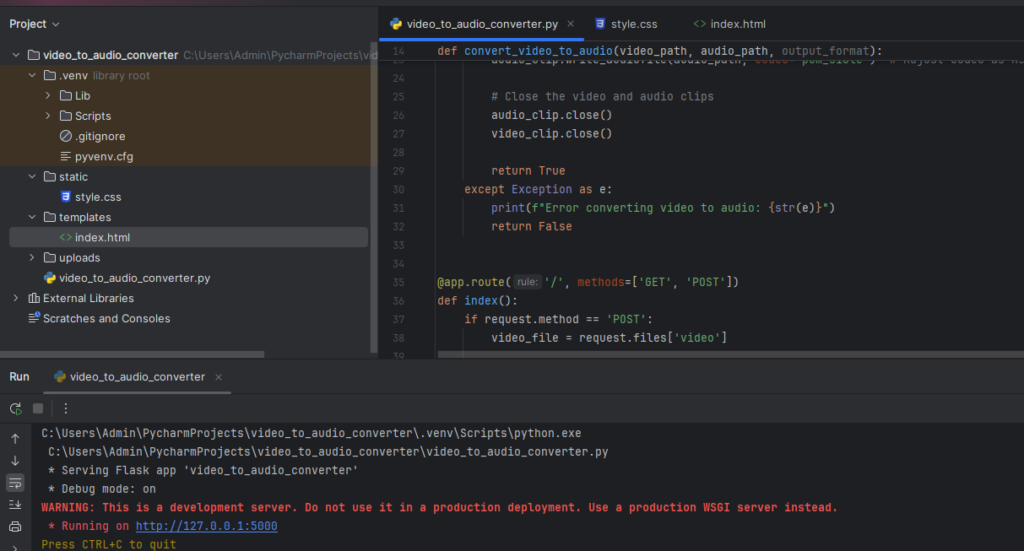
if __name__ == '__main__':
    app.run(debug=True)
- The script runs the Flask app in debug mode when executed directly.
This setup allows users to upload MP4 files, convert them to MP3 audio, and download the converted files.
Creating the HTML Interface
Next, we need a simple HTML form for users to upload their MP4 files and select the desired audio format.
templates/index.html
<!DOCTYPE html>
<html lang="en">
<head>
    <meta charset="UTF-8">
    <meta name="viewport" content="width=device-width, initial-scale=1.0">
    <title>Free MP4 to MP3 Converter</title>
    <link rel="stylesheet" href="{{ url_for('static', filename='style.css') }}">
</head>
<body>
    <div class="container">
        <h1>Free MP4 to MP3 Converter</h1>
        <form action="/" method="post" enctype="multipart/form-data">
            <label for="video">Select Video File:</label>
            <input type="file" id="video" name="video" accept=".mp4,.avi,.mov" required><br><br>

            <label for="format">Select Output Format:</label>
            <select id="format" name="format" required>
                <option value="wav">WAV</option>
                <option value="mp3">MP3</option>
            </select><br><br>

            <button type="submit">Convert Now</button>
        </form>

        {% with messages = get_flashed_messages() %}
            {% if messages %}
                {% for message in messages %}
                    <p>{{ message }}</p>
                {% endfor %}
            {% endif %}
        {% endwith %}

        {% if audio_filename %}
            <p><a href="{{ url_for('download', filename=audio_filename) }}">Download {{ audio_filename }}</a></p>
        {% endif %}
    </div>
</body>
</html>
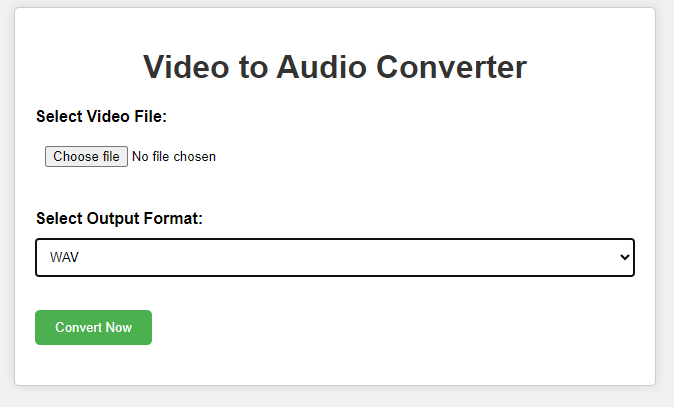
This HTML file creates the interface for our MP4 to MP3 online Converter. Convert your MP4 file Now.
Document Setup
- It defines the document type and language.
- Meta tags specify character set and viewport settings for responsive design.
- The title sets the page title, and a link imports a CSS file for styling.
Body Content
- The page displays a heading “Free MP4 to MP3 Converter” and a container div for content.
- Inside the container, a form is set up to submit data to the root URL (“/”) using the POST method, with the encoding type for file uploads.
Form Elements
- File Input: Users can select an MP4 file using an
<input>element of type “file”. - Output Format: A dropdown
<select>allows users to choose between WAV and MP3 formats for the output audio file.
Submit Button
- A “Convert Now” button triggers form submission.
Message Display
- Flash messages, if any, are displayed using
{% with messages = get_flashed_messages() %}. - Messages like success or error notifications appear under the form.
Download Link
- If
audio_filenameis set (after successful conversion), a download link is displayed to download the converted audio file.
This HTML template provides a user-friendly interface where users can upload MP4 files, select an output audio format, initiate conversion, and download the resulting audio file.
Adding CSS Styling
To enhance the user interface, let’s add some CSS styling.
static/style.css
body {
    font-family: Arial, sans-serif;
    background-color: #f4f4f4;
    margin: 0;
    padding: 0;
}

.container {
    width: 50%;
    margin: auto;
    overflow: hidden;
}

h1 {
    text-align: center;
    padding: 20px 0;
}

form {
    background: #fff;
    padding: 20px;
    border-radius: 5px;
    margin-top: 10px;
    box-shadow: 0 0 10px rgba(0, 0, 0, 0.1);
}

label {
    display: block;
    margin-bottom: 5px;
}

input[type="file"],
select {
    width: 100%;
    padding: 10px;
    margin-bottom: 10px;
}

button {
    display: block;
    width: 100%;
    padding: 10px;
    background: #333;
    color: #fff;
    border: none;
    border-radius: 5px;
    cursor: pointer;
}

button:hover {
    background: #555;
}

p {
    text-align: center;
    padding: 10px 0;
}
Testing the Application
To test the application, follow these steps:
- Start the Flask Application: Go to your project folder and run the command
python app.pyin your terminal or command prompt. - Open the Application: Launch your web browser and visit local host to access the converter.
- Upload and Convert: Use the form on the webpage to upload an MP4 file from your computer. Choose MP3 as the desired output format. Click on “Convert Now” to begin converting the file into audio.
Features and Enhancements
Here are some ways to enhance your converter
Additional Audio Formats
- Besides MP3, consider adding support for other formats like WAV, AAC, and OGG.
- Update both the HTML form to include these options and the
convert_video_to_audiofunction in your Python code to handle different output formats.
User Authentication
- Implement user authentication for a safer and more personalized experience.
- Users can log in to track their conversion history and manage their uploaded and converted files securely.
- Flask offers extensions like Flask-Login that simplify the integration of user authentication features into your application.
Progress Bar
- Improve user experience by adding a progress bar that indicates the status of the conversion process.
- Use JavaScript and AJAX techniques to update the progress bar dynamically as the conversion progresses.
- This gives users a visual indication of how far along the conversion is and enhances the overall usability of your converter.
Cloud Storage Integration
- Integrate cloud storage services such as AWS S3 or Google Cloud Storage.
- Store uploaded videos and converted audio files securely in the cloud, which ensures scalability, reliability, and efficient file management.
- This approach also reduces reliance on local storage and provides easier access to files from anywhere.
Deploying the Application
Choosing a Hosting Provider
Select a hosting provider that supports Python applications, such as Heroku, AWS, or DigitalOcean.
Preparing for Deployment
- Create a
requirements.txtFile: List all dependencies by runningpip freeze > requirements.txt. - Set Up a Production Server: Use a production-ready server like Gunicorn.
Deployment Steps
- Push Your Code to a Git Repository: Use Git to manage your project and push your code to a repository.
- Deploy to the Chosen Provider: Follow the specific deployment instructions for your chosen provider.
Conclusion
Building a Free MP4 to MP3 Converter using Python is a great project for those who interested in exploring web development and media handling. This guide helps you create a strong and effective Online MP4 to MP3 Converter using Python and Flask. It’s capable of managing different formats and can be customized with features like user login and cloud storage, making it adaptable to various requirements. Online for free.
Source Code
app.py
from flask import Flask, render_template, request, redirect, url_for, flash, send_from_directory
from moviepy.editor import VideoFileClip
import os

app = Flask(__name__)
app.secret_key = 'your_secret_key'  # Change this to a secure key for sessions

# Ensure the 'uploads' directory exists
UPLOAD_FOLDER = 'uploads'
os.makedirs(UPLOAD_FOLDER, exist_ok=True)  # Create uploads directory if it doesn't exist
app.config['UPLOAD_FOLDER'] = UPLOAD_FOLDER


def convert_video_to_audio(video_path, audio_path, output_format):
    try:
        # Load the video file
        video_clip = VideoFileClip(video_path)

        # Extract audio from the video
        audio_clip = video_clip.audio

        # Save the audio file with specified format
        audio_clip.write_audiofile(audio_path, codec='pcm_s16le')  # Adjust codec as needed

        # Close the video and audio clips
        audio_clip.close()
        video_clip.close()

        return True
    except Exception as e:
        print(f"Error converting video to audio: {str(e)}")
        return False


@app.route('/', methods=['GET', 'POST'])
def index():
    if request.method == 'POST':
        video_file = request.files['video']

        # Check if a file was submitted
        if video_file.filename == '':
            flash('No selected file')
            return redirect(request.url)

        # Save the uploaded video file
        video_path = os.path.join(app.config['UPLOAD_FOLDER'], video_file.filename)
        video_file.save(video_path)

        # Determine the output audio format
        output_format = request.form['format']
        audio_filename = f"{os.path.splitext(video_file.filename)[0]}.{output_format}"
        audio_path = os.path.join(app.config['UPLOAD_FOLDER'], audio_filename)

        # Convert video to audio
        if convert_video_to_audio(video_path, audio_path, output_format):
            flash('Audio converted successfully!')
            return redirect(url_for('download', filename=audio_filename))
        else:
            flash('Error converting video to audio')

        # Redirect to the index page with a message
        return redirect(url_for('index'))

    # Render the index.html template
    return render_template('index.html')


@app.route('/download/<filename>')
def download(filename):
    return send_from_directory(app.config['UPLOAD_FOLDER'], filename)


if __name__ == '__main__':
    app.run(debug=True)
External Resources
Here are some external resources that can further strengthen your understanding and implementation of a Free Online MP4 to MP3 Converter with Python
Flask Documentation: Flask is a lightweight WSGI web application framework in Python. The Flask documentation provides you detailed informations, tutorials, and API references to help you understand Flask’s capabilities.
MoviePy Documentation: MoviePy is a Python library for video editing, which includes functions for video/audio conversion. The MoviePy documentation offers detailed explanations of its features, examples, and API references.
HTML5 File Input Documentation: Understanding how HTML forms and file inputs work is crucial for handling file uploads in web applications. The MDN Web Docs on HTML file input provide a comprehensive guide.
CSS Tricks: For improving the user interface of your web application, CSS Tricks offers a wealth of tutorials, tips, and techniques for styling HTML elements effectively. Visit CSS Tricks for insights into modern web design practices.
PythonAnywhere: PythonAnywhere is a popular platform for hosting and running Python applications, including web applications built with Flask. Their documentation and community forums can be valuable resources for deploying your Flask application.




[…] Free Online MP4 to MP3 Converter with Python […]