How to Build Your own Advanced AI Writer
Have you noticed how AI writing assistants are popping up everywhere lately? Whether it’s ChatGPT drafting an email, Grammarly fixing your grammar, or Notion helping you write blog posts—these tools are everywhere. And they’re trending for one big reason: they make writing easier. Faster. Less painful. For businesses, it’s about scaling content. For students, it’s about clarity. For creators, it’s about pushing past the blank page. And in this post, I’ll show you how to build your own advanced AI writer—from scratch to smart.
Understanding the Basics of AI Writing
Before starting into the construction of an advanced AI writer, it’s important to understand the basics of fundamentals of how AI writing works. AI writers are built using natural language processing (NLP) and machine learning (ML) technologies. NLP allows machines to understand and produce human language, while ML allows the system to learn and improve from data.
Key Concepts and Technologies
- Natural Language Processing (NLP): The field of AI that focuses on the interaction between computers and human language.
- Machine Learning (ML): A subset of AI that involves training algorithms on data to make predictions or decisions.
- Deep Learning: A type of ML that uses neural networks with many layers (hence “deep”) to model complex patterns in data.
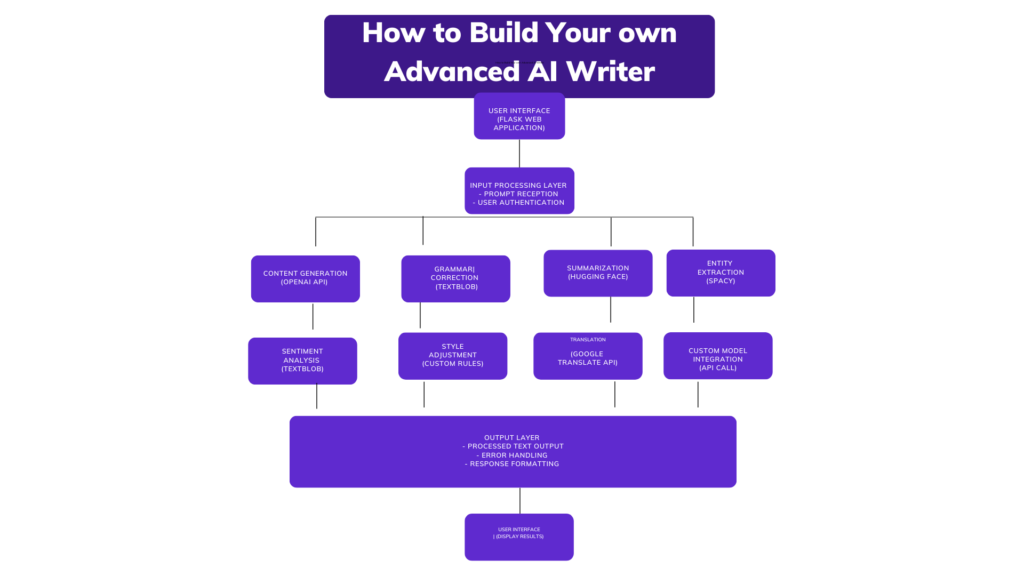
Guide to Building an Advanced AI Writer
1: Define Your Goals and Requirements
Begin by identifying the specific requirements and goals for your AI writer. Consider the following questions:
- What type of content will the AI writer generate (e.g., articles, blog posts, social media updates)?
- What tone and style should it adopt?
2: Gather and Prepare Your Data
Data is the backbone of any AI project. For an AI writer, you’ll need a substantial amount of text data to train your model. Sources can include:
- Publicly available datasets (e.g., Wikipedia, Project Gutenberg)
- Your own proprietary content
- Web scraping (ensure compliance with legal and ethical guidelines)
3: Choose the Right Framework and Tools
Selecting the appropriate framework and tools is crucial. Popular frameworks for building AI writers include:
- TensorFlow: An open-source platform for machine learning.
- PyTorch: A deep learning framework that provides flexibility and speed.
- Hugging Face Transformers: A library specifically designed for NLP tasks, offering pre-trained models like GPT-3 and BERT.
4: Preprocessing the Data
Data preprocessing involves cleaning and preparing your text data for training. This includes:
- Tokenization: Breaking down text into individual words or tokens.
- Normalization: Converting text to a standard format (e.g., lowercasing, removing punctuation).
- Removing Stop Words: Filtering out common words that don’t contribute much to meaning (e.g., “the,” “and”).
5: Train Your Model
With your data prepared, it’s time to train your model. This involves:
- Choosing a Pre-trained Model: Explore pre-trained models like GPT-3 can save time and resources.
- Fine-Tuning: Adjusting the pre-trained model on your specific dataset to improve performance.
- Training from Scratch: For unique applications, you might train a model from scratch, though this requires significant computational power and data.
6: Evaluate and Optimize
After training, evaluate your model’s performance using metrics like perplexity (for language models) or BLEU score (for translation tasks). Optimize your model by:
- Hyperparameter Tuning: Adjusting parameters like learning rate and batch size.
- Iterative Testing: Continuously testing and refining the model to improve accuracy and relevance.
7: Deployment
Once your model meets the desired performance criteria, deploy it into a production environment. Consider using cloud services like AWS, Google Cloud, or Azure for scalability and reliability.
8: Monitor and Maintain
AI models require ongoing maintenance to ensure they continue to perform well. Monitor your AI writer’s output for quality and relevance, and update the model as needed with new data or improved algorithms.
Building an Advanced AI Writer
Let’s start a step-by-step approach to developing an advanced AI writer application, covering everything from environment setup and library imports to deployment considerations. Each step is explained in detail to ensure you have a clear understanding of the process.
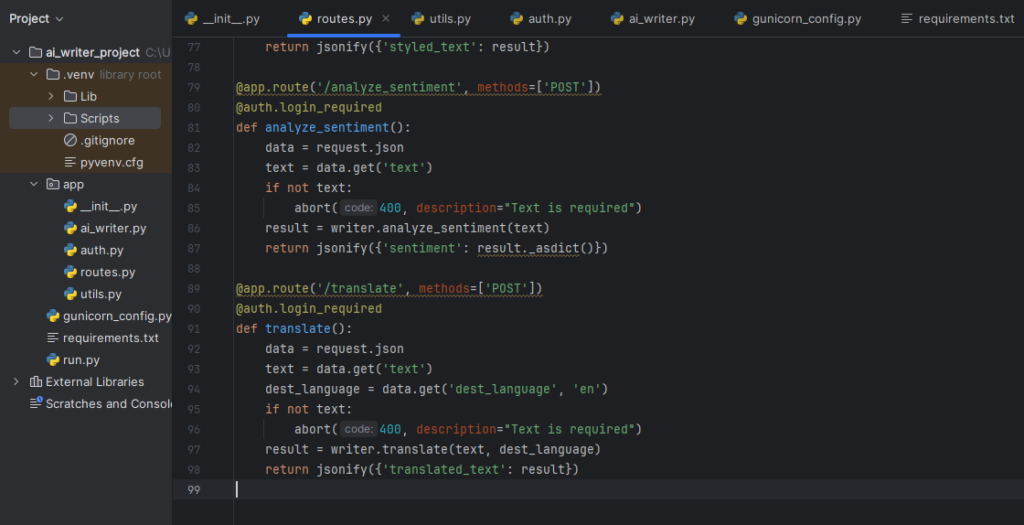
Setup Environment
To begin, make sure you have all the necessary packages installed. These packages are important for various tasks such as natural language processing (NLP), machine learning, web framework functionalities, and more.
pip install openai transformers spacy textblob googletrans==4.0.0-rc1 flask flask-httpauth gunicorn
Explanation
To build a powerful and secure AI writing application, you can use several key tools and libraries:
- OpenAI: Offers advanced language models like GPT-3 and GPT-4 for NLP tasks such as text completion, translation, and summarization. Developers can integrate these models via OpenAI’s API.
- Transformers: A Hugging Face library providing pre-trained models (e.g., BERT, GPT-3) for various NLP tasks like text classification and question answering.
- spaCy: An efficient library for advanced NLP tasks, supporting tokenization, part-of-speech tagging, named entity recognition, and more. It’s designed for production use.
- TextBlob: A simple text processing library with APIs for tasks like part-of-speech tagging, sentiment analysis, and translation, accessible to developers without deep NLP expertise.
- googletrans: A free Python library for Google Translate API, useful for text translation and multilingual support.
- Flask: A lightweight web framework for creating web applications and APIs, known for its simplicity and flexibility.
- Flask-HTTPAuth: An extension for securing Flask APIs with basic and digest HTTP authentication.
- Gunicorn: A WSGI server for running Python web applications in production, providing a robust and scalable infrastructure.
- werkzeug.security: For handling password hashing and verification.
Combining these tools enables the creation of an advanced AI writing tool with a web interface and efficient handling of production-level traffic.
Import Libraries
In this step, you’ll import all the necessary libraries which you installed before, to build your AI writer. These libraries provide the tools and functionalities required for various natural language processing tasks.
import openai
import spacy
from textblob import TextBlob
from transformers import pipeline
from googletrans import Translator
from flask import Flask, request, jsonify, abort
from flask_httpauth import HTTPBasicAuth
from werkzeug.security import generate_password_hash, check_password_hash

# Load Spacy model for NLP tasks
nlp = spacy.load('en_core_web_sm')
# Initialize the translator
translator = Translator()
# Initialize Flask and HTTPBasicAuth
app = Flask(__name__)
auth = HTTPBasicAuth()
OpenAI API Configuration
To interact with OpenAI’s language models, you need to configure the OpenAI API by setting your API key. This key is a unique identifier that allows your application to authenticate and communicate with OpenAI’s servers.
Configure the API Key in Your Code
In your Python script, you need to set the openai.api_key variable to your API key. This configuration step allows your script to authenticate with OpenAI’s servers.Replace 'your-api-key' with your actual API key.
openai.api_key = 'your-api-key'
Security Tip
Never Hardcode API Keys in Public Repositories: If you’re using version control systems like Git, make sure your API keys are not hardcoded in the files that you push to public repositories. Instead, use environment variables or configuration files that are not included in your public codebase.
import openai
import os

# Set the API key from an environment variable
openai.api_key = os.getenv('OPENAI_API_KEY')
In this example, you would set the script to read the OPENAI_API_KEY environment variable set in your operating system. This approach strengthens security by ensuring sensitive information remains separate from your codebase.
Define Functions for Features with Error Handling
You have to define various functions to handle different features of your AI writer, including error handling to manage exceptions gracefully.
a. Content Generation
def generate_text(prompt, model="text-davinci-003", max_tokens=150):
    try:
        response = openai.Completion.create(
            engine=model,
            prompt=prompt,
            max_tokens=max_tokens
        )
        return response.choices[0].text.strip()
    except Exception as e:
        return str(e)
The generate_text function uses OpenAI’s API to create text based on a given input prompt. Here’s a summary:
Parameters
“This function is defined with three parameters:
prompt: This is the text or prompt used by the AI model for text generation.model: It specifies the AI model to be used; by default, it is set to “text-davinci-003”.max_tokens: This parameter determines the maximum number of words or characters in the generated text, thus controlling its length.
Within the function, it utilizes openai.Completion.create to generate text through the OpenAI API. This method employs the provided model, prompt, and max_tokens to generate text.
Must Read
- How Python Searches Data: Linear Search, Binary Search, and Hash Lookup Explained
- I Implemented Every Sorting Algorithm in Python — The Results Nobody Talks About (Benchmarked on CPython)
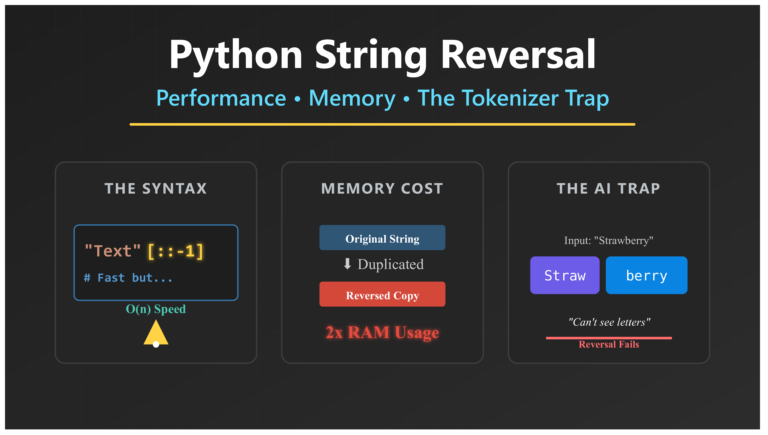
- How to Reverse a String in Python: Performance, Memory, and the Tokenizer Trap
- How to Check Palindrome in Python: 5 Efficient Methods (2026 Guide)
- Mastering Python Regex (Regular Expressions): A Step-by-Step Guide
Try-Except Block
The function is enclosed in a try-except block to handle potential errors, like network issues or API limits. Within this block:
- It calls
openai.Completion.createto generate text via the OpenAI API. - The method usees the provided model, prompt, and max_tokens to produce text.
- The generated text is then extracted from the response and trimmed of any leading or trailing whitespace.
Exception Handling: In case of an exception during the API call (e.g., network errors), the function captures it and returns an error message.
Return Value: The function returns the generated text if successful; otherwise, it returns an error message string.
Basically, generate_text offers a streamlined method to employ OpenAI’s robust text generation capabilities, ensuring smooth operation while handling potential errors.
b. Grammar and Style Checking
def check_grammar(text):
    try:
        blob = TextBlob(text)
        corrected_text = blob.correct()
        return str(corrected_text)
    except Exception as e:
        return str(e)
The check_grammar function uses TextBlob, a natural language processing library, to rectify grammatical errors within the provided text. Here’s a summary:
Function Signature
The check_grammar function accepts one parameter:
text: The input text requiring scrutiny for grammatical errors.
Try-Except Block
Enclosed within a try-except block, check_grammar assures strong error handling to manage potential exceptions during execution, preventing script crashes.
TextBlob Processing
- Within the try block, the input text undergoes processing by passing it to the TextBlob constructor, creating a TextBlob object.
- TextBlob offers a suite of natural language processing functionalities, including grammar correction.
Grammar Correction
- The
correct()method of the TextBlob object is invoked to rectify any identified grammatical errors within the input text. - This method scan the text, applying suitable corrections such as rectifying misspelled words, adjusting verb forms, and refining punctuation.
Return Value
- Upon successful grammar correction, the function returns the corrected text as a string.
- In case of exceptions during execution, the except block captures the error and returns an error message as a string.
In general, check_grammar provides a simple means to authorize TextBlob’s grammar correction capabilities, enhancing the accuracy and clarity of input text by addressing grammatical inconsistencies.
Text Summarization
summarizer = pipeline("summarization")

def summarize_text(text, max_length=50):
    try:
        summary = summarizer(text, max_length=max_length, min_length=25, do_sample=False)
        return summary[0]['summary_text']
    except Exception as e:
        return str(e)
This Python script defines a function for text summarization using Hugging Face’s summarization pipeline.
- The script initializes a summarization pipeline using the
pipelinefunction from the Hugging Face library. - The
summarize_textfunction takes two parameters:text: The input text to be summarized.max_length: The maximum length of the summary (default is 50 words).
- Inside the function, it tries to generate a summary using the initialized
summarizerpipeline with specified parameters likemax_lengthandmin_length. - If successful, it returns the summarized text extracted from the result. If an exception occurs during the summarization process, it returns the error message as a string.
In summary, this script provides a simple and convenient way to generate text summaries using pre-trained models provided by Hugging Face.
Context Understanding (Named Entity Recognition)
def extract_entities(text):
    try:
        doc = nlp(text)
        entities = [(entity.text, entity.label_) for entity in doc.ents]
        return entities
    except Exception as e:
        return str(e)
This Python script defines a function called extract_entities for context understanding through Named Entity Recognition (NER). Here’s a brief explanation:
- The function takes a single parameter
text, which represents the input text containing entities. - Inside the function, it tries to process the input text using a natural language processing (NLP) model (
nlp). This model is assumed to have been initialized elsewhere in the code. - Once the text is processed, the function extracts entities recognized by the NER model. It iterates over the entities detected in the processed document (
doc) and stores each entity’s text and label (type) in a tuple. - If the process is successful, it returns a list of tuples, where each tuple contains the text of an entity and its corresponding label.
- If an exception occurs during the NER process, the function returns the error message as a string.
In summary, this script provides a method to extract entities such as names of people, organizations, locations, etc., from a given input text using a Named Entity Recognition model.
Style Adjustment
def adjust_style(text, style="formal"):
    try:
        prompt = f"Rewrite the following text in a {style} style:\n\n{text}"
        return generate_text(prompt)
    except Exception as e:
        return str(e)
- The function
adjust_styletakes two parameters:text: The input text whose style needs adjustment.style: The desired style for the output text (default is “formal”).
- Inside the function, it constructs a prompt by formatting the input text within a statement requesting it to be rewritten in the specified style.
- It then calls a function (
generate_text) to generate text using OpenAI’s API, passing the constructed prompt as input. - If successful, the function returns the generated text, which is expected to reflect the desired style adjustment.
- In case an exception occurs during the process, it returns the error message as a string.
In summary, this script provides a convenient method to adjust the writing style of input text by utilizing OpenAI’s API for text generation.
Sentiment Analysis
def analyze_sentiment(text):
    try:
        blob = TextBlob(text)
        return blob.sentiment
    except Exception as e:
        return str(e)
The function analyze_sentiment takes a single parameter:
text: The input text whose sentiment needs to be analyzed.
- Inside the function, it tries to analyze the sentiment of the input text using TextBlob.
- TextBlob is a Python library that provides simple API access to perform various natural language processing tasks, including sentiment analysis.
- Once the sentiment analysis is performed, the function returns the sentiment result, which typically includes polarity and subjectivity scores. The polarity score indicates the sentiment’s positivity or negativity, while the subjectivity score measures how subjective or objective the text is.
- If an exception occurs during the sentiment analysis process, the function returns the error message as a string.
To sum up, this script provides a direct approach to assess the sentiment of given text using the TextBlob library, delivering both polarity and subjectivity scores as results.
Translation
def translate_text(text, dest_language='en'):
    try:
        translation = translator.translate(text, dest=dest_language)
        return translation.text
    except Exception as e:
        return str(e)
The function translate_text accepts two parameters:
text: The input text to be translated.dest_language: The desired language into which the text will be translated (default is English, abbreviated as ‘en’).
- Within the function, it attempts to translate the input text into the specified destination language using the Google Translate API.
- The translation is performed through the
translator.translatemethod, passing the input text and the destination language as arguments. - Upon successful translation, the function returns the translated text.
- If an exception occurs during the translation process, such as connectivity issues or invalid input, the function returns the error message as a string.
Custom Model Integration
import requests

def custom_model_integration(prompt, api_url):
    try:
        response = requests.post(api_url, json={'prompt': prompt})
        return response.json().get('text', 'Error: No text returned from custom model')
    except Exception as e:
        return str(e)
This Python script defines a function called custom_model_integration that facilitates integration with a custom model API to generate text based on a provided prompt. Here’s a brief explanation:
The custom_model_integration function accepts two parameters:
prompt: The text prompt used for generating the desired text.api_url: The URL endpoint of the custom model API.
The function initiates a POST request to the designated API URL, passing the prompt as JSON data in the request body.
Subsequently, it endeavors to extract the generated text from the API response received.
In case of success, it returns the extracted generated text.
However, if any exception arises during the operation, such as network issues or invalid responses, the function returns an error message as a string.
Integrating Features into an AI Writer Class with Error Handling
Create an AIWriter class that integrates all the defined functions and handles the OpenAI API key configuration.
Code for AI Writer Class
class AIWriter:
    def __init__(self, api_key):
        openai.api_key = api_key

    def generate(self, prompt, max_tokens=150):
        return generate_text(prompt, max_tokens=max_tokens)

    def check_grammar(self, text):
        return check_grammar(text)

    def summarize(self, text, max_length=50):
        return summarize_text(text, max_length=max_length)

    def extract_entities(self, text):
        return extract_entities(text)

    def adjust_style(self, text, style="formal"):
        return adjust_style(text, style)

    def analyze_sentiment(self, text):
        return analyze_sentiment(text)

    def translate(self, text, dest_language='en'):
        return translate_text(text, dest_language)

    def custom_integration(self, prompt, api_url):
        return custom_model_integration(prompt, api_url)
AIWriter: A class that integrates all AI writing functionalities.
Basic Authentication Setup
Set up basic authentication to secure the API endpoints.
Define Users
This Python code snippet manages user authentication using hashed passwords.
users = {
    "admin": generate_password_hash("secret"),
    "user": generate_password_hash("password")
}

@auth.verify_password
def verify_password(username, password):
    if username in users and check_password_hash(users.get(username), password):
        return username
- users: Dictionary storing usernames and hashed passwords.
- verify_password: Function to verify user credentials.
Creating a Flask API with Error Handling and Authentication
Develop the Flask API to handle various requests and ensure proper error handling and authentication.
Code
@app.errorhandler(400)
def bad_request(error):
    return jsonify({'error': 'Bad Request', 'message': str(error)}), 400

@app.errorhandler(401)
def unauthorized(error):
    return jsonify({'error': 'Unauthorized', 'message': str(error)}), 401

@app.errorhandler(404)
def not_found(error):
    return jsonify({'error': 'Not Found', 'message': str(error)}), 404

@app.errorhandler(500)
def internal_error(error):
    return jsonify({'error': 'Internal Server Error', 'message': str(error)}), 500

@app.route('/generate', methods=['POST'])
@auth.login_required
def generate():
    data = request.json
    prompt = data.get('prompt')
    max_tokens = data.get('max_tokens', 150)
    if not prompt:
        abort(400, description="Prompt is required")
    result = writer.generate(prompt, max_tokens)
    return jsonify({'text': result})

@app.route('/check_grammar', methods=['POST'])
@auth.login_required
def check_grammar():
    data = request.json
    text = data.get('text')
    if not text:
        abort(400, description="Text is required")
    result = writer.check_grammar(text)
    return jsonify({'corrected_text': result})

@app.route('/summarize', methods=['POST'])
@auth.login_required
def summarize():
    data = request.json
    text = data.get('text')
    max_length = data.get('max_length', 50)
    if not text:
        abort(400, description="Text is required")
    result = writer.summarize(text, max_length)
    return jsonify({'summary': result})

@app.route('/extract_entities', methods=['POST'])
@auth.login_required
def extract_entities():
    data = request.json
    text = data.get('text')
    if not text:
        abort(400, description="Text is required")
    result = writer.extract_entities(text)
    return jsonify({'entities': result})

@app.route('/adjust_style', methods=['POST'])
@auth.login_required
def adjust_style():
    data = request.json
    text = data.get('text')
    style = data.get('style', 'formal')
    if not text:
        abort(400, description="Text is required")
    result = writer.adjust_style(text, style)
    return jsonify({'styled_text': result})

@app.route('/analyze_sentiment', methods=['POST'])
@auth.login_required
def analyze_sentiment():
    data = request.json
    text = data.get('text')
    if not text:
        abort(400, description="Text is required")
    result = writer.analyze_sentiment(text)
    return jsonify({'sentiment': result._asdict()})

@app.route('/translate', methods=['POST'])
@auth.login_required
def translate():
    data = request.json
    text = data.get('text')
    dest_language = data.get('dest_language', 'en')
    if not text:
        abort(400, description="Text is required")
    result = writer.translate(text, dest_language)
    return jsonify({'translated_text': result})

if __name__ == '__main__':
    app.run(debug=True)
- API Endpoints: Handles different tasks like text generation, grammar checking, summarization, entity extraction, style adjustment, sentiment analysis, and translation.
- Error Handling: Custom error handlers for different HTTP error codes.
- Authentication: Ensures only authenticated users can access the endpoints.
Deployment Considerations
Deploy the Flask app using Gunicorn for production readiness.
Create a Gunicorn Configuration File (gunicorn_config.py)
bind = "0.0.0.0:8000"
workers = 4
- bind: Specifies the address and port.
- workers: Number of worker processes.
Run the Flask App with Gunicorn
gunicorn -c gunicorn_config.py app:app
Gunicorn Command: Starts the Flask app using Gunicorn with the specified configuration.
Final Thoughts on AI Writer
This comprehensive guide gives you detailed instructions for setting up the environment, importing necessary libraries, configuring the OpenAI API, defining various AI writer functions, integrating these functions into a class, setting up authentication, creating a Flask API, and deploying the app with Gunicorn. This setup ensures a secure, strong, and production-ready AI writer application that can be accessed through RESTful API endpoints. For further security, consider using HTTPS and more sophisticated authentication mechanisms like OAuth.
To ensure your AI writer application is robust and secure, consider the following additional steps and improvements:
Security Enhancements for AI Writer
To enhance the security of your application, especially if it’s exposed to the public internet, you should implement HTTPS and consider more advanced authentication mechanisms.
Enabling HTTPS
Use Let’s Encrypt:
- Obtain a free SSL certificate from Let’s Encrypt.
- Configure your web server (e.g., Nginx or Apache) to use the SSL certificate.
Proxy Setup:
- Set up Nginx or Apache as a reverse proxy in front of your Flask application.
- Configure the proxy to handle HTTPS connections and forward requests to your Flask app running on Gunicorn.
Nginx Configuration Example
server {
    listen 80;
    server_name your_domain.com;
    return 301 https://$host$request_uri;
}

server {
    listen 443 ssl;
    server_name your_domain.com;

    ssl_certificate /etc/letsencrypt/live/your_domain.com/fullchain.pem;
    ssl_certificate_key /etc/letsencrypt/live/your_domain.com/privkey.pem;

    location / {
        proxy_pass http://127.0.0.1:8000;
        proxy_set_header Host $host;
        proxy_set_header X-Real-IP $remote_addr;
        proxy_set_header X-Forwarded-For $proxy_add_x_forwarded_for;
        proxy_set_header X-Forwarded-Proto $scheme;
    }
}
Advanced Authentication Mechanisms
OAuth2:
- Implement OAuth2 for more secure authentication.
- Use libraries like
authliborflask-oauthlibto integrate OAuth2 with your Flask application.
OAuth2 Example with Authlib
from authlib.integrations.flask_client import OAuth

oauth = OAuth(app)
oauth.register(
    name='example',
    client_id='YOUR_CLIENT_ID',
    client_secret='YOUR_CLIENT_SECRET',
    authorize_url='https://provider.com/oauth/authorize',
    authorize_params=None,
    access_token_url='https://provider.com/oauth/token',
    access_token_params=None,
    refresh_token_url=None,
    redirect_uri='https://your_domain.com/auth/callback',
    client_kwargs={'scope': 'openid profile email'}
)

@app.route('/login')
def login():
    redirect_uri = url_for('auth', _external=True)
    return oauth.example.authorize_redirect(redirect_uri)

@app.route('/auth/callback')
def auth_callback():
    token = oauth.example.authorize_access_token()
    user = oauth.example.parse_id_token(token)
    return jsonify(user)
Monitoring and Logging
Implement monitoring and logging to keep track of your application’s performance and errors.
Logging
- Use Python’s built-in
loggingmodule to log important events and errors. - Configure log rotation to manage log file sizes.
Logging Example
import logging
from logging.handlers import RotatingFileHandler

handler = RotatingFileHandler('app.log', maxBytes=10000, backupCount=3)
handler.setLevel(logging.INFO)
formatter = logging.Formatter('%(asctime)s %(levelname)s: %(message)s [in %(pathname)s:%(lineno)d]')
handler.setFormatter(formatter)
app.logger.addHandler(handler)
Monitoring
- Use monitoring tools like Prometheus and Grafana for real-time performance metrics.
- Set up alerts for critical issues.
Prometheus Example
Export Flask metrics to Prometheus using prometheus_flask_exporter.
from prometheus_flask_exporter import PrometheusMetrics

metrics = PrometheusMetrics(app)
Scalability
Consider how your application can scale to handle increased load.
a. Load Balancing:
- Use a load balancer (e.g., AWS ELB, Nginx, HAProxy) to distribute traffic across multiple instances of your application.
b. Auto-Scaling:
- Configure auto-scaling policies on your cloud provider (e.g., AWS Auto Scaling, Google Cloud Auto Scaling) to automatically adjust the number of running instances based on load.
Continuous Integration/Continuous Deployment (CI/CD)
Implement CI/CD pipelines to automate testing, deployment, and updates.
a. CI/CD Tools:
- Use tools like Jenkins, GitHub Actions, GitLab CI, or Travis CI to set up your pipelines.

Practical Tips and Best Practices
Start Small: Begin with a manageable project scope and gradually expand as you gain more experience.
Leverage Community Resources: Utilize forums, GitHub repositories, and online courses to stay updated with the latest advancements.
Ensure Ethical Use: Be mindful of ethical considerations, such as data privacy and the potential for bias in AI-generated content.
Conclusion – AI Writer
Building your own advanced AI writer is a challenging but rewarding endeavor. By following this guide, you can create a powerful tool that automates content creation and enhances productivity. Remember to stay curious, experiment with different approaches, and continuously learn from the AI community. With dedication and persistence, you’ll be well on your way to mastering the art of AI writing.
Structure of the Advanced AI writer with Source Code
Project Structure
ai_writer_project/
│
├── app/
│   ├── __init__.py
│   ├── routes.py
│   ├── utils.py
│   ├── auth.py
│   └── ai_writer.py
│
├── gunicorn_config.py
├── requirements.txt
└── run.py
File Contents
app/init.py
from flask import Flask
from flask_httpauth import HTTPBasicAuth

app = Flask(__name__)
auth = HTTPBasicAuth()

from app import routes
app/routes.py
from flask import request, jsonify, abort
from app import app, auth
from app.utils import verify_password
from app.ai_writer import AIWriter

# Initialize AI Writer
api_key = 'your-openai-api-key'
writer = AIWriter(api_key)

@app.errorhandler(400)
def bad_request(error):
    return jsonify({'error': 'Bad Request', 'message': str(error)}), 400

@app.errorhandler(401)
def unauthorized(error):
    return jsonify({'error': 'Unauthorized', 'message': str(error)}), 401

@app.errorhandler(404)
def not_found(error):
    return jsonify({'error': 'Not Found', 'message': str(error)}), 404

@app.errorhandler(500)
def internal_error(error):
    return jsonify({'error': 'Internal Server Error', 'message': str(error)}), 500

@app.route('/generate', methods=['POST'])
@auth.login_required
def generate():
    data = request.json
    prompt = data.get('prompt')
    max_tokens = data.get('max_tokens', 150)
    if not prompt:
        abort(400, description="Prompt is required")
    result = writer.generate(prompt, max_tokens)
    return jsonify({'text': result})

@app.route('/check_grammar', methods=['POST'])
@auth.login_required
def check_grammar():
    data = request.json
    text = data.get('text')
    if not text:
        abort(400, description="Text is required")
    result = writer.check_grammar(text)
    return jsonify({'corrected_text': result})

@app.route('/summarize', methods=['POST'])
@auth.login_required
def summarize():
    data = request.json
    text = data.get('text')
    max_length = data.get('max_length', 50)
    if not text:
        abort(400, description="Text is required")
    result = writer.summarize(text, max_length)
    return jsonify({'summary': result})

@app.route('/extract_entities', methods=['POST'])
@auth.login_required
def extract_entities():
    data = request.json
    text = data.get('text')
    if not text:
        abort(400, description="Text is required")
    result = writer.extract_entities(text)
    return jsonify({'entities': result})

@app.route('/adjust_style', methods=['POST'])
@auth.login_required
def adjust_style():
    data = request.json
    text = data.get('text')
    style = data.get('style', 'formal')
    if not text:
        abort(400, description="Text is required")
    result = writer.adjust_style(text, style)
    return jsonify({'styled_text': result})

@app.route('/analyze_sentiment', methods=['POST'])
@auth.login_required
def analyze_sentiment():
    data = request.json
    text = data.get('text')
    if not text:
        abort(400, description="Text is required")
    result = writer.analyze_sentiment(text)
    return jsonify({'sentiment': result._asdict()})

@app.route('/translate', methods=['POST'])
@auth.login_required
def translate():
    data = request.json
    text = data.get('text')
    dest_language = data.get('dest_language', 'en')
    if not text:
        abort(400, description="Text is required")
    result = writer.translate(text, dest_language)
    return jsonify({'translated_text': result})
app/utils.py
from app import auth
from werkzeug.security import generate_password_hash, check_password_hash

# Define Users
users = {
    "admin": generate_password_hash("secret"),
    "user": generate_password_hash("password")
}

@auth.verify_password
def verify_password(username, password):
    if username in users and check_password_hash(users.get(username), password):
        return username
app/auth.py
from app import auth

@auth.error_handler
def auth_error():
    return jsonify({'error': 'Unauthorized access'}), 401
app/ai_writer.py
import openai
import spacy
from textblob import TextBlob
from transformers import pipeline
from googletrans import Translator
import requests

# Load Spacy model for NLP tasks
nlp = spacy.load('en_core_web_sm')
# Initialize the translator
translator = Translator()

class AIWriter:
    def __init__(self, api_key):
        openai.api_key = api_key

    def generate(self, prompt, max_tokens=150):
        try:
            response = openai.Completion.create(
                engine="text-davinci-003",
                prompt=prompt,
                max_tokens=max_tokens
            )
            return response.choices[0].text.strip()
        except Exception as e:
            return str(e)

    def check_grammar(self, text):
        try:
            blob = TextBlob(text)
            corrected_text = blob.correct()
            return str(corrected_text)
        except Exception as e:
            return str(e)

    def summarize(self, text, max_length=50):
        summarizer = pipeline("summarization")
        try:
            summary = summarizer(text, max_length=max_length, min_length=25, do_sample=False)
            return summary[0]['summary_text']
        except Exception as e:
            return str(e)

    def extract_entities(self, text):
        try:
            doc = nlp(text)
            entities = [(entity.text, entity.label_) for entity in doc.ents]
            return entities
        except Exception as e:
            return str(e)

    def adjust_style(self, text, style="formal"):
        try:
            prompt = f"Rewrite the following text in a {style} style:\n\n{text}"
            return self.generate(prompt)
        except Exception as e:
            return str(e)

    def analyze_sentiment(self, text):
        try:
            blob = TextBlob(text)
            return blob.sentiment
        except Exception as e:
            return str(e)

    def translate(self, text, dest_language='en'):
        try:
            translation = translator.translate(text, dest=dest_language)
            return translation.text
        except Exception as e:
            return str(e)

    def custom_integration(self, prompt, api_url):
        try:
            response = requests.post(api_url, json={'prompt': prompt})
            return response.json().get('text', 'Error: No text returned from custom model')
        except Exception as e:
            return str(e)
gunicorn_config.py
bind = "0.0.0.0:8000"
workers = 4
requirements.txt
flask
flask-httpauth
gunicorn
openai
transformers
spacy
textblob
googletrans==4.0.0-rc1
requests
run.py
from app import app

if __name__ == '__main__':
    app.run(debug=True)
This project structure includes all necessary files and directories to create, run, and deploy the AI Writer Flask application.
External Resources for AI Writer
Here are key resources for building and training AI models, with a focus on natural language processing (NLP):
- OpenAI GPT-4 Documentation
- Comprehensive documentation for using OpenAI’s GPT-4, including API usage, model details, and code examples.
- Hugging Face Transformers
- Extensive library for NLP with pre-trained models, including setup guides, tutorials, and API references.
- FastAPI Documentation
- Modern, fast web framework for building APIs with Python 3.6+ based on standard Python type hints. Useful for creating the backend of your AI writer.
- AWS Machine Learning Services
- Tools and services for building, training, and deploying machine learning models. Ideal for hosting and scaling your AI writer.
- Google Colaboratory
- Free Jupyter notebook environment that runs in the cloud, providing access to GPUs and TPUs, useful for training AI models.
- Kaggle Datasets
- Repository of datasets shared by the Kaggle community. Great for finding text data to train your AI writer.
- AllenNLP
- Open-source NLP research library built on PyTorch. Provides resources for building advanced AI models for natural language understanding.
- PyTorch
- Deep learning framework that provides flexibility and speed, making it easier to build and train custom AI models.




Leave a Reply