How to Create a Voice Recorder with Python
I Made a Voice Recorder Because I’m Lazy
Okay so this is stupid but I was in a meeting last week taking notes on my phone and it was terrible. Like really terrible. My thumbs hurt and I kept making typos and missing half of what people were saying.
And then I’m like, why am I even typing? I could just record this whole thing. But the voice memo app on my phone is weird – it saves everything to some cloud thing I don’t understand and the files have random names like “Recording_2024_08_13_15_23_47.m4a” which tells me nothing.
So naturally instead of just dealing with it like a normal person, I decided to spend my entire Saturday building my own voice recorder. Because that’s definitely a proportional response to a minor inconvenience.
How computers hear stuff (sort of)
Before I started this I literally thought there was some tiny microphone inside my laptop that worked like ears. Turns out that’s not how it works at all.
Computers don’t hear. They just measure how much air is pushing against the microphone thing really really fast. Like 44,000 times per second. Each measurement is just a number – how hard is the air pushing right now? Then you save all those numbers in order and apparently that’s audio.
It’s like if you took a picture of a bouncing ball every millisecond and then flipped through all the pictures really fast to see it bounce. Except instead of a ball it’s invisible air waves and instead of pictures it’s numbers.
Weird but okay.
The bare minimum code that works
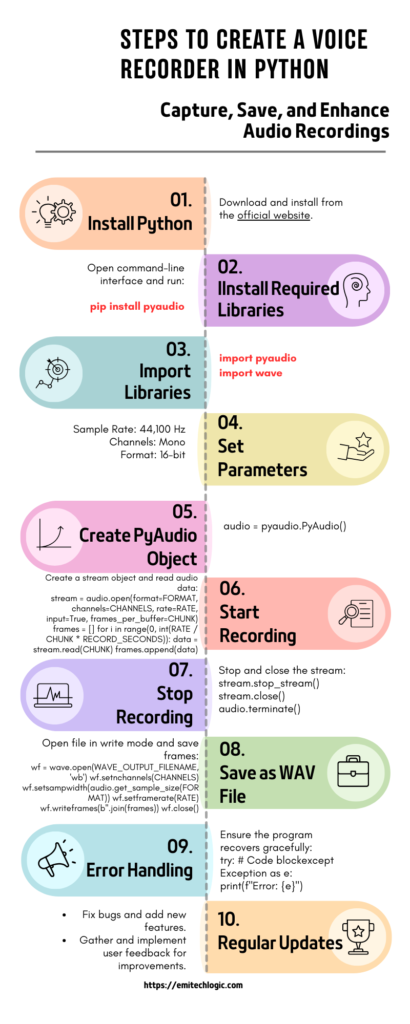
I came across two Python libraries recently — pyaudio and wave. Installing pyaudio was… let’s just say an adventure. My computer kept throwing errors about missing dependencies, and I spent a good 20 minutes hunting down the issue. Eventually, I got it working.
If you want to save yourself the trouble, just open your terminal and run:
pip install pyaudioThen I wrote some code and modified it until it didn’t crash:
import pyaudio
import wave

# I have no idea what most of these numbers mean
CHUNK = 1024  # apparently this is good?
FORMAT = pyaudio.paInt16  # 16-bit whatever that means
CHANNELS = 1  # mono because stereo is complicated
RATE = 44100  # CD quality allegedly
RECORD_SECONDS = 5

p = pyaudio.PyAudio()

print("Recording... say something")

stream = p.open(format=FORMAT,
                channels=CHANNELS,
                rate=RATE,
                input=True,
                frames_per_buffer=CHUNK)

frames = []

# This loop runs for 5 seconds and grabs audio chunks
for i in range(0, int(RATE / CHUNK * RECORD_SECONDS)):
    data = stream.read(CHUNK)
    frames.append(data)

print("Done")

stream.stop_stream()
stream.close()
p.terminate()

# Save the file
wf = wave.open("output.wav", 'wb')
wf.setnchannels(CHANNELS)
wf.setsampwidth(p.get_sample_size(FORMAT))
wf.setframerate(RATE)
wf.writeframes(b''.join(frames))
wf.close()Let me break this down because I had to figure out what all this stuff does:
The setup part – Those constants at the top are basically telling your computer how to record. CHUNK is how many audio samples to grab at once (bigger chunks = less frequent reads but more delay). FORMAT is how to store each sample – 16-bit integers work fine for voice. CHANNELS = 1 means mono recording, RATE = 44100 means take 44,100 samples per second.
The recording part – p.open() basically says “hey computer, start listening to the microphone with these settings.” The input=True part means we want to record, not play audio.
The loop – This is the weird math part. We want to record for 5 seconds, and we’re grabbing CHUNK samples at a time, so we need RATE / CHUNK * RECORD_SECONDS total reads. Each time through the loop we read one chunk and stick it in our list.
The cleanup – Stop the stream, close it, shut down pyaudio. If you skip this your program might crash or leave the microphone stuck on.
Saving the file – The wave library handles all the complicated WAV file format stuff. You tell it the audio parameters (channels, sample rate, etc.) and then dump all your audio chunks into it.
This actually worked on the first try which never happens. I recorded myself saying “hello this is a test” and when I played back the file it was my voice. Magic.
Making it not terrible to use
Command line stuff is fine for me but if I wanted other people to use this (which I don’t really but whatever) it needed buttons. So I made a GUI with tkinter which comes with Python.
First attempt was a disaster. I put the recording code in the same thread as the interface so when you clicked record the whole window froze until it was done. Took me way too long to figure out I needed threading.
Here’s what I ended up with after way too much debugging:
import pyaudio
import wave
import tkinter as tk
from tkinter import filedialog  # Add this import
import threading
import os


class VoiceRecorder:
    def __init__(self):
        self.is_recording = False
        self.frames = []
        self.p = pyaudio.PyAudio()

        # Audio settings
        self.chunk = 1024
        self.format = pyaudio.paInt16
        self.channels = 1
        self.rate = 44100

        self.make_gui()

    def make_gui(self):
        self.root = tk.Tk()
        self.root.title("Voice Recorder Thing")
        self.root.geometry("300x150")

        self.record_btn = tk.Button(
            self.root,
            text="Record",
            command=self.record_click,
            width=20,
            height=2
        )
        self.record_btn.pack(pady=10)

        self.play_btn = tk.Button(
            self.root,
            text="Play",
            command=self.play_click,
            width=20,
            state="disabled"
        )
        self.play_btn.pack(pady=5)

        self.save_btn = tk.Button(
            self.root,
            text="Save As...",
            command=self.save_click,
            width=20,
            state="disabled"
        )
        self.save_btn.pack(pady=5)

        self.status = tk.Label(self.root, text="Click record to start")
        self.status.pack(pady=10)

    def record_click(self):
        if not self.is_recording:
            self.start_recording()
        else:
            self.stop_recording()

    def start_recording(self):
        self.is_recording = True
        self.frames = []

        self.record_btn.config(text="Stop Recording")
        self.play_btn.config(state="disabled")
        self.save_btn.config(state="disabled")
        self.status.config(text="Recording...")

        # Run this in background so GUI doesn't freeze
        self.thread = threading.Thread(target=self.record_thread)
        self.thread.start()

    def record_thread(self):
        stream = self.p.open(
            format=self.format,
            channels=self.channels,
            rate=self.rate,
            input=True,
            frames_per_buffer=self.chunk
        )

        while self.is_recording:
            data = stream.read(self.chunk)
            self.frames.append(data)

        stream.stop_stream()
        stream.close()

    def stop_recording(self):
        self.is_recording = False

        self.record_btn.config(text="Record")
        self.play_btn.config(state="normal")
        self.save_btn.config(state="normal")
        self.status.config(text="Recording stopped")

        # Auto save temporary file
        self.temp_file = "temp.wav"
        self.save_file(self.temp_file)

    def save_file(self, filename):
        wf = wave.open(filename, 'wb')
        wf.setnchannels(self.channels)
        wf.setsampwidth(self.p.get_sample_size(self.format))
        wf.setframerate(self.rate)
        wf.writeframes(b''.join(self.frames))
        wf.close()

    def play_click(self):
        if not hasattr(self, 'temp_file') or not os.path.exists(self.temp_file):
            return

        wf = wave.open(self.temp_file, 'rb')
        stream = self.p.open(
            format=self.p.get_format_from_width(wf.getsampwidth()),
            channels=wf.getnchannels(),
            rate=wf.getframerate(),
            output=True
        )

        data = wf.readframes(1024)
        while data:
            stream.write(data)
            data = wf.readframes(1024)

        stream.close()
        wf.close()

    def save_click(self):
        filename = filedialog.asksaveasfilename(  # Now this will work
            defaultextension=".wav",
            filetypes=[("WAV files", "*.wav")]
        )
        if filename:
            self.save_file(filename)

    def run(self):
        self.root.mainloop()

    def __del__(self):
        # Clean up PyAudio when the object is destroyed
        if hasattr(self, 'p'):
            self.p.terminate()


if __name__ == "__main__":
    recorder = VoiceRecorder()
    recorder.run()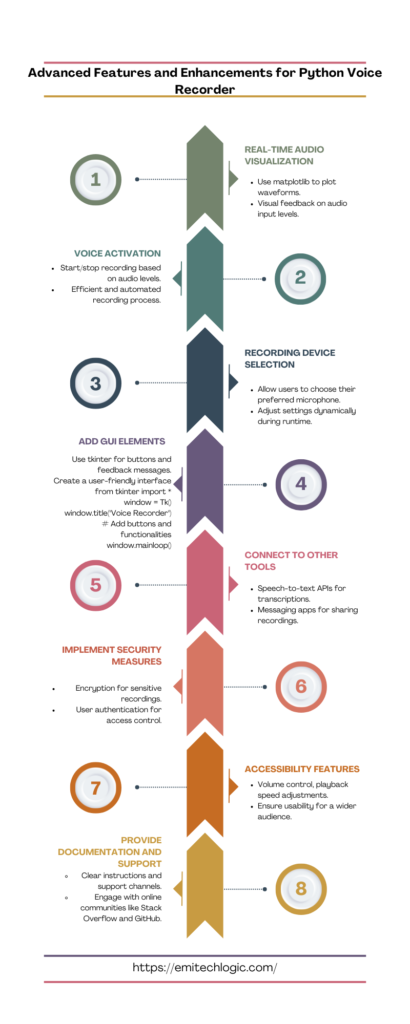
Okay let me explain the GUI version because it’s more complicated and I had to figure out a bunch of stuff:
The class structure – I put everything in a class called VoiceRecorder instead of just having loose functions everywhere. Makes it easier to keep track of the recording state and audio settings.
The init method – This runs when you create a new VoiceRecorder. Sets up all the audio parameters (same as before) plus some variables to track whether we’re currently recording and where to store the audio data.
The GUI setup – make_gui() creates the window and all the buttons using tkinter. Nothing fancy – just three buttons stacked vertically and a status label at the bottom. The command=self.record_click part tells tkinter what function to call when someone clicks the button.
The threading part – This is where I messed up the first time. When you click record, it calls start_recording() which starts a background thread running record_thread(). The background thread does the actual audio recording while the main thread keeps the GUI responsive. Without this, clicking record would freeze the entire window.
The recording logic – record_thread() opens an audio stream and sits in a loop reading chunks of audio data. It keeps going until self.is_recording gets set to False (which happens when you click stop). Each chunk gets added to the self.frames list.
Button state management – This was annoying to get right. When you start recording, the record button changes to “Stop Recording” and the other buttons get disabled. When you stop, everything switches back. The state="disabled" thing prevents people from clicking buttons when they shouldn’t.
Auto-save – When recording stops, it automatically saves a temporary file called “temp.wav”. This lets you play back your recording immediately without having to save it somewhere first.
Playback – The play function is pretty basic. It opens the temporary WAV file and just dumps all the audio data to the speakers. Works fine for short recordings but might be choppy for really long ones.
Save As – Uses tkinter’s file dialog to let you pick where to save the recording. Pretty standard stuff.
The trickiest part was figuring out that GUI updates have to happen on the main thread. You can’t just update button text from the background recording thread or tkinter freaks out.
Stuff that went wrong
The microphone permissions thing on Mac was annoying. Had to go into System Preferences and manually allow Terminal to access the microphone. Forgot about this and spent like an hour thinking my code was broken.
Also threading is weird. You can’t update GUI elements from background threads directly or tkinter gets mad. Had to figure out how to use the main thread for GUI updates.
The playback is kind of basic. It just dumps all the audio data at once instead of streaming it properly. Works fine for short recordings but probably breaks with long ones.
Why this was worth doing
Now I have exactly what I wanted – a simple recorder that saves files with names I pick, no cloud nonsense, no extra features I don’t need. Takes up like 50 lines of actual code.
Plus I learned how audio works in Python which is pretty cool. Might add some features later like showing audio levels while recording or trimming silence from the ends.
The whole thing took maybe 4 hours including all the googling and debugging. Not bad for solving my original problem plus learning something new.
If you want to try this yourself just copy the code and run it. Probably works on your computer too unless you have some weird audio setup.
Stuff I might add later (if I get bored)
Now that the basic thing works, there’s a bunch of random features I keep thinking about:
Making voices sound weird – You know how you can make your voice sound like a chipmunk or Darth Vader? That’s just changing the playback speed or pitch. Shouldn’t be too hard to add some sliders for that. Could be fun for messing with friends.
Hooking it up to other stuff – I’ve been thinking about connecting this to one of those speech-to-text things so it could automatically transcribe meetings. Or maybe send recordings directly to Slack or email. Would save me from having to manually share files all the time.
Not getting fired for recording confidential stuff – If I actually use this at work I should probably add some encryption or password protection. Right now anyone can just open the WAV files. Maybe add a simple password prompt or encrypt the files with something basic.
Making it less terrible for people with disabilities – My dad has hearing issues and always complains about audio being too quiet or fast. Could add some volume boost and speed controls. Probably not that hard and would actually be useful.
Writing instructions that don’t suck – Right now if someone else wanted to use this they’d have to figure it out themselves. Should probably write up some basic “how to install and run this thing” instructions. Maybe throw it on GitHub or something.
Actually maintaining it – This is the part I’m bad at. I always build these little projects and then forget about them when they break or need updates. Should probably at least fix bugs if people report them. Maybe add a version number so I can tell if it’s getting outdated.
Most of this stuff I’ll probably never get around to but it’s fun to think about. The basic recorder already does what I need it to do so everything else is just bonus features.
Frequently Asked Questions
External Resources
- Python Documentation: Official documentation for Python programming.
- Stack Overflow: Community-driven platform for asking and answering programming questions.
- GitHub: Platform for hosting and collaborating on software projects.
- YouTube: Tutorials and educational videos on Python programming and audio processing.
- Python Community Forums: Forums for discussing Python-related topics.
By using these resources, you can enhance your learning and create a powerful and user-friendly voice recorder with Python.






[…] MP3 converter, because these formats are used commonly. In this guide, we’ll show you how to create a Free MP4 to MP3 Converter using Python. This online converter is designed to be simple, fast, and efficient. We’ll give you […]
[…] developed by Hugging Face, has gained widespread recognition for its pre-trained models in natural language processing (NLP). […]
[…] Imagine being able to control your devices just by talking to them. Virtual assistants make this possible with voice recognition technology. […]