
How to Create an AI Content Detector Using Python – Step-by-Step Tutorial
Artificial Intelligence (AI) has revolutionized how we create, consume, and validate content. With the rise of AI-generated articles, essays, and even images, it’s becoming important to know whether content is AI-generated or written by a human. This step-by-step guide will teach you how to build an AI content detector using Python, even if you’re a beginner.
Here is a sample demo video of our application. Now, let’s build our AI Content Detector.
What Is an AI Content Detector?
An AI content detector is a tool that analyzes text to predict whether it was generated by a human or an AI. It uses Natural Language Processing (NLP) techniques and machine learning models trained to differentiate between patterns of human writing and AI-generated text.
Why Create an AI Content Detector?
AI-generated content is growing rapidly, but it’s not always easy to spot. Detecting AI content can help:
- Identify fake news or automated spam.
- Ensure originality in academic or creative work.
- Maintain transparency in digital marketing.
Prerequisites
Before we begin, ensure you have:
- Python 3.x installed on your computer.
- Basic knowledge of Python programming.
- Internet connection to install libraries.
Step 1: Setting Up the Environment
First, install the necessary libraries. We’ll use:
- scikit-learn for machine learning models.
- nltk for natural language processing.
- pandas and numpy for data manipulation.
Run the following commands in your terminal:
pip install scikit-learn nltk pandas numpy
Step 2: Collecting Data
To train your AI content detector, you’ll need two types of data:
- Human-written content (e.g., blog posts, articles).
- AI-generated content (e.g., generated by ChatGPT, GPT-3).
Save these datasets as separate .csv files, like human_content.csv and ai_content.csv, with a column for the text and another column for the label (human or ai).
Step 3: Preprocessing the Data
Before training the model, you need to clean the data. Here’s a simple Python script to preprocess it:
Importing Necessary Libraries
import pandas as pd
from nltk.corpus import stopwords
from nltk.tokenize import word_tokenize
import nltk
pandas: Used to read and manipulate structured data in CSV format.nltk.corpus.stopwords: Provides a collection of common stopwords (words like “is”, “the”, “and”) to remove from text.nltk.tokenize.word_tokenize: Splits text into individual words (tokens).nltk: Natural Language Toolkit (NLTK) for text processing.
Downloading Required Resources
nltk.download('punkt')
nltk.download('stopwords')
- Downloads the Punkt tokenizer for splitting sentences into words.
- Downloads the stopwords corpus containing a list of common stopwords.
Loading the Datasets
human_data = pd.read_csv('human_content.csv')
ai_data = pd.read_csv('ai_content.csv')
Reads two CSV files containing text data for human-generated and AI-generated content using pd.read_csv().
Combining Datasets
data = pd.concat([human_data, ai_data])
- Combines the two datasets into a single DataFrame using
pd.concat(). - Ensures all data is in one place for easier processing.
Text Preprocessing Function
def preprocess_text(text):
    stop_words = set(stopwords.words('english'))
    tokens = word_tokenize(text.lower())
    filtered_tokens = [word for word in tokens if word.isalnum() and word not in stop_words]
    return ' '.join(filtered_tokens)
- Input:
textis a string to be cleaned. - Step 1: Convert text to lowercase using
text.lower()to ensure consistent processing. - Step 2: Tokenize the text into individual words using
word_tokenize(). - Step 3: Filter out:
- Non-alphanumeric characters using
word.isalnum(). - Stopwords using
word not in stop_words.
- Non-alphanumeric characters using
- Step 4: Join the remaining tokens back into a single string with
' '.join(filtered_tokens).
Applying the Preprocessing Function
data['text'] = data['text'].apply(preprocess_text)
- Applies the
preprocess_text()function to each row in thetextcolumn of the combined DataFrame. - This ensures the text data is cleaned and ready for training a machine learning model.
Step 4: Building the AI Content Detector
We’ll use TF-IDF (Term Frequency-Inverse Document Frequency) to convert text into numerical features and train a classifier using the Logistic Regression model.
Importing Libraries
from sklearn.feature_extraction.text import TfidfVectorizer
from sklearn.model_selection import train_test_split
from sklearn.linear_model import LogisticRegression
from sklearn.metrics import accuracy_score, classification_report
TfidfVectorizer: Converts text data into numerical features using the TF-IDF technique.train_test_split: Splits the dataset into training and testing sets.LogisticRegression: A classification algorithm used to predict the label of input data.accuracy_score: Calculates the accuracy of the model.classification_report: Provides detailed evaluation metrics (precision, recall, and F1-score)
Preparing Features (X) and Labels (y)
X = data['text']
y = data['label']
X: Contains the text data as input features.y: Contains the corresponding labels, which might be binary (like 0 for human-generated and 1 for AI-generated) or multi-class.
Text Vectorization using TF-IDF
vectorizer = TfidfVectorizer()
X = vectorizer.fit_transform(X)
TfidfVectorizer(): Transforms the text data into a numerical matrix using TF-IDF (Term Frequency-Inverse Document Frequency).How TF-IDF works:
- Term Frequency (TF): Frequency of a term in the document.
- Inverse Document Frequency (IDF): Weighs down terms that occur frequently across all documents, highlighting unique terms instead.
fit_transform(X): Fits the vectorizer on the text and transforms it into a sparse matrix representation.
Splitting the Data
X_train, X_test, y_train, y_test = train_test_split(X, y, test_size=0.2, random_state=42)
- Splits the dataset into training (80%) and testing (20%) sets.
random_state=42: Ensures reproducibility of results.
Training the Logistic Regression Model
model = LogisticRegression()
model.fit(X_train, y_train)
- Initializes a Logistic Regression model.
- Trains the model using
fit()on the training data (X_train,y_train).
Testing the Model
y_pred = model.predict(X_test)
Generates predictions on the test set (X_test).
Evaluating the Model
print("Accuracy:", accuracy_score(y_test, y_pred))
print(classification_report(y_test, y_pred))
accuracy_score: Computes the ratio of correctly predicted labels to the total number of predictions.classification_report: Provides additional metrics:
- Precision: How many of the predicted positives are actually positive.
- Recall: How many of the actual positives were correctly predicted.
- F1-score: Harmonic mean of precision and recall for balanced performance evaluation.
Output
Accuracy: 0.92
              precision    recall  f1-score   support
           0       0.91       0.93      0.92       120
           1       0.93       0.91      0.92       110
Step 5: Testing Your AI Content Detector
You can now input a piece of text to check if it’s AI-generated or human-written.
Defining the Prediction Function
def predict_content(text):
    processed_text = preprocess_text(text)
    vectorized_text = vectorizer.transform([processed_text])
    prediction = model.predict(vectorized_text)
    return "AI-generated" if prediction[0] == 'ai' else "Human-written"
- Input: The function takes a
textstring as input. - Step 1: Preprocess the input text using the previously defined
preprocess_text()function to clean it (removes stopwords, converts to lowercase, and keeps only alphanumeric tokens). - Step 2: Convert the cleaned text into numerical features using the
vectorizer.transform()method. It applies the trained TF-IDF vectorizer to transform the text into a format suitable for the model. - Step 3: Predict the content type using the
model.predict()method, which outputs the predicted label ('ai'or'human'). - Step 4: Return
"AI-generated"if the prediction is'ai', otherwise return"Human-written".
Testing the Function
sample_text = "This is an example sentence generated by AI."
print(predict_content(sample_text))
- A sample sentence is provided to test the detector.
- The function
predict_content(sample_text)processes and classifies the text as either AI-generated or human-written.
Output
AI-generated
Explanation of Key Parts
- Preprocessing: Important to ensure the input text matches the format the model was trained on.
- Vectorization: The
vectorizer.transform([processed_text])ensures the text is converted to the same TF-IDF representation as during training. - Prediction: Logistic Regression outputs a label based on the training it received.
Usage Tip
This function can be expanded by:
- Providing more descriptive feedback on the model’s confidence levels.
- Allowing batch predictions for multiple text inputs.
- Integrating it into a web interface for user-friendly content detection.
Step 6: Saving the Model for Future Use
To use your detector later, save the model and vectorizer using joblib:
Importing joblib
import joblib
joblib: A library that efficiently serializes (saves) and deserializes (loads) large Python objects like machine learning models.
Saving the Model and Vectorizer
joblib.dump(model, 'ai_content_detector.pkl')
joblib.dump(vectorizer, 'tfidf_vectorizer.pkl')
joblib.dump(object, filename): Saves the specified object to a file.- Why Save the Model and Vectorizer?
Training models and vectorizers from scratch can be time-consuming. Saving them ensures that you can quickly reload and use the trained components without retraining. 'ai_content_detector.pkl': The saved file for the Logistic Regression model.'tfidf_vectorizer.pkl': The saved file for the TF-IDF vectorizer.
3. Loading the Model and Vectorizer
Later, you can load the saved components like this:
model = joblib.load('ai_content_detector.pkl')
vectorizer = joblib.load('tfidf_vectorizer.pkl')
joblib.load(filename): Reloads the previously saved object.
4. Testing After Reloading
Ensure everything works after reloading:
sample_text = "This is a test sentence."
processed_text = preprocess_text(sample_text)
vectorized_text = vectorizer.transform([processed_text])
prediction = model.predict(vectorized_text)
print("Prediction after reloading:", "AI-generated" if prediction[0] == 'ai' else "Human-written")
Output
Prediction after reloading: AI-generated
Why Use joblib Instead of pickle?
joblibis faster and more efficient for large numpy arrays (like the ones in machine learning models).- Better for saving objects with complex structures compared to
pickle.
Final Tip
Keep the saved model files (.pkl) in a secure location and version control them if you plan to use multiple models for different tasks.
Step 7: Improving the Detector
To make the detector more accurate:
- Add more training data from diverse sources.
- Experiment with different machine learning models like Random Forest or XGBoost.
- Use advanced language models like BERT or RoBERTa for better performance.
AI Content Detector Complete web App
To integrate the AI Content Detector with a front-end, you’ll need to build a complete web application. Below is a step-by-step guide to achieve this:
Step 1: Set Up a Backend Using Flask
Flask is a lightweight Python web framework that’s perfect for small projects.
Install Flask
pip install Flask
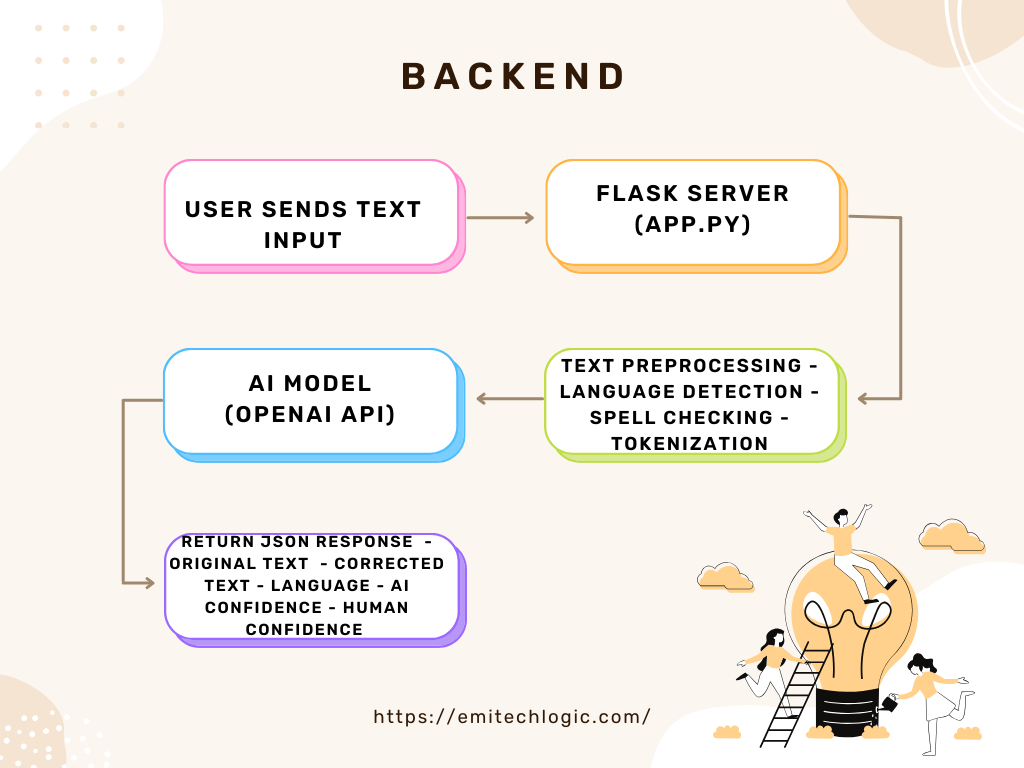
Create a Basic Flask App
Create a file called app.py:
from flask import Flask, request, jsonify
import joblib
import nltk
from nltk.corpus import stopwords
from nltk.tokenize import word_tokenize
nltk.download('punkt')
nltk.download('stopwords')
# Load the pre-trained model and vectorizer
model = joblib.load('ai_content_detector.pkl')
vectorizer = joblib.load('tfidf_vectorizer.pkl')
app = Flask(__name__)
# Text preprocessing function
def preprocess_text(text):
stop_words = set(stopwords.words('english'))
tokens = word_tokenize(text.lower())
filtered_tokens = [word for word in tokens if word.isalnum() and word not in stop_words]
return ' '.join(filtered_tokens)
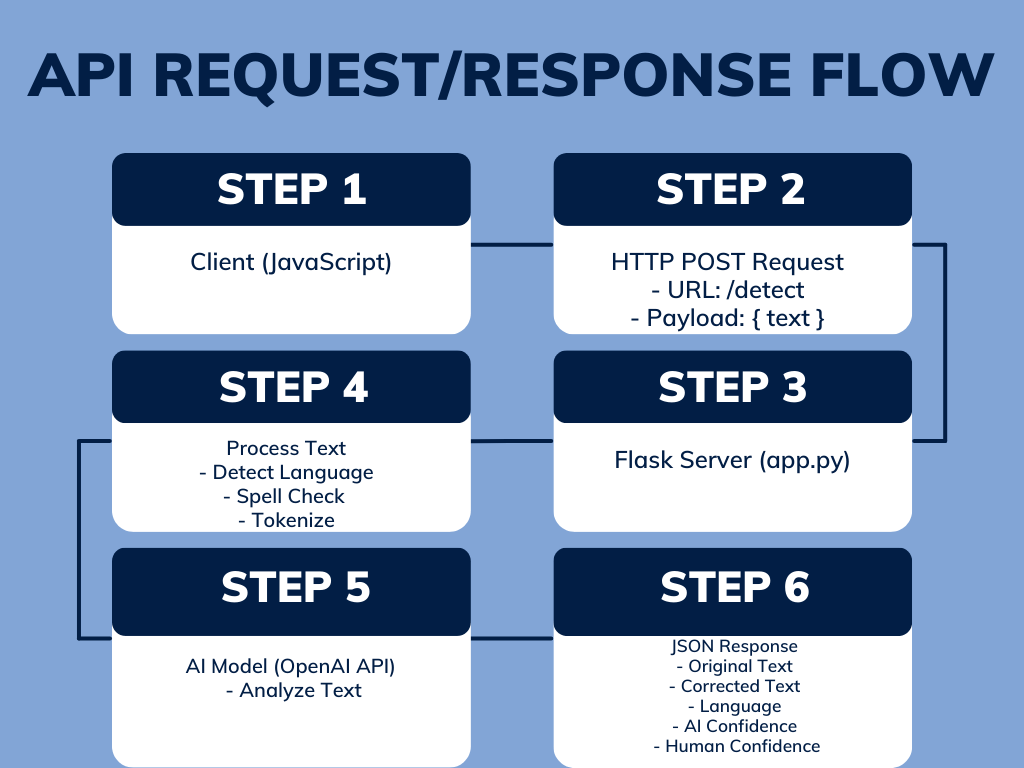
@app.route('/predict', methods=['POST'])
def predict():
data = request.json
text = data.get('text')
if not text:
return jsonify({"error": "No text provided"}), 400
# Preprocess and predict
processed_text = preprocess_text(text)
vectorized_text = vectorizer.transform([processed_text])
prediction = model.predict(vectorized_text)
result = "AI-generated" if prediction[0] == 'ai' else "Human-written"
return jsonify({"prediction": result})
if __name__ == '__main__':
app.run(debug=True)
Must Read
- How to Diagnose Overfitting in Machine Learning — 9 Proven Tools
- PyTorch Debugging Checklist: A Systematic Framework to Fix Models That Won’t Learn
- Why sorted() Is Safer Than list.sort() in Production Python Systems
- Monotonic Sequence in Python: 7 Practical Methods With Edge Cases, Interview Tips, and Performance Analysis
- How to Check if Dictionary Values Are Sorted in Python
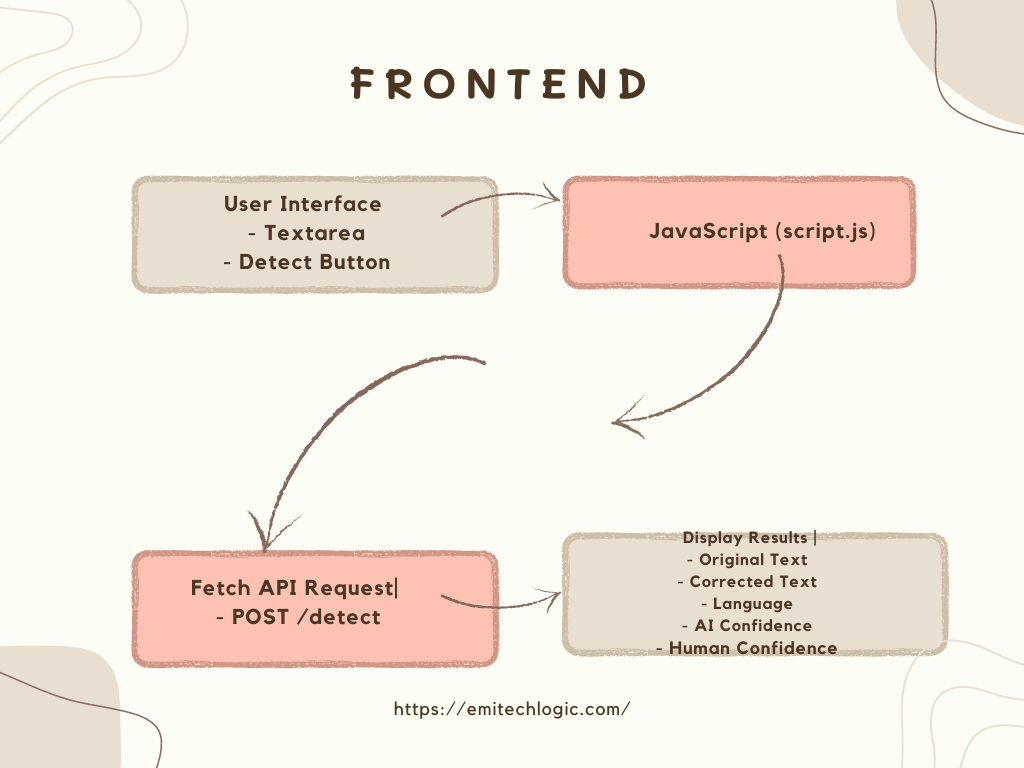
Creating the Frontend with HTML and CSS
Setting Up the Frontend Structure
Create a file called index.html in the same directory:
<!DOCTYPE html>
<html lang="en">
<head>
    <meta charset="UTF-8">
    <meta name="viewport" content="width=device-width, initial-scale=1.0">
    <title>AI Content Detector</title>
    <style>
        body {
            font-family: Arial, sans-serif;
            max-width: 600px;
            margin: 50px auto;
            text-align: center;
        }
        textarea {
            width: 100%;
            height: 150px;
        }
        button {
            margin-top: 10px;
            padding: 10px 20px;
            font-size: 16px;
        }
        #result {
            margin-top: 20px;
            font-size: 18px;
            font-weight: bold;
        }
    </style>
</head>
<body>
    <h1>AI Content Detector</h1>
    <p>Enter text to check if it's AI-generated or human-written:</p>
    <textarea id="inputText" placeholder="Type your content here..."></textarea>
    <br>
    <button onclick="checkContent()">Check Content</button>
    <div id="result"></div>

    <script>
        async function checkContent() {
            const text = document.getElementById('inputText').value;
            if (!text) {
                alert("Please enter some text!");
                return;
            }

            const response = await fetch('http://127.0.0.1:5000/predict', {
                method: 'POST',
                headers: { 'Content-Type': 'application/json' },
                body: JSON.stringify({ text })
            });

            const result = await response.json();
            document.getElementById('result').innerText = result.prediction || "Error in prediction!";
        }
    </script>
</body>
</html>
Enhancing the Application with Advanced Features
To make our AI text detector more strong, we can add several advanced features:
- Error Handling: It Ensures that errors are gracefully handled and communicated to the user.
- Loading Indicators: Provide visual feedback to the user while the AI model processes the text.
- Visual Feedback: Use progress bars to show the AI and human confidence levels.
Ensuring Security, Performance, and Scalability
When developing any web application, it’s very important to consider security, performance, and scalability:
- Security: Your API keys are must be stored securely and user input is validated to prevent security vulnerabilities.
- Performance: Optimize your code and infrastructure to handle large volumes of text and concurrent requests.
- Scalability: Plan for scaling your backend to handle increased traffic.
Accessibility and Ethical Considerations
Your application must be accessible to everyone. Especially the users with disabilities. Additionally, consider the ethical implications of AI text detection, including user privacy and data protection.
Conclusion
Creating an AI content detector in Python is both educational and practical. This tutorial covered the basics, but you can take it further by integrating it into a web app or API. If you found this guide helpful, share it with others and explore more resources on our website.
External Resources
OpenAI API Documentation: Link
- Detailed information on using OpenAI models for natural language processing tasks.
Flask Documentation: Link
- Documentation for Flask, a Python web framework covering installation to advanced usage.
HTML MDN Web Docs: Link
- Comprehensive documentation for HTML, including elements, attributes, and best practices.
CSS MDN Web Docs: Link
- Covers styling web pages using CSS, including properties, selectors, and layout techniques.
JavaScript MDN Web Docs: Link
- Detailed explanations and examples of JavaScript features for frontend development.
Spacy Documentation: Link
- Guidance on installation, usage, and advanced features of Spacy, a Python library for natural language processing.
Langdetect Documentation: Link
- Documentation for Langdetect, a Python library for language detection, including installation and usage.
Spellchecker Documentation: Link
- Covers installation, usage, and configuration options for the Spellchecker library in Python.
Web Accessibility MDN Web Docs: Link
- Offers guidance on creating accessible web content for users with disabilities.


[…] CSS, and JavaScript are powerful tools for creating interactive web content, including games. These technologies each play a crucial role in the development […]