

How to Generate Images from Text Using Python
In today’s exciting tech world, generate images from text has completely transformed many areas, from the arts to scientific studies. Python, thanks to its wide range of libraries and tools, has become the top choice for developing advanced methods to turn text into images. In this detailed guide, we’ll show you step-by-step how to use Python to create amazing images from text, exploring all the advanced features and techniques you need to know.
Introduction
Turning words into pictures isn’t just cool—it’s incredibly useful! Designers, content creators, game developers, and even AI researchers use text-to-image generation to bring ideas to life. Luckily, Python makes this process much easier with powerful tools and libraries. With the right techniques, you can transform written descriptions into stunning visuals, unlocking a whole new level of creativity and communication. Whether you’re working with Natural Language Processing (NLP) or advanced image generation models, Python provides everything you need to explore this exciting field.
Why Generate Images from Text?
Before diving into the technical details, let’s explore why text-to-image generation is so important.
Creative Content Generation
Python is a game-changer when it comes to designing eye-catching visuals for stories, ads, and social media. Automating image creation saves time and effort while maintaining consistency across branding. With Python’s flexibility, you can customize visuals to match your message and audience perfectly. This not only boosts productivity but also lets you focus on what truly matters—connecting with your audience and growing your brand.
Data Visualization
Transforming text into images makes complex information more digestible. Instead of overwhelming your audience with raw data, you can present it as engaging visuals like charts, infographics, and diagrams. Whether you’re explaining trends, sharing insights, or crafting reports, visual representation makes information clearer and more impactful.
AI and Machine Learning Applications
Artificial Intelligence (AI) and Machine Learning (ML) are revolutionizing text-to-image generation. These technologies can interpret descriptions and create realistic images, almost like having a virtual artist at your fingertips. From marketing and design to education and research, AI-driven image generation is opening new doors for creativity and automation.
Enhanced User Experiences
Auto-generated visuals can make user interfaces more engaging and interactive. Imagine dynamic charts that update in real-time or interactive graphics that respond to user input. These enhancements elevate user engagement, creating a richer and more personalized experience that keeps people coming back.
Getting Started with Text-to-Image Generation
Prerequisites
To get started with text-to-image generation, make sure you have the following set up:
Python 3.x
This is the programming language we’ll be using to write our text-to-image generation code. If you haven’t already installed Python, you can download it from the official Python website (python.org) and follow the installation instructions.
Jupyter Notebook or any Python IDE
You’ll need a development environment to write and execute your Python code. Jupyter Notebook is a popular choice for data science tasks like text-to-image generation, but you can also use any other Python Integrated Development Environment (IDE) that you’re comfortable with, such as PyCharm, Visual Studio Code, or Spyder.
Basic knowledge of Python programming
While you don’t need to be an expert, having a basic understanding of Python programming will be helpful as we’ll be writing Python code to generate images from text.
Key Python Libraries for Text-to-Image Generation
Python offers several powerful libraries for converting text into images. These tools help in AI-generated art, content creation, and data visualization.
✅ TensorFlow – A machine learning library widely used for deep learning models. It helps generate images from text using GANs (Generative Adversarial Networks) and VAEs (Variational Autoencoders). TensorFlow is great for handling large datasets and offers fast training with GPU acceleration.
✅ PyTorch – Known for its flexibility and ease of use, PyTorch is widely used for building and testing AI models for text-to-image tasks. It allows real-time model updates, making it ideal for experiments, research, and creative applications.
✅ Transformers (Hugging Face) – Provides pre-trained AI models for natural language processing (NLP) and image generation. It plays a key role in models like Stable Diffusion and DALL·E, making AI-generated images more accessible for storytelling, digital art, and automated design.
✅ OpenCV – A computer vision library that enhances and modifies AI-generated images. It helps adjust brightness, contrast, and blending effects, making it useful for photo editing, document processing, and AI-generated visuals.
✅ PIL/Pillow – A simple image-handling library for creating and modifying images. It’s perfect for adding text, effects, and overlays, making it useful for social media content, posters, and advertisements.
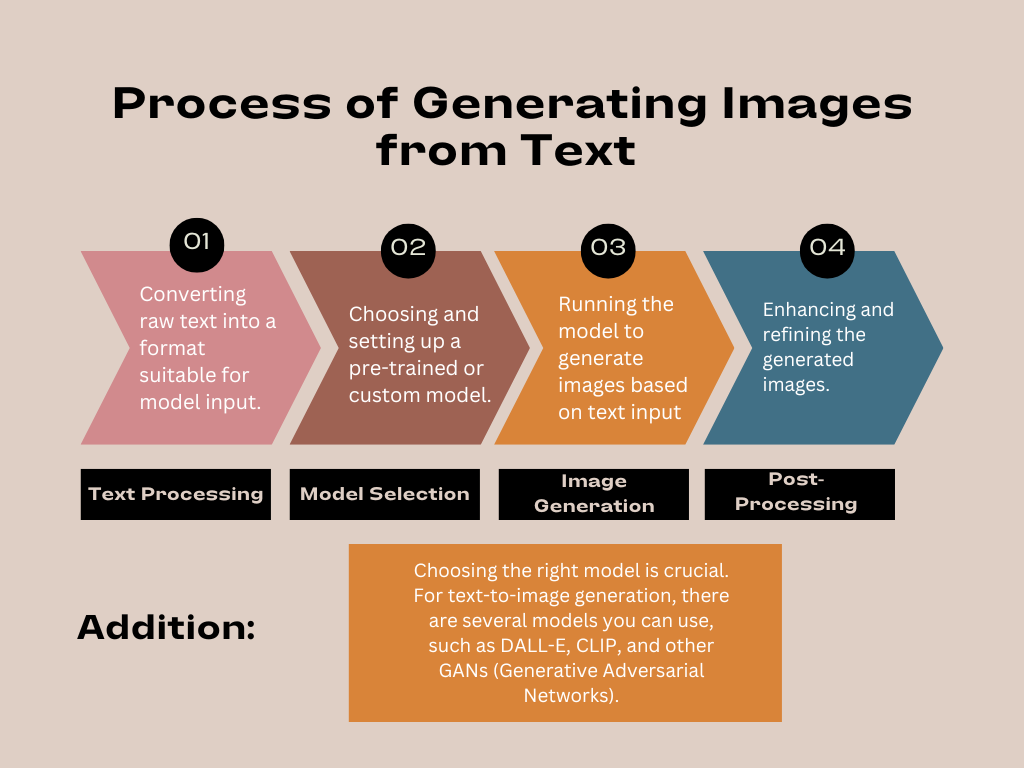
Understanding the Text-to-Image Generation Process
The process of generating images from text typically involves several steps:
- Text Processing: Converting raw text into a format suitable for model input.
- Model Selection: Choosing and setting up a pre-trained or custom model.
- Image Generation: Running the model to generate images based on text input.
- Post-Processing: Enhancing and refining the generated images.
Before entering into the Text-to-Image Generation Process, we must install required libraries as I explained it in detail. let’s install.
You can install these libraries using pip:
pip install tensorflow torch transformers opencv-python pillow
Step1: Text Processing
Before generating an image, the text needs to be converted into a format the AI model can understand.
✅ Key Steps:
- Tokenization – Break the text into smaller parts (tokens) like words or subwords.
- Encoding – Convert these tokens into numerical values.
- Formatting – Ensure the text is structured correctly for the model.
from transformers import AutoTokenizer

# Load the tokenizer for the chosen model
tokenizer = AutoTokenizer.from_pretrained('gpt-2')

# Example text
text = "A beautiful sunset over the mountains."

# Tokenize the text
tokens = tokenizer.encode(text, return_tensors='pt')
print(tokens)
Step 2: Model Selection
Choosing the right model is crucial. For text-to-image generation, there are several models you can use, such as DALL-E, CLIP, and other GANs (Generative Adversarial Networks). In this guide, we will focus on using a pre-trained model for simplicity.
Using DALL-E Mini
DALL-E is a model developed by OpenAI that generates images from textual descriptions. We will use the DALL-E Mini, a smaller version of the original model, which is easier to run on standard hardware.
from dalle_pytorch import DALLE
from transformers import CLIPProcessor, CLIPModel

# Load the CLIP model and processor
clip_model = CLIPModel.from_pretrained("openai/clip-vit-base-patch32")
processor = CLIPProcessor.from_pretrained("openai/clip-vit-base-patch32")

# Load the DALL-E model
dalle = DALLE(
    dim=64,
    vae=None,
    text_seq_len=128,
    depth=12,
    heads=8,
    dim_head=64,
    reversible=True
)

# Define a function to generate images
def generate_image(text):
    inputs = processor(text=text, return_tensors="pt", padding=True)
    image = dalle(inputs)
    return image
Step 3: Image Generation
Once the model is set up, you can generate images from text. Let’s generate an image for our example text.
import matplotlib.pyplot as plt

# Generate an image from text
image = generate_image("A beautiful sunset over the mountains.")

# Convert tensor to numpy array and plot
image_np = image.squeeze().permute(1, 2, 0).detach().numpy()
plt.imshow(image_np)
plt.axis('off')
plt.show()
Step 4: Post-Processing
Post-processing involves refining the generated images to enhance their quality. This can include techniques such as image sharpening, color adjustment, and noise reduction. OpenCV and Pillow are excellent libraries for these tasks.
from PIL import Image, ImageEnhance

# Convert tensor to PIL image
image_pil = Image.fromarray((image_np * 255).astype('uint8'))

# Enhance the image
enhancer = ImageEnhance.Sharpness(image_pil)
image_enhanced = enhancer.enhance(2.0)

# Save and display the enhanced image
image_enhanced.save("generated_image.png")
image_enhanced.show()
Advanced Techniques for Text-to-Image Generation
To generate high-quality images, you can use several advanced techniques:
- How to Debug ML Inference Latency and Throughput Issues
- Shadow Deployment and Canary Testing for Machine Learning Models: A Practical Guide
- How to Build an ML Monitoring Dashboard from Scratch (Streamlit Tutorial)
- ML Model Monitoring: How to Detect Data Drift and Model Decay in Production
- Retrain vs Fine-Tune vs Train from Scratch: A Decision Framework for ML Engineers
Using Generative Adversarial Networks (GANs)
Generative Adversarial Networks (GANs) are widely used for generating realistic images. A GAN consists of two networks: a generator and a discriminator. The generator creates images, while the discriminator evaluates them.
Setting Up a GAN
We will use the popular GAN library, pytorch-gan, to set up a simple GAN for text-to-image generation.
from pytorch_gan.models import Generator, Discriminator

# Define the generator and discriminator
generator = Generator()
discriminator = Discriminator()

# Define the loss function and optimizers
criterion = torch.nn.BCELoss()
optimizer_g = torch.optim.Adam(generator.parameters(), lr=0.0002)
optimizer_d = torch.optim.Adam(discriminator.parameters(), lr=0.0002)

# Training loop
for epoch in range(num_epochs):
    for data in dataloader:
        # Train discriminator
        optimizer_d.zero_grad()
        real_images = data[0]
        real_labels = torch.ones(batch_size, 1)
        fake_images = generator(text_embeddings)
        fake_labels = torch.zeros(batch_size, 1)

        real_loss = criterion(discriminator(real_images), real_labels)
        fake_loss = criterion(discriminator(fake_images.detach()), fake_labels)
        d_loss = real_loss + fake_loss
        d_loss.backward()
        optimizer_d.step()

        # Train generator
        optimizer_g.zero_grad()
        g_loss = criterion(discriminator(fake_images), real_labels)
        g_loss.backward()
        optimizer_g.step()
Transfer Learning
Transfer learning involves using pre-trained models and fine-tuning them on your specific dataset. This technique is beneficial when you have limited data or resources.
Fine-Tuning a Pre-Trained Model
You can fine-tune a pre-trained model like CLIP for better performance on your specific text-to-image tasks.
from transformers import CLIPTextModel

# Load a pre-trained CLIP model
model = CLIPModel.from_pretrained("openai/clip-vit-base-patch32")

# Fine-tuning setup
model.train()
optimizer = torch.optim.Adam(model.parameters(), lr=0.0001)

# Fine-tuning loop
for epoch in range(num_epochs):
    for batch in dataloader:
        inputs = processor(batch["text"], return_tensors="pt", padding=True)
        outputs = model(**inputs)
        loss = criterion(outputs.logits, batch["labels"])
        loss.backward()
        optimizer.step()
Combining Models
Combining different models can enhance the capabilities of text-to-image generation. For example, you can use a combination of CLIP and GANs for better results.
Hybrid Model Example
Here’s how you can set up a hybrid model combining CLIP and GAN:
# Generate text embeddings using CLIP
text_embeddings = clip_model.encode_text(tokens)

# Use embeddings in GAN
fake_images = generator(text_embeddings)

# Training steps similar to previous GAN setup
Practical Applications
Text-to-image generation has numerous practical applications:
- Content Creation: Automatically generate images for blogs, articles, and marketing materials.
- Design and Art: Assist artists and designers in visualizing their ideas.
- Education: Create visual aids and interactive content for educational purposes.
- Virtual Worlds: Generate assets for video games and virtual reality environments.

Example Project: Automated Story Illustration
Let’s create a project that automatically illustrates a story. We will input a story and generate images for each scene.
story = [
    "Once upon a time, in a small village surrounded by mountains.",
    "A young girl discovered a hidden cave filled with sparkling gems.",
    "She decided to explore further, lighting her way with a torch.",
]

# Generate and display images for each scene
for scene in story:
    image = generate_image(scene)
    image_np = image.squeeze().permute(1, 2, 0).detach().numpy()
    plt.imshow(image_np)
    plt.axis('off')
    plt.show()
Stable Diffusion Model
If you’re looking to use an advanced image generation model without relying on OpenAI, one of the best alternatives is the latest version of Stable Diffusion. We’ll use the diffusers library from Hugging Face, which provides access to state-of-the-art models for text-to-image generation.
Step-by-Step Guide for Using the Latest Stable Diffusion Model
Set Up Your Environment
Ensure you have the necessary libraries installed. You’ll need diffusers, torch, and transformers.
Load the Pre-trained Model
Use the diffusers library to load the latest Stable Diffusion model.
Generate the Image
Use the text-to-image pipeline provided by the model.
Example Code with Advanced Features
Use the following code to generate images with advanced features:
from diffusers import StableDiffusionPipeline
import torch
from PIL import Image, ImageEnhance

# Load the pre-trained Stable Diffusion model
model_id = "stabilityai/stable-diffusion-2-1"
device = "cuda" if torch.cuda.is_available() else "cpu"

pipe = StableDiffusionPipeline.from_pretrained(model_id)
pipe = pipe.to(device)

# Function to generate images with advanced features
def generate_images(
    prompt,
    negative_prompt=None,
    num_images=1,
    image_size=(512, 512),
    guidance_scale=7.5,
    num_inference_steps=50
):
    images = []
    with torch.autocast(device):
        for _ in range(num_images):
            result = pipe(
                prompt,
                negative_prompt=negative_prompt,
                guidance_scale=guidance_scale,
                width=image_size[0],
                height=image_size[1],
                num_inference_steps=num_inference_steps
            )
            images.append(result.images[0])

    return images

# Apply styles (example function to apply basic styles using PIL)
def apply_styles(images, styles):
    styled_images = []
    for img in images:
        styled_img = img
        for style in styles:
            if style == "enhance_color":
                enhancer = ImageEnhance.Color(styled_img)
                styled_img = enhancer.enhance(1.5)
            elif style == "enhance_contrast":
                enhancer = ImageEnhance.Contrast(styled_img)
                styled_img = enhancer.enhance(1.5)
            elif style == "grayscale":
                styled_img = styled_img.convert("L")
            # Add more styles as needed
        styled_images.append(styled_img)
    return styled_images

# Example usage
prompt = "A futuristic cityscape with flying cars and neon lights at sunset"
negative_prompt = "blurry, low quality"
num_images = 3
image_size = (768, 768)  # Larger image size for higher resolution
guidance_scale = 7.5
num_inference_steps = 50

# Generate images
images = generate_images(prompt, negative_prompt, num_images, image_size, guidance_scale, num_inference_steps)

# Save and display original images
for i, img in enumerate(images):
    img.save(f"generated_image_{i+1}.png")
    img.show()

# Define styles to apply
styles = ["enhance_color", "enhance_contrast", "grayscale"]

# Apply styles to the images
styled_images = apply_styles(images, styles)

# Save and display styled images
for i, img in enumerate(styled_images):
    img.save(f"styled_image_{i+1}.png")
    img.show()
Explanation of Features
Generate Images Function
The generate_images function receives inputs such as the prompt, negative prompt, number of images to create, image size, guidance scale, and the number of inference steps. It utilizes the Stable Diffusion pipeline to produce the desired images.
Apply Styles Function
The apply_styles function adds a set of pre-established styles to every generated image. These styles may involve improving color, enhancing contrast, and changing to grayscale, as shown in this example. You can expand this function to include morecomplex styles if required.
Usage Example
The prompt and negative_prompt are used to guide the image generation. Several images are created with the specified resolution and then saved and displayed. Styles are applied to the generated images, and the styled images are also saved and displayed.
Advanced Settings
Guidance Scale and Inference Steps
These parameters determine the level of accuracy to the text prompt and the quality of the generated images. Higher values generally enhance adherence and quality but require more computational resources.
Styles
The example styles use basic image enhancements from the PIL library. More sophisticated styles can be incorporated, such as using neural style transfer models or applying custom filters.
This approach provides a comprehensive framework for generating high-quality images from text using the latest Stable Diffusion model, with additional features for customization and style application.
Important Notes
- For the best performance, make sure you have access to a GPU, as the Stable Diffusion model requires significant computational resources.
- You can add more styles and transformations by expanding the
apply_stylesfunction with more image processing techniques. - For better control and flexibility, you can summarize these functions into a class or a larger framework, particularly when incorporating them into a larger application.
This complete version provides a strong and flexible framework for generating high-quality images from text using the Stable Diffusion model, with additional features for customization and style application.
Conclusion
Creating images from text using Python is an exciting ability that offers endless creative options. Understanding the techniques and using advanced features helps you make beautiful visuals from written descriptions. If you’re a developer, artist, or researcher, Python’s wide range of libraries and tools can help you turn your ideas into reality more easily than ever before.
Don’t forget to try out various models, adjust them to fit your needs, and discover the many possibilities of text-to-image generation. With practice and imagination, you can create impressive outcomes that enhance your projects and engage your audience.


")


[…] Abstractive summaries tend to be more fluent and readable. The generated text flows naturally because it is written […]
[…] python. Those who wants to build an AI-generated images from text using python can visit this page: How to Generate Images from Text Using Python. Now it’s time to build our most advanced AI-generated images from text using HTML/CSS and […]