
How to Install Python and Run Your First Program in Just 5 Minutes
Introduction
Python is one of the most beginner-friendly programming languages, and that’s a big reason why it’s so popular. Whether you’re interested in web development, data science, automation, or AI, Python is a great place to start. It has a simple syntax, a massive community, and works on almost any operating system. In this guide, you’ll learn how to install Python and run your first Python script in just a few minutes. Let’s get started!
Step 1: Download and Install Python
Check if Python is Already Installed
Before installing Python, let’s check if it’s already on your system. Open your terminal (Mac/Linux) or command prompt (Windows) and type:
python --version
or
python3 --version
If Python is installed, you’ll see an output like this:
Python 3.x.x
If you get an error or no version is displayed, that means Python isn’t installed, and you’ll need to install it manually. Let’s do that next!
Download Python from the Official Website
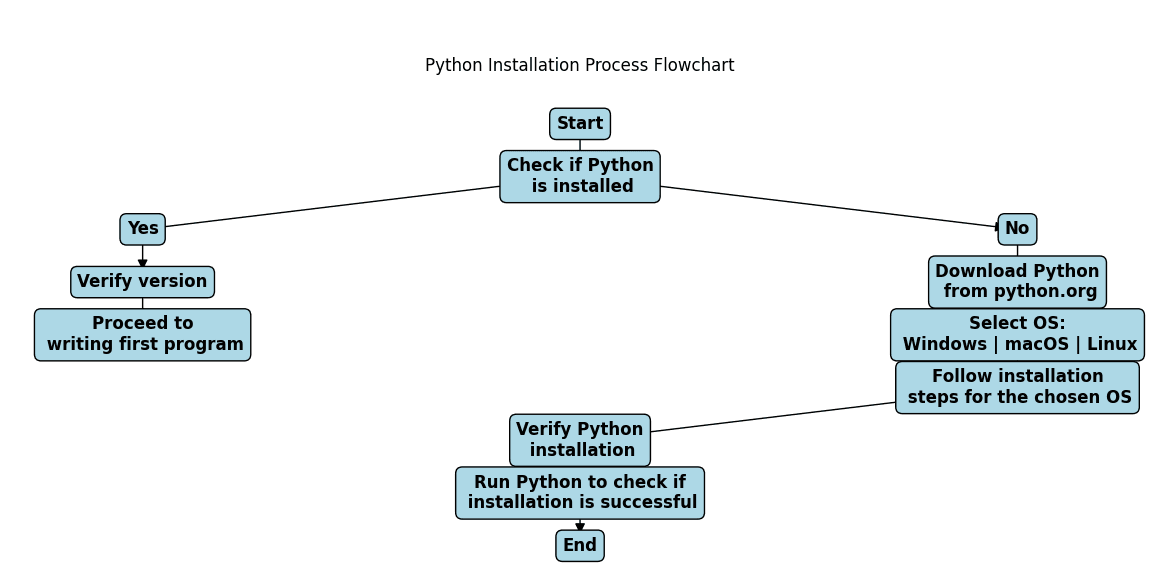
To install Python, you’ll need to download the latest version from the official Python website:
Let’s go through the process step by step for Windows, macOS, and Linux.
Windows Users
- Visit the Python Download Page: Go to python.org/downloads and click the big yellow “Download Python 3.x.x” button.
- Run the Installer: Locate the downloaded file (usually in the “Downloads” folder) and double-click it to open.
- Enable “Add Python to PATH”: Before clicking “Install Now,” check the box that says “Add Python to PATH.” This is important because it allows you to run Python from the command prompt without extra configuration.
- Start Installation: Click “Install Now”, and wait for the installation to complete.
- Verify Installation: Open Command Prompt (
Win + R, typecmd, and press Enter), then type: bashCopyEdit
python --version
If Python is installed correctly, you’ll see an output like:
Python 3.x.x
macOS Users
- Download Python: Visit python.org/downloads and download the macOS installer (.pkg file).
- Open the Installer: Locate the downloaded file (usually in the “Downloads” folder) and double-click it to open the installation wizard.
- Follow Installation Steps: Click “Continue” and follow the on-screen instructions.
- Verify Installation: Open Terminal (
Cmd + Space, typeTerminal, and press Enter), then run:
python3 --version
If Python is installed correctly, you should see:
Python 3.x.x
Linux Users
Most Linux distributions come with Python pre-installed. But if you need to install or update it, follow these steps:
- Check if Python is Installed:
Open a terminal and type:
python3 --version
If you see something like Python 3.x.x, you’re good to go! If not, install it using the following commands based on your Linux distribution:
2. Install Python on Ubuntu/Debian:
sudo apt update && sudo apt install python3
3. Install Python on Fedora:
sudo dnf install python3
4. Install Python on Arch Linux:
sudo pacman -S python
5. Verify Installation: After installation, run:
python3 --version
You should see:
Python 3.x.x
Now that Python is installed, let’s move on to running your first Python program!
Step 3: Run Your First Python Program

Now that Python is installed, let’s write and run your first program! There are two main ways to run Python code:
- Using the Python Interactive Shell (for quick testing)
- Writing a Python Script (for saving and running later)
Using the Python Interactive Shell
The Python Interactive Shell (also called the REPL) lets you run Python commands one at a time. This is great for quick tests and debugging.
Steps to Open the Python Shell:
- Open Command Prompt (Windows) or Terminal (Mac/Linux).
- Type:
python
(If this doesn’t work, try python3 instead.)
3. You should see something like this:
Python 3.x.x (default, YYYY-MM-DD)
Type "help", "copyright", "credits" or "license" for more information.
>>>
4. Now, type this simple command and press Enter:
print("Hello, Python!")
5. You should see the output:
Hello, Python!
6. To exit the shell, type:
exit()
or press Ctrl + Z (Windows) / Ctrl + D (Mac/Linux).
Writing a Python Script (.py File)
If you want to save your code and run it later, you need to write a Python script (a .py file).
Steps to Create and Run a Python Script:
- Open a Text Editor
You can use any text editor, such as:- VS Code (Recommended)
- Notepad++
- Nano (Linux)
- Built-in Notepad (Windows)
- Write Your First Python Program
Type the following code:
print("Welcome to Python programming!")
3. Save the File
- Click File > Save As…
- Name the file first_program.py
- Make sure to save it in a folder where you can easily find it.
4. Run the Script
- Open Command Prompt (Windows) or Terminal (Mac/Linux).
- Navigate to the folder where you saved the file using
cd:
cd path/to/your/file
(For example, if your file is in Documents/Python, use cd Documents/Python.)
Run the script with:
python first_program.py
(If this doesn’t work, try python3 first_program.py.)
5. See the Output!
You should see:
Welcome to Python programming!
Must Read
- ML Model Monitoring: How to Detect Data Drift and Model Decay in Production
- Retrain vs Fine-Tune vs Train from Scratch: A Decision Framework for ML Engineers
- Continual Learning in PyTorch: A Practical Guide for ML Engineers
- Online Learning Machine Learning: Building Real-Time Streaming Systems in Python
- How to Prevent Catastrophic Forgetting in PyTorch (Complete Guide)
Step 4: Set Up a Python IDE (Optional but Recommended)
While you can write and run Python programs using a basic text editor and terminal, using an IDE (Integrated Development Environment) makes coding easier. An IDE provides syntax highlighting, auto-completion, debugging tools, and better organization.
Best Python IDEs for Beginners
Here are three great options for beginners:
IDLE (Built-in Python IDE)
- Comes pre-installed with Python.
- Simple and easy to use for small scripts.
- To open it, just type
idlein the command prompt (Windows) or terminal (Mac/Linux). - Best for learning and quick testing, but lacks advanced features.
VS Code (Recommended for Beginners & Pros)
- Lightweight, powerful, and free.
- Supports extensions for Python, Git, and more.
- To install:
- Download from VS Code’s official website.
- Install the Python extension from the VS Code Marketplace.
PyCharm Community Edition (For Serious Python Development)
- Designed specifically for Python.
- Great for large projects and debugging.
- To install:
- Download PyCharm Community Edition (free) from JetBrains’ website.
- Install and open PyCharm, then create a new Python project.
Running Python Programs in an IDE
Running Python in VS Code
- Open VS Code and install the Python extension (if not already installed).
- Open your Python script:
- Click File > Open Folder and select the folder where your
.pyfile is saved. - Click on the
.pyfile to open it in VS Code.
- Click File > Open Folder and select the folder where your
- Run the script:
- Click the Run button (▶️ at the top right) OR
- Press
Ctrl + Shift + Pand typeRun Python File in Terminal. - You’ll see the output in the Terminal window below.
Running Python in PyCharm
- Open PyCharm and create a new project.
- Open your Python script:
- Click File > Open and select your
.pyfile.
- Click File > Open and select your
- Run the script:
- Click Run > Run… and select your script OR
- Press
Shift + F10. - The output will appear in the Run window at the bottom.
Why Use an IDE?
Using an IDE makes writing, debugging, and running Python code much easier. If you’re serious about learning Python, setting up an IDE is a great step!
Step 5: Troubleshooting Common Installation Issues
Sometimes, after installing Python, you might run into issues when trying to use it. Here’s how to fix some of the most common problems.
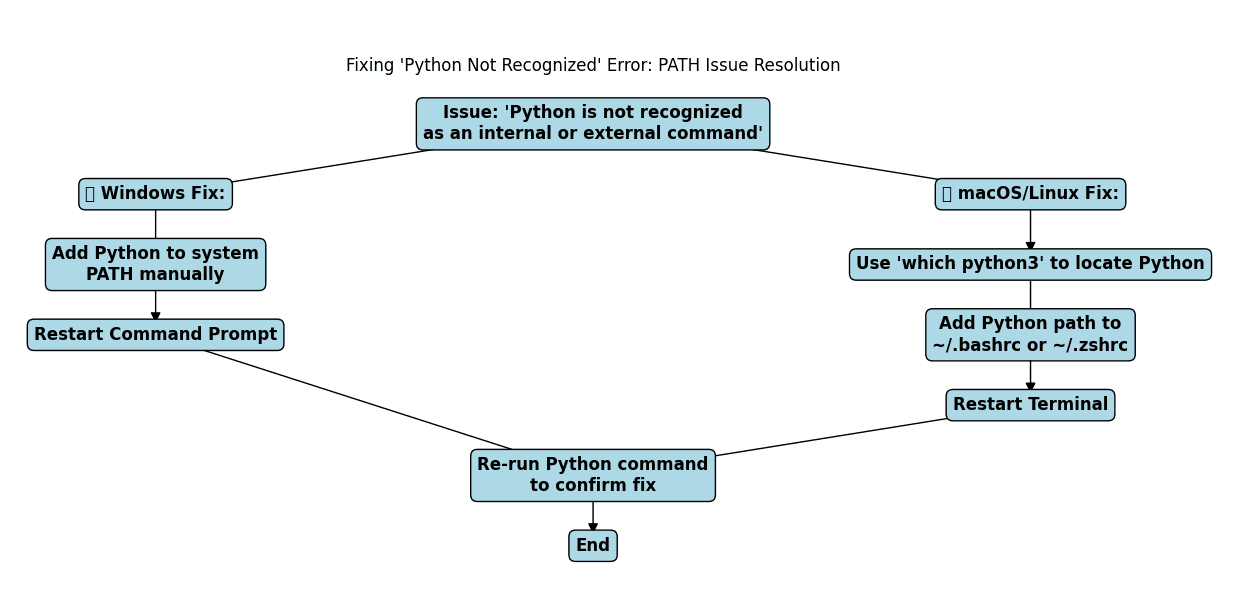
Python Not Recognized in Command Line
If you see an error like this when running python in the command prompt (Windows) or terminal (Mac/Linux):
'python' is not recognized as an internal or external command, operable program, or batch file.
or
command not found: python
it means Python isn’t added to your system’s PATH. Here’s how to fix it:
🛠 Fix on Windows:
- Check if Python is Installed Correctly
- Open Command Prompt (
Win + R, typecmd, and press Enter). - Type:
- Open Command Prompt (
where python
- If Python is installed but not found in the PATH, you’ll need to manually add it.
Add Python to PATH (Windows 10/11)
- Open Settings > System > About.
- Click Advanced system settings on the right.
- Click Environment Variables.
- Under System Variables, find and select
Path, then click Edit. - Click New, then add the path to your Python installation (e.g.,
C:\Python39\orC:\Users\YourUsername\AppData\Local\Programs\Python\Python39\). - Click OK and restart your computer.
Check if Python Works
- Open Command Prompt again and type:
python --version
You should see something like:
Python 3.x.x
Fix on macOS/Linux:
- Check if Python is Installed
- Open Terminal and type:
which python
If nothing appears, try:
which python3
2. Use python3 Instead
- On macOS and some Linux systems, Python 2 and Python 3 are both installed.
- Always use:
python3 --version
- If Python 3 is installed but
pythonstill runs Python 2, you can setpythonto use Python 3:
alias python=python3
Running Python 2 Instead of Python 3
On some older systems, running python might start Python 2, which is outdated.
🛠 Fix on Windows:
- Use
python --versionto check which version is running. - If Python 2 appears, try running
python3instead:
python3 --version
If that works, you can update your system to use python instead of python3:
- Open Command Prompt as Administrator.
- Type:
py -3
- If Python 3 runs, update your system’s PATH (see Step 5.1).
🛠 Fix on macOS/Linux:
- Always use
python3instead ofpython. - If you want
pythonto default to Python 3, set an alias:
alias python=python3
- To make it permanent, add this line to your ~/.bashrc or ~/.zshrc file:
echo "alias python=python3" >> ~/.bashrc
Then restart your terminal.
Final Check: Confirm Python Installation
Once you’ve fixed the issues, run:
python --version
or
python3 --version
If you see Python 3.x.x, you’re good to go!
Conclusion
You’ve successfully installed Python and run your first script! 🎉 Let’s quickly recap what we covered:
- Checked if Python is installed on your system.
- Downloaded and installed Python from the official website.
- Ran Python in the interactive shell and wrote your first script.
- Set up an optional IDE for better coding experience.
- Troubleshot common issues like PATH errors and Python version conflicts.
This is just the beginning of your Python journey! Now that you have Python up and running, here are some great next steps:
➡ Learn Python basics: Explore concepts like variables, loops, functions, and lists.
➡ Write more Python scripts: Automate tasks, build small programs, and get hands-on practice.
➡ Explore Python frameworks: Start with Flask for web development, Pandas for data analysis, or TensorFlow for AI.
Ready to take the next step? Check out our guide on Python Basics for Beginners to continue your learning!
FAQs
1. How can I check if Python is already installed on my computer?
2. Which Python version should I install?
3. How do I run a Python script after installation?
.py extension, then open the Command Prompt or Terminal, navigate to the file location, and run the script by typing “python” followed by the filename.


")


Leave a Reply