

How to Set Up CI/CD for Your Python Projects Using Jenkins
Introduction
Let’s say you are writing a Python project. You write some code, save it, and then test it to make sure it works. But doing this every time can be boring and slow.
What if a robot could do this for you?
That’s what CI/CD does.
What is CI/CD?
CI/CD is short for:
- CI = Continuous Integration
- CD = Continuous Delivery
Don’t worry about the big words. Here’s what they really mean:
- CI means your code is automatically tested when you change it.
- CD means your code is automatically shared or deployed after it’s tested.
So, instead of doing everything by hand, a computer can do it for you!
What is Jenkins?
Jenkins is a free tool that helps you with CI/CD. It works like a robot assistant. When you change your code, Jenkins can:
- Check if your code has mistakes
- Run your tests
- Send your code to the server
You just set it up once, and Jenkins keeps helping you every time.
In this blog post, I will teach you how to set up Jenkins for your Python project. You don’t need to be an expert. We’ll do it step by step.

What You Need Before Creating a Jenkins CI/CD Pipeline for Python
Before we start building a Jenkins CI/CD pipeline, let’s make sure you have everything ready. Here’s what you need before creating a Jenkins CI/CD pipeline for Python:
1. Python Environment Installed
You need Python on your computer. If you’re not sure, open a terminal and type:
python --version
If it shows a version like Python 3.10.0, you’re good. If not, you can download Python here.
2. Git and GitHub (or any Git Repository)
Git helps you track your code. GitHub is where your code can live online.
- Install Git from git-scm.com
- Create a free GitHub account at github.com
You should know a few basic Git commands like:
git init
git add .
git commit -m "My message"
git push
3. Jenkins Installed (Locally or on a Server)
Jenkins is the tool we’ll use to build the CI/CD pipeline.
You can:
- Install Jenkins on your own computer (localhost)
- Or use a server (like AWS, DigitalOcean, etc.)
You can follow the official guide at jenkins.io.
4. Basic Knowledge of Python Scripting and Git
You don’t need to be a pro, but you should know:
- How to write simple Python scripts
- How to push code to GitHub
- and How to open and use a terminal or command prompt
How to Install Jenkins for CI/CD with Python
Now that you know what you need, let’s set up Jenkins. Jenkins is the tool that will help us build the CI/CD pipeline for your Python project.
You don’t need to worry — we’ll keep things easy!
Installing Jenkins on Ubuntu, Windows, or Mac
You can install Jenkins on any system you’re using. Here are simple guides for each:
- Ubuntu:
Follow this guide: Install Jenkins on Ubuntu
Use the terminal and follow the steps to update, add Jenkins, and start it. - Windows:
Go here: Install Jenkins on Windows
Just download the installer and follow the setup wizard. - Mac:
Use Homebrew if you have it installed:
brew install jenkins-lts
- Or check this guide: Install Jenkins on Mac
Once Jenkins is installed, open your browser and go to:
http://localhost:8080
You’ll see the Jenkins login or setup page.
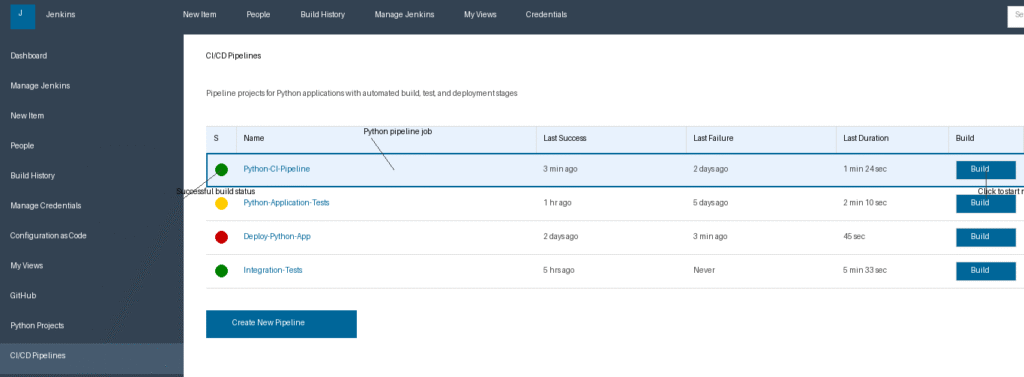
Jenkins Dashboard Overview
After logging in, you’ll see the Jenkins dashboard.
Here’s what you’ll find:
- New Item: Create a new job or project
- Manage Jenkins: Settings and updates
- Build History: See past builds
- People: See users
- My Views: Organize your projects
You’ll spend most of your time creating jobs and checking build results here.
Installing Required Jenkins Plugins for Python Projects
To work with Python and Git, you’ll need a few plugins.
Here’s how to install them:
- Click “Manage Jenkins”
- Select “Manage Plugins”
- Go to the Available tab
- Search for and install these:
- Git Plugin
This lets Jenkins pull your code from GitHub or any Git repo. - Pipeline Plugin
This helps you write CI/CD steps using a special script called aJenkinsfile. - Blue Ocean (Optional but Helpful)
This gives you a cleaner and easier-to-use interface for pipelines.
Once installed, restart Jenkins if asked.
That’s it!
You’ve installed Jenkins and added the tools you need for working with Python.
Next, we’ll connect Jenkins to your Python project and set up your first pipeline.
Setting Up a Python Project for Jenkins CI/CD
Let’s now prepare your Python project for Jenkins. We’ll create a sample project, add a test, and connect it to GitHub.
This way, Jenkins can watch your code, test it, and build it when changes are made.
Step 1: Creating a Sample Python Project
Create a new folder for your project. Inside it, add these 3 files:
main.py
def add(a, b):
    return a + b
test_sample.py
We’ll use Python’s built-in testing tool called unittest.
import unittest
from main import add

class TestAddFunction(unittest.TestCase):
    def test_add(self):
        self.assertEqual(add(2, 3), 5)

if __name__ == "__main__":
    unittest.main()
You can also use pytest if you prefer. Just change the test style and run
pytestinstead.
requirements.txt
This tells Jenkins what Python packages are needed.
unittest
(If you’re using pytest, write pytest instead.)
Step 2: Connect Jenkins to Your GitHub Repository
Now let’s put your project on GitHub and connect it to Jenkins.
Steps:
- Push your code to GitHub
Create a GitHub repo and push your files using these commands:
git init
git add .
git commit -m "Initial commit"
git remote add origin https://github.com/your-username/your-repo.git
git push -u origin master
2. Open Jenkins
Go to your Jenkins dashboard:http://localhost:8080
3. Create a New Item
- Click “New Item”
- Choose “Pipeline”
- Give it a name and click OK
4. Connect to GitHub
- In the project settings, go to “Pipeline”
- Under “Definition”, select Pipeline script from SCM
- Choose Git
- Paste your GitHub repo URL
Step 3: Configure Webhooks (So Jenkins Knows When You Push Code)
Webhooks tell Jenkins when something changes in your repo.
- Go to your GitHub repo
- Click Settings → Webhooks → Add Webhook
- Enter this URL:
http://your-jenkins-url/github-webhook/
4. Set Content type to application/json
5. Choose “Just the push event”
6. Click Add webhook
Now every time you push code, GitHub tells Jenkins to build it!
Step 4: Add Your GitHub Credentials in Jenkins
If your repo is private, Jenkins needs permission to access it.
- In Jenkins, go to “Manage Jenkins → Credentials”
- Choose “(global)” → Add Credentials
- Select:
- Username and Password (your GitHub login)
- Or Personal Access Token if using tokens
- Save it and use it in your pipeline settings
Now your Python project is ready. Jenkins can:
- Get your code
- Run tests
- Build it every time you update it
Next, we’ll set up your first Jenkins pipeline using a Jenkinsfile.
Let’s do it step by step.
Must Read
- PyTorch Debugging Checklist: A Systematic Framework to Fix Models That Won’t Learn
- Why sorted() Is Safer Than list.sort() in Production Python Systems
- Monotonic Sequence in Python: 7 Practical Methods With Edge Cases, Interview Tips, and Performance Analysis
- How to Check if Dictionary Values Are Sorted in Python
- Check If a Tuple Is Sorted in Python — 5 Methods Explained
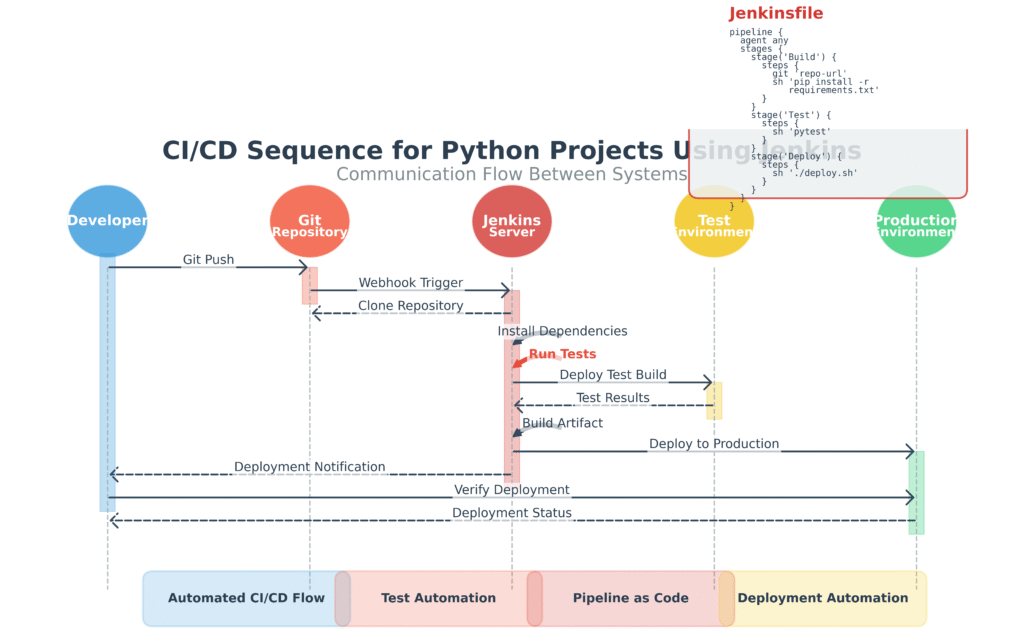
Writing a Jenkins Pipeline Script (Jenkinsfile) for Python
Understanding Jenkinsfile for Python CI/CD
Now that your Python project is ready and connected to Jenkins, we’re all set to move on to the next step — writing the Jenkins pipeline using a Jenkinsfile.
This will tell Jenkins exactly what to do each time you push your code (like install packages, run tests, etc.).
This means every time you push new code, Jenkins knows what to do — without you clicking buttons.
pipeline {
    agent any

    stages {
        stage('Clone Repo') {
            steps {
                git 'https://github.com/username/repo-name.git'
            }
        }

        stage('Install Dependencies') {
            steps {
                sh 'pip install -r requirements.txt'
            }
        }

        stage('Run Tests') {
            steps {
                sh 'pytest'
            }
        }

        stage('Build & Deploy') {
            steps {
                echo 'Deploying application...'
                // Your deployment logic here
            }
        }
    }
}
Let’s break it down:
1. pipeline { ... }
This is like the start and end of your recipe. Everything you want Jenkins to do goes inside these curly braces {}.
2. agent any
This tells Jenkins where to run your tasks.
“Any” means Jenkins can use any available computer or server to do the job.
3. stages { ... }
This is where the main steps of your recipe live. Each stage is a part of the whole process.
You have four stages here:
- Clone your code
- Install Python packages
- Run tests
- Build and deploy your app
4. Stage 1: Clone Repo
stage('Clone Repo') {
    steps {
        git 'https://github.com/username/repo-name.git'
    }
}
This step tells Jenkins:
“Go to this GitHub address and get the latest copy of the code.”
It’s like getting your ingredients ready before cooking.
5. Stage 2: Install Dependencies
stage('Install Dependencies') {
    steps {
        sh 'pip install -r requirements.txt'
    }
}
Here Jenkins runs a command (sh means “run shell command”) to install the Python packages your project needs.requirements.txt lists these packages.
So Jenkins makes sure the computer has all the right tools before testing.
6. Stage 3: Run Tests
stage('Run Tests') {
    steps {
        sh 'pytest'
    }
}
This step runs your tests using pytest.
Tests check if your code works correctly.
If a test fails, Jenkins will stop here and tell you something is wrong.
7. Stage 4: Build & Deploy
stage('Build & Deploy') {
    steps {
        echo 'Deploying application...'
        // Your deployment logic here
    }
}
This is where Jenkins gets your code ready to share or use in the real world.
Right now, it just prints a message.
You can add more steps here to send your app to a server or cloud.
Why is this useful?
- You don’t have to test and build your code by hand every time.
- Jenkins does it automatically when you push new code.
- It saves you time and catches errors early.
Running and Monitoring Your Python CI/CD Pipeline in Jenkins
Once your Jenkins pipeline (Jenkinsfile) is ready, you want to run it automatically and watch how it works.
How to Trigger Builds Automatically
Jenkins needs to know when to start building your project. There are two common ways:
1. Using Webhooks (Recommended)
- Webhooks are messages sent from GitHub to Jenkins.
- Every time you push new code, GitHub sends a webhook to Jenkins.
- Jenkins then starts the build right away.
How to set it up:
- Go to your GitHub repo settings → Webhooks → Add webhook.
- Add your Jenkins URL like:
http://your-jenkins-url/github-webhook/
- Set content type to
application/jsonand choose “Just the push event.”
2. Using Polling SCM (Less efficient)
- Jenkins checks your GitHub repo every few minutes.
- If it finds new changes, it starts a build.
- This is slower and uses more resources.
How to set it up:
- In your Jenkins project, go to Build Triggers.
- Check Poll SCM and set a schedule (e.g.,
H/5 * * * *means every 5 minutes).
Monitoring Build Results and Logs in Jenkins
- After a build runs, you can see if it passed or failed on the Jenkins dashboard.
- Click the build number to see detailed logs.
- Logs show you every step Jenkins did, so you can find errors easily.
Interpreting Test Results
- If your tests pass, Jenkins marks the build as successful.
- If tests fail, the build is marked failed or unstable.
- You can open the test report to see which tests failed and why.
Troubleshooting Common Pipeline Errors
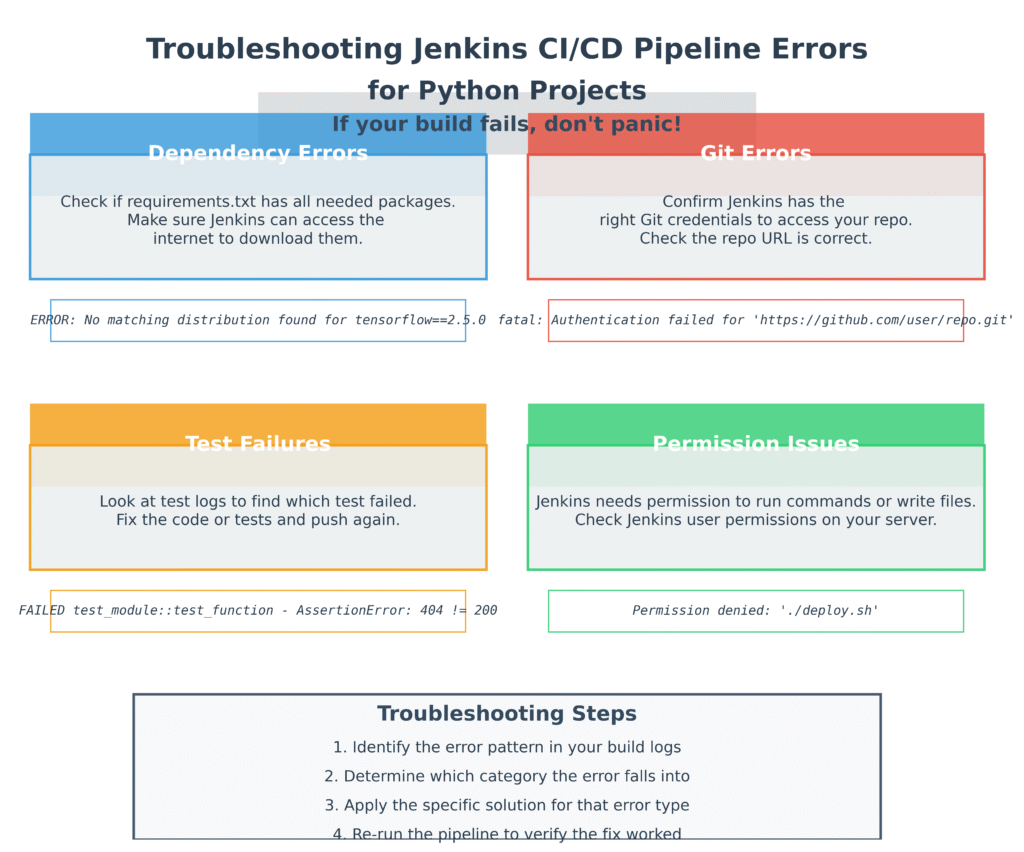
If your build fails, don’t panic! Here are some common issues:
- Dependency Errors:
Check ifrequirements.txthas all needed packages.
Make sure Jenkins can access the internet to download them. - Git Errors:
Confirm Jenkins has the right Git credentials to access your repo.
Check the repo URL is correct. - Test Failures:
Look at test logs to find which test failed.
Fix the code or tests and push again. - Permission Issues:
Jenkins needs permission to run commands or write files.
Check Jenkins user permissions on your server.
With these tips, you can easily run, watch, and fix your Python CI/CD pipeline in Jenkins.
Advanced Jenkins CI/CD Tips for Python Developers
How to Use Virtualenv or venv with Jenkins Python Pipelines
When Jenkins runs your Python code, it’s best to keep the environment clean.
Using virtual environments like virtualenv or venv helps Jenkins install packages only for your project, without messing with other projects or system-wide Python.
How to use it in Jenkinsfile:
Before installing packages, add these steps:
stage('Setup Virtualenv') {
    steps {
        sh 'python3 -m venv venv'
        sh '. venv/bin/activate'
        sh 'pip install -r requirements.txt'
    }
}
This way, Jenkins works inside the virtual environment, making your pipeline safer and more reliable.
Integrating Code Coverage Tools in Python CI/CD
It’s important to check how much of your code is tested.
Tools like coverage.py help you see which parts of your Python code are covered by tests.
Steps to add coverage:
- Install coverage with pip:
pip install coverage - Run tests with coverage:
coverage run -m pytest - Generate report:
coverage reportorcoverage html
In Jenkins, you can publish these reports for easy viewing.
Publishing Coverage Reports in Jenkins
- Use Jenkins plugins like Cobertura or HTML Publisher.
- After your tests run with coverage, configure Jenkins to show the report in the build results.
- This helps you quickly spot parts of your code that need more tests.
Automate Deployment for Python Web Apps Using Jenkins CI/CD
After tests pass, you can automatically deploy your app so users get the latest version without delay.
You can deploy apps built with popular Python frameworks like Flask, Django, or FastAPI.
Examples of Deployment Targets
- Heroku: Easy cloud platform for deploying apps.
- AWS: More control with services like Elastic Beanstalk or EC2.
- Docker: Package your app in a container to run anywhere.
Here’s a simple example of deployment to Heroku in your Jenkinsfile:
stage('Deploy to Heroku') {
    steps {
        sh 'heroku login'
        sh 'git push heroku main'
    }
}
Using these tips, you can make your Jenkins CI/CD pipeline more powerful, clean, and fully automatic — from testing to deployment.
Best Practices for Python CI/CD with Jenkins
1. Keep Pipeline Code Versioned
Always keep your Jenkinsfile and related scripts in your project’s Git repository.
This way, changes to your pipeline are tracked like your code, and you can easily update or fix your build process.
2. Make Builds Fast and Repeatable
Keep your builds quick by:
- Installing only what you need (use virtual environments).
- Caching dependencies if possible.
- Avoid manual steps in the pipeline.
Fast builds help you catch problems sooner.
3. Isolate Test Environments
Run your tests in a clean, separate environment so they don’t interfere with each other.
Using tools like virtualenv, venv, or Docker containers helps keep tests reliable and repeatable.
4. Run Security Scans and Linters
Add steps to your pipeline to check code quality and security.
Linters (like flake8 or pylint) catch style and error issues.
Security tools (like bandit) help find vulnerabilities in your code.
Following these practices will make your Jenkins CI/CD pipeline more reliable, easier to maintain, and safer for your Python projects.
Conclusion
Setting up CI/CD for your Python projects using Jenkins may seem tricky at first, but step by step, it becomes much easier.
With Jenkins, you can automate testing, building, and deploying your Python apps — saving you time and avoiding mistakes.
Remember to prepare your environment, write a clear Jenkinsfile, and monitor your builds carefully.
Using virtual environments, running tests with coverage, and automating deployment will make your pipeline strong and reliable.
Follow the best practices we talked about to keep your projects clean, fast, and secure.
Start small, keep learning, and soon you’ll have a smooth CI/CD process that helps your Python projects grow with confidence!
Quiz Time
Test Your CI/CD and Jenkins Knowledge
Want to make sure you’ve grasped the key concepts of Python CI/CD with Jenkins? Take this quick quiz and find out!
Your Quiz Results
Challenge Yourself: Build Your Own CI/CD Pipeline
Challenge Yourself: Build Your Own CI/CD Pipeline
You've learned how to set up a basic CI/CD pipeline for your Python project using Jenkins — now it's your turn to put that knowledge into practice.
- Create or use an existing Python project (even a simple Flask app or CLI tool).
- Write a requirements.txt file to manage dependencies.
- Create a Jenkinsfile with the following stages:
requirements.txt within the Jenkins pipeline environment.
Example in Jenkinsfile:
stage('Install Dependencies') {

          steps {

            sh 'pip install -r requirements.txt'

          }

        }
Example in Jenkinsfile:
stage('Test') {

          steps {

            sh 'python -m pytest tests/'

          }

        }
Example in Jenkinsfile:
stage('Lint') {

          steps {

            sh 'flake8 .' // or 'pylint your_package_name'

          }

        }
Example in Jenkinsfile:
stage('Package') {

          steps {

            sh 'python setup.py sdist bdist_wheel'

          }

        }
- Use Jenkins Blue Ocean for a clean pipeline view.
- (Optional) Integrate GitHub webhooks for automatic builds on push.
Take it a step further by adding:
Frequently Asked Questions (FAQs)
Frequently Asked Questions (FAQs)
stage('Test') {
    steps {
        sh 'pytest tests/'
    }
}
Just make sure you've installed pytest using pip install pytest.
- Push to a remote server using SSH
- Deploy to AWS Lambda or EC2 using the AWS CLI
- Build and push Docker images to Docker Hub or ECR
- A commit is pushed
- A pull request is created


Leave a Reply