How to Import and Use Modules in Python
Introduction
If you’ve spent any time coding in Python, you know it’s a language packed with possibilities. But what truly makes Python stand out is its extensive collection of modules. These modules allow you to access pre-built functions and tools without having to reinvent the wheel. Whether you’re handling data analysis with Pandas, or automating tasks with OS knowing how to import and use these modules is crucial.
But importing modules isn’t just about typing a few lines of code—it’s about unlocking the full potential of Python. In this guide, I’ll walk you through easily importing both built-in and custom modules. How to avoid common mistakes like import errors. And even explore some advanced techniques that will make your coding life easier.
By the end of this post, you’ll not only understand how to import modules but also how to use them like a pro. Let’s get started!
Understanding the Importance of Modules in Python
When you’re starting with Python, everything can feel a bit overwhelming. You have this vast toolkit at your disposal, and it might be tricky to know how to structure things properly. One of the things that makes Python so efficient—and keeps your code from becoming a giant, tangled mess—is modules.
Modules, in a simple sense, are like building blocks. They help you break your code into smaller, manageable pieces. Think about it: when you cook, you don’t throw everything into a single pot. Instead, you use different utensils and ingredients. Similarly, Python modules allow you to organize and reuse chunks of code across multiple projects.
What Are Python Modules?
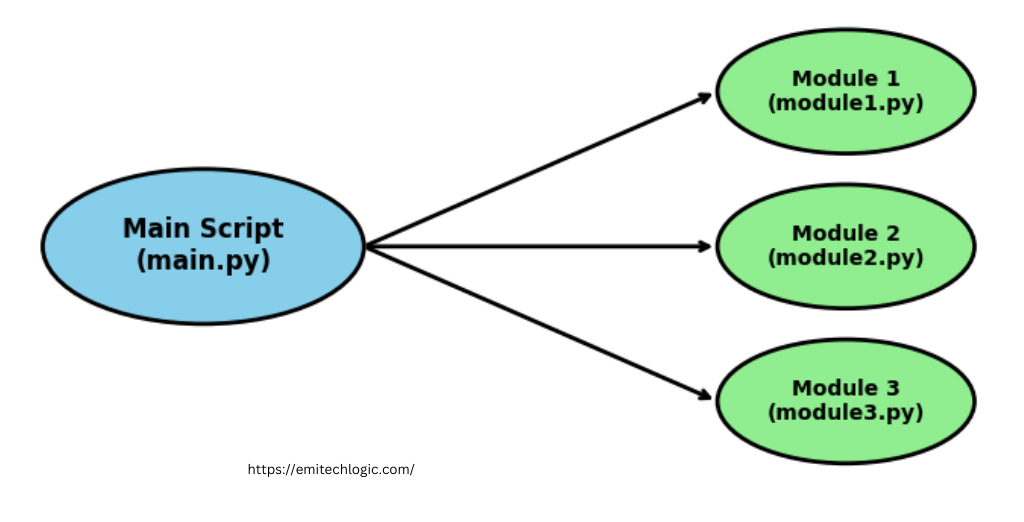
A Python module is just a file that contains Python definitions and statements. You might have functions, classes, or even variables inside a module. When you write your own code, or if you use pre-existing code from others, you can save it in a module and then call upon it whenever you need it.
For example, if you’ve created a function to calculate the area of a circle, you don’t want to rewrite that function every time. Instead, you save it as a module and simply import it when needed.
Here’s a quick example:
# Save this as circle.py
def area_of_circle(radius):
    return 3.14 * radius * radius
Now, in another script:
# main.py
import circle

radius = 5
print("Area:", circle.area_of_circle(radius))
That’s it! You’ve just reused your code by breaking it into a module. This makes life easier when projects start getting more complex.
Benefits of Using Modules in Python Programming
Using modules can significantly improve how you write Python programs. Here are some key benefits:
1. Code Reusability:
Modules help you reuse code across different projects. Whether it’s a function you wrote or a third-party module you downloaded, it’s easy to use the same logic without rewriting everything from scratch.For instance, Python has a module called math that provides useful mathematical functions like sqrt() for square root, or pow() for power calculations.
Example:
import math
print(math.sqrt(16))  # Output: 4.0
2. Organized Code:
When you’re working on a large project, things can get messy. But by organizing related functionalities into modules, it becomes easier to find and manage code.Imagine having a project with different functionalities: user authentication, database operations, and data visualization. Instead of placing all these tasks in one file, you can split them into separate modules like auth.py, db.py, and visualize.py. This way, each part has its own place.
3. Collaboration:
When multiple people work on the same project, modular code becomes essential. Each developer can focus on a specific module without worrying about affecting someone else’s work. For instance, one person can handle the database module, while another works on the user interface module. This approach allows teams to work efficiently, reducing overlap and confusion.
4. Ease of Maintenance:
Bugs happen, but with modular code, you don’t need to dig through thousands of lines of code to find and fix issues. If a bug appears in a module, you can easily isolate and fix it without touching the rest of your project.
Why Modular Code is Essential for Large Python Projects
As projects grow, modular code becomes not just a convenience, but a necessity. Without modules, a large Python project might become a web of interconnected functions and variables, hard to manage and even harder to debug.
Picture working on an app with hundreds of features—everything from user profiles to payment processing and notifications. Without organizing the code into modules, it would be nearly impossible to maintain.
Here’s an example of how a modular structure can help a large project:

In this example, we’ve organized the project into separate folders and files, each with its own purpose. This structure allows us to easily locate and modify specific parts of the code without getting lost.
Moreover, modular code makes it easy to scale your project. If you want to add a new feature, say a new payment method or notification type, you can simply create a new module without disrupting the rest of the system.
Must Read
- Monotonic Sequence in Python: 7 Practical Methods With Edge Cases, Interview Tips, and Performance Analysis
- How to Check if Dictionary Values Are Sorted in Python
- Check If a Tuple Is Sorted in Python — 5 Methods Explained
- How to Check If a List Is Sorted in Python (Without Using sort()) – 5 Efficient Methods
- How Python Searches Data: Linear Search, Binary Search, and Hash Lookup Explained
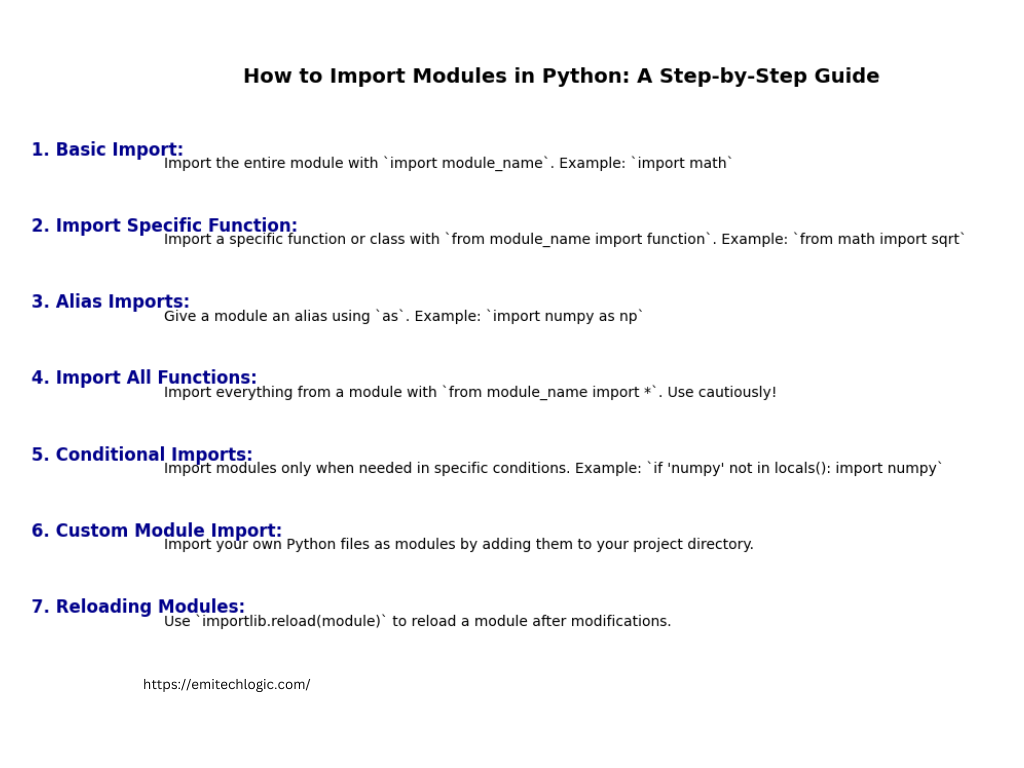
How to Import Modules in Python: A Step-by-Step Guide
One of Python’s greatest strengths is the ability to extend its functionality using modules. Whether you’re using the vast library of built-in modules or creating your own, understanding how to import them is crucial. In this section, we’ll explore the basics of importing modules, from built-in options like os and math, to creating and importing your own custom modules. We’ll also explore the benefits of using aliases, which can help make your code more readable and easier to maintain.
Importing Built-in Python Modules
Python comes with a treasure trove of built-in modules that allow us to perform various tasks without needing to install any third-party libraries. Whether it’s interacting with the operating system, performing mathematical operations, or manipulating system parameters, built-in modules save us time and effort, providing easy access to essential functionality.
Examples of Popular Built-in Python Modules
Here are a few examples of widely-used built-in Python modules:
- os: This module allows interaction with the operating system, enabling file and directory manipulations like renaming, deleting, or accessing environment variables.
- sys: With the
sysmodule, you can manipulate Python’s runtime environment, access command-line arguments, and handle system-specific parameters. - math: This is perfect for performing mathematical operations like trigonometry, logarithmic calculations, and dealing with complex numbers.
For instance, the os module could help if you wanted to automate tasks like file renaming, or the math module would be great if you need advanced calculations in your program.
How to Use the import Statement
To access these built-in modules, we use the import statement. Importing a module brings all of its functions and classes into your program, making them ready to use.
Here’s an example of how to import and use the math module:
import math

# Calculate the square root of 25
result = math.sqrt(25)
print(result)  # Output: 5.0
In this case, by importing the math module, you can directly use its sqrt() function to find the square root of a number.
Importing Multiple Modules at Once
You’re not limited to importing just one module at a time. If your program requires multiple built-in modules, Python allows you to import them together in a single line, which can make your code cleaner and more readable.
Here’s an example:
import os, sys, math

# Print current working directory using os module
print(os.getcwd())

# Access command-line arguments using sys module
print(sys.argv)

# Perform a mathematical operation
print(math.pi)
In this code, we’re importing three different modules (os, sys, and math) all at once. Each of these modules is now ready to be used within our script.
When to Use Specific Imports
Sometimes, importing an entire module may feel unnecessary, especially if you only need one or two functions from it. In such cases, specific imports can be helpful. With this approach, you import only the particular function or class you need from a module.
Let’s say we only need the sqrt() function from the math module. Instead of importing the whole math module, we can do this:
from math import sqrt

# Now you can use sqrt directly without the math. prefix
result = sqrt(16)
print(result)  # Output: 4.0
The benefit here is simplicity — the code becomes easier to read, and you avoid bringing in unnecessary functions that won’t be used.
However, you need to be careful when using specific imports in larger projects. If multiple modules have functions with the same name, this could lead to conflicts and make your code harder to maintain. For small projects or scripts, though, it’s an excellent way to keep things clean.
Importing Custom Python Modules
When working on your own projects, there’s often a need to organize your code into separate files or even custom Python modules. By creating custom modules, you can keep your code manageable, reusable, and easier to debug, especially as your project grows in complexity. Let’s walk through how to set up and import custom modules in Python, step by step.
Creating Your Own Python Modules
In Python, any .py file you create can be considered a module. It’s as simple as creating a Python file that contains functions, classes, or variables, and then importing it into other files where you need to use those elements.
For example, let’s say you have a file named mymath.py with some math functions:
# mymath.py
def add(a, b):
    return a + b

def subtract(a, b):
    return a - b
Now, you can import this mymath module into another Python script and use its functions:
# main.py
import mymath

print(mymath.add(10, 5))       # Output: 15
print(mymath.subtract(10, 5))  # Output: 5
By creating modules like this, you can reuse functions across multiple scripts, saving time and reducing duplication in your code.
File Structure for Custom Modules
If your project is relatively small, keeping modules in the same directory is fine. However, as projects get bigger, structuring them into packages and sub-packages becomes more important for clarity and maintenance.
Here’s an example of a basic project structure that uses custom modules:
my_project/
│
├── main.py
├── utilities/
│   ├── __init__.py
│   ├── mymath.py
│   └── stringutils.py
In this setup, you’ve organized your custom modules (mymath.py, stringutils.py) into a directory called utilities. The __init__.py file is used to mark utilities as a package, allowing you to import from it easily.
Now, in your main.py, you can import modules from the utilities package like this:
from utilities import mymath, stringutils

print(mymath.add(7, 3))
print(stringutils.capitalize("python"))
Organizing code into packages like this ensures that everything stays neat and easy to find, especially in larger projects.
Importing Custom Modules from Different Directories
Sometimes, you may need to import modules from a different directory. By default, Python only searches for modules in the current directory and in locations specified in the PYTHONPATH. If your module is located somewhere else, you’ll need to adjust this path or use relative imports.
For example, if you want to import a module from a sibling directory, you might modify the sys.path like so:
import sys
sys.path.append('/path/to/directory')
import mymath
Alternatively, relative imports (using . or ..) can be used when importing modules within a package. These approaches make importing custom modules easier even if they’re located in separate directories.
Using Aliases in Module Imports
Aliases in Python allow you to rename a module when importing it, making the code easier to read and write. This is particularly useful when the module name is long, or you want to avoid conflicts with other modules.
Benefits of Using Aliases with the as Keyword
One of the most common use cases for aliases is with libraries like NumPy, where the full name numpy would be too cumbersome to repeatedly type. Instead, you can import it with an alias:
import numpy as np
This allows you to reference numpy simply as np throughout your code, improving readability and reducing the chances of typing errors. For example:
import numpy as np

array = np.array([1, 2, 3, 4])
print(np.mean(array))
Using np instead of numpy makes the code cleaner without losing clarity.
Example: import numpy as np
NumPy is a perfect example of when to use an alias. Since NumPy is used extensively in data science and machine learning projects, developers often work with arrays, matrices, and mathematical operations. Typing out numpy in every line would be tedious, so the alias np has become a convention.
import numpy as np

# Create a numpy array
my_array = np.array([1, 2, 3, 4])

# Find the mean of the array
mean_value = np.mean(my_array)
print(mean_value)
In this example, the alias makes the code shorter and easier to understand while still maintaining readability.
When to Use Aliases for Readability
Aliases should be used when they enhance the readability of your code. If a module has a long name or is used frequently, an alias helps to make your code more concise. However, it’s essential to follow conventions. For example, if you’re using NumPy, np is a well-known alias that most developers understand immediately. Creating random or unclear aliases can make the code harder to follow.
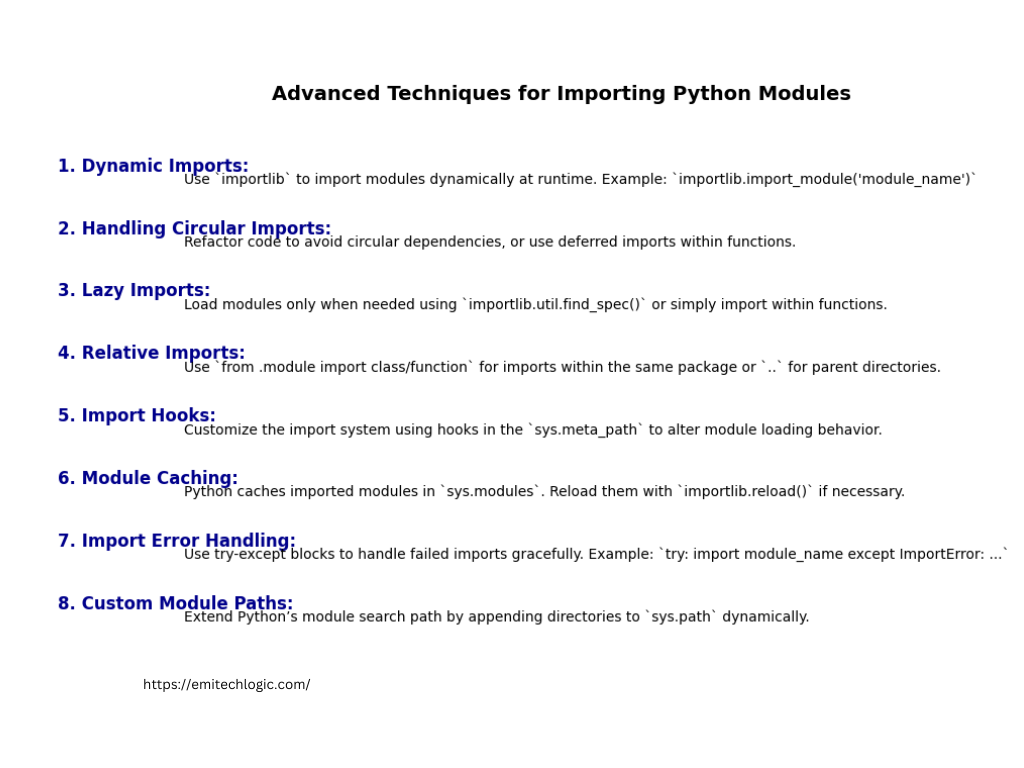
Advanced Techniques for Importing Python Modules
Importing Specific Functions or Classes from Modules
When working with Python, there are moments when you don’t need the entire module; maybe you just need a single function or class. That’s where importing specific functions or classes comes in handy. By doing so, you not only make your code more readable but also avoid loading unnecessary parts of the module into your program. This can help you keep things clean and efficient, especially for larger projects.
Syntax: from module import function_name
The syntax for importing a specific function or class from a module is quite simple. Instead of importing the entire module, you can use
from module import function_name
This allows you to directly access the specific function or class without having to refer to the module every time you call it. For instance, if you need only the sqrt() function from the math module, you can import just that:
from math import sqrt

# Now you can use sqrt directly
result = sqrt(16)
print(result)  # Output: 4.0
Here, by importing sqrt() specifically, you avoid loading the entire math module, which might contain functions you don’t need.
Advantages of Importing Specific Functions
- Cleaner Code: If you’re only using one or two functions from a module, importing just those keeps your code neater. This way, you won’t need to prefix your function calls with the module name.
Example:
# Importing the entire math module
import math
result = math.sqrt(25)

# Importing just the sqrt function
from math import sqrt
result = sqrt(25)
Notice how the second approach is more readable, especially in larger scripts.
2. Memory Efficiency: Though Python is efficient in how it manages memory, importing specific functions or classes can minimize the amount of memory used in your program. This might be more noticeable when working with larger modules.
3. Improved Readability: When you import specific parts of a module, it’s immediately clear what parts of the module are being used. If someone else reads your code (or you return to it later), it’s easier to follow the logic because it’s obvious which functions are important.
Example: Using Specific Imports from the math Module
Let’s use an example from the math module to show the difference in importing specific functions. Imagine you’re working with a program that calculates areas of different shapes. You might need functions like sqrt() or pi.
# Importing specific functions
from math import sqrt, pi

# Calculate area of a circle
radius = 5
circle_area = pi * radius * radius
print("Area of the circle:", circle_area)

# Using sqrt to calculate diagonal of a square
side_length = 10
diagonal = sqrt(2) * side_length
print("Diagonal of the square:", diagonal)
In this example, we’ve only imported sqrt and pi because they’re the only functions needed. This keeps the code tidy, without loading the entire module.
When to Use Specific Imports
Using specific imports is particularly useful when:
- You only need a few functions or classes from a module.
- Readability is important, especially in larger projects where you want to keep things clear and easy to follow.
- You want to avoid namespace conflicts, which might happen if different modules have functions with the same name. Importing specific functions makes sure you’re using exactly what you need.
However, in some cases, it may still be better to import the entire module. For instance, if you’re using many functions from a single module, it could be easier and less repetitive to import the whole thing.
Using Wildcard Imports (Not Recommended)
In Python, there’s a way to import everything from a module at once using a wildcard import. While it might seem convenient at first, wildcard imports are generally avoided for several reasons. In this section, we’ll break down what wildcard imports are, why they aren’t recommended, and the potential issues you could face when using them.
Syntax: from module import *
The syntax for a wildcard import looks like this:
from module import *
This tells Python to import all the functions, classes, and variables from the specified module. You don’t need to explicitly list what you need from the module, so it might look like a shortcut.
For example, let’s use the math module:
from math import *

result = sqrt(16)   # Using sqrt function without referencing math
print(result)  # Output: 4.0
In this case, you’ve imported all the available functions from math and can use them without specifying the module name.
Why Wildcard Imports Are Generally Avoided
While wildcard imports can save a few lines of code, they come with significant drawbacks:
- Namespace Conflicts: When you import everything from a module, you risk overwriting existing functions or variables in your program. This happens because wildcard imports dump all the names into the global namespace, which can lead to confusion and errors.
Example:
from math import *
from cmath import *  # Complex math functions

# Which sqrt function is being used here?
result = sqrt(-1)  # This may cause confusion, as both math and cmath have sqrt functions
The problem here is that both the math and cmath modules have a sqrt function, but they handle numbers differently. Without being explicit about which sqrt you’re calling, Python might use the wrong one, leading to unexpected results or errors.
2. Readability Issues: When you use wildcard imports, it’s hard for someone reading your code (or even for yourself, later on) to know where certain functions or variables came from. This makes debugging and maintaining your code more difficult.
3. Slower Performance: Although Python is smart about memory management, importing unnecessary parts of a module can slow things down, especially in large projects. When you import everything, you’re bringing in parts of the module that you may never use, which can waste both time and memory.
4. Unintended Behavior: Modules sometimes have hidden functions or variables that you don’t need to interact with. Wildcard imports can bring those into your program unintentionally, leading to unpredictable behavior or security vulnerabilities.
Examples: Potential Issues with Wildcard Imports
Let’s illustrate the issues with some examples:
- Namespace Conflict:
# File: my_module.py
def process_data():
    return "Processing data"

# Main script
from my_module import *
from data_utils import *  # Another module with a process_data function

result = process_data()  # Which one is called? This is unclear.
In this example, both my_module and data_utils might have a function named process_data. When you use wildcard imports, it’s unclear which version of process_data will be used, which could lead to unintended results.
2. Unclear Origin of Functions:
from os import *
from sys import *

# Using path function
current_path = path.abspath(".")  # Is this from os or sys?
Without knowing where the path function comes from, it becomes confusing. Explicit imports make your code much clearer:
from os.path import abspath

current_path = abspath(".")  # Now it's clear this comes from os.path
3. Unintentional Import of Unused Functions:
Suppose you only need the sqrt function from the math module, but by using a wildcard import, you bring in every function that math offers. This could lead to unnecessary memory usage and make your code less efficient.
from math import *  # You only need sqrt, but everything is imported

result = sqrt(16)
A better approach is to import just what you need:
from math import sqrt

result = sqrt(16)
Importing Modules Dynamically in Python
When coding in Python, there are times when you might not know in advance which modules your program will need. This is where dynamic imports come in handy. Rather than importing everything at the beginning, you can import modules dynamically based on certain conditions, like user input or the environment. Python makes this process easier with the importlib module, allowing more flexibility in how and when you load your modules.
In this section, we’ll explore how dynamic imports work, how to use the importlib module, and when to apply this technique in large-scale projects.
How to Use the importlib Module for Dynamic Imports
Python’s built-in importlib module allows you to import modules at runtime, providing flexibility when writing complex programs. Dynamic imports can be especially useful in situations where your program might not need certain modules unless specific actions or inputs are triggered.
The syntax for importing dynamically using importlib is:
import importlib

module_name = 'math'  # Name of the module to import
math_module = importlib.import_module(module_name)

# Now you can use functions from the dynamically imported module
result = math_module.sqrt(16)
print(result)  # Output: 4.0
In this example, instead of importing the math module at the top of the script, you dynamically import it using the importlib.import_module() function based on the variable module_name. This way, your code has more flexibility in loading only the modules you need at runtime.
When to Use Dynamic Imports in Large-Scale Projects
Dynamic imports are particularly useful in large-scale projects where you might not want to load all modules upfront. This can save resources like memory and improve the performance of your program. Let’s discuss a few scenarios where dynamic imports shine:
- Loading Modules Based on User Input: Imagine you’re building an application where users can select different processing modes. Each mode requires different modules, and loading them all at once would be inefficient. Instead, you can dynamically import only the modules related to the user’s choice.
- Plugin Systems: In large applications, you might have plugins or extensions that are optional. Dynamic imports allow you to load these only when needed, making the core of your application lighter.
- Conditional Logic: Sometimes, you need to decide which module to import based on certain conditions like platform type, network status, or the presence of specific libraries.For example:
import importlib
import platform

if platform.system() == 'Windows':
    os_module = importlib.import_module('nt')
else:
    os_module = importlib.import_module('posix')

print(os_module.name)
In this case, the program dynamically imports different operating system modules based on whether it’s running on Windows or a Unix-based system. This is helpful in writing cross-platform applications.
Example: Dynamic Import of Modules Based on User Input
Let’s walk through an example where the module to be imported depends on user input. Suppose you’re building a basic calculator where the user can choose between simple or advanced operations. If the user selects advanced operations, you’ll need to load the math module dynamically.
Here’s how you can do it:
import importlib

# Ask the user for input
operation_type = input("Choose operation type: simple or advanced: ").lower()

if operation_type == 'advanced':
    # Dynamically import the math module for advanced operations
    math_module = importlib.import_module('math')
    num = float(input("Enter a number to find its square root: "))
    print(f"The square root of {num} is {math_module.sqrt(num)}")
else:
    # For simple operations, no need to import anything extra
    num1 = float(input("Enter the first number: "))
    num2 = float(input("Enter the second number: "))
    print(f"The sum of {num1} and {num2} is {num1 + num2}")
What’s happening here:
- If the user chooses “advanced”, the program imports the
mathmodule dynamically to calculate the square root. - If the user selects “simple”, the program performs basic arithmetic without needing any additional imports.
This approach optimizes resource usage by loading the math module only when necessary, and it keeps your program more efficient.
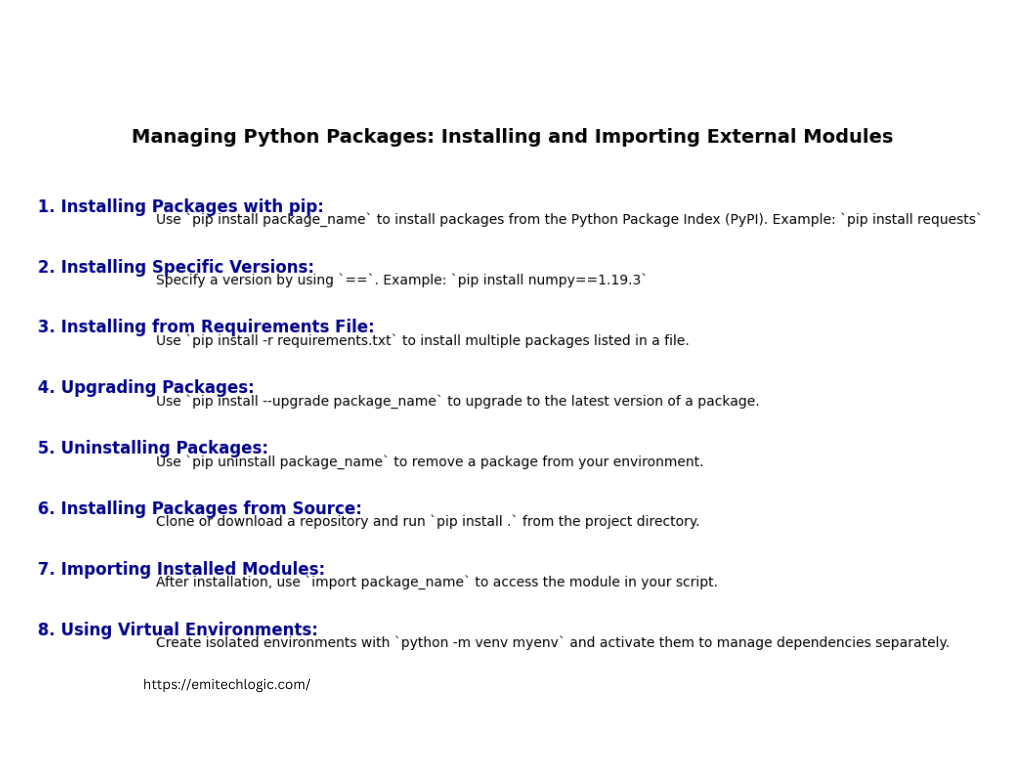
Managing Python Packages: Installing and Importing External Modules
Managing Python packages effectively is crucial for any Python developer, especially when working on larger projects. Whether you’re installing external modules or managing dependencies, understanding how to navigate these processes ensures your code runs smoothly across different environments. In this section, we’ll explore how to install Python packages using pip, the importance of virtual environments, and how to import external libraries like requests and pandas.
Installing Python Modules Using Pip
Managing Python packages is a fundamental skill for any developer, and pip is the tool that simplifies this process. Whether you’re just starting out or have been coding for a while, understanding how to use pip to install and manage Python packages is essential for efficient development. In this section, we’ll cover how to use pip to install packages, provide an example with the requests library, and touch on the broader topic of managing dependencies in Python.
How to Use Pip to Install Python Packages
Pip is the package installer for Python, and it is used to install and manage software packages written in Python. It’s included with Python installations, so you’re likely already familiar with it.
Here’s how to use pip to install a package:
- Open Your Command Line Interface: Depending on your operating system, this could be Command Prompt on Windows, Terminal on macOS, or a shell on Linux.
- Install a Package: Use the following command to install a package:
pip install package_name
Replace package_name with the name of the package you want to install.
For example, if you want to install the requests library, you would use:
pip install requests
Pip will download the package from the Python Package Index (PyPI) and install it along with any dependencies it requires.
Example: Installing the Requests Library
The requests library is a popular package that simplifies making HTTP requests. Here’s how you can install it and start using it in your Python projects:
- Install Requests:Open your command line interface and type:
pip install requests
This command will download and install the requests library.
2. Using Requests in Your Code:
After installing, you can import and use requests in your Python script like this:
import requests

response = requests.get('https://api.github.com')
print(response.status_code)  # Output the status code of the response
print(response.json())       # Print the response in JSON format
In this example, you’re using requests to make a GET request to the GitHub API. The status_code gives you the HTTP response status, and json() converts the response to a JSON format.
How to Manage Dependencies in Python
Managing dependencies is a critical part of maintaining a Python project. Dependencies are external libraries your project relies on, and keeping track of them ensures your project runs consistently across different environments. Here’s how you can manage these dependencies effectively:
- Using a Requirements File: To keep track of the packages your project depends on, you can use a
requirements.txtfile. This file lists all the packages and their versions.To create this file, you can use the following command to freeze the current environment’s packages intorequirements.txt:
pip freeze > requirements.txt
To install packages listed in requirements.txt, use:
pip install -r requirements.txt
2. Handling Version Conflicts: Sometimes, different packages might require different versions of the same library. Specifying exact versions in your requirements.txt helps avoid these conflicts. For instance:
requests==2.26.0
pandas==1.3.3
This ensures that anyone who installs your dependencies gets the exact versions that you’ve tested and confirmed to work with your project.
Working with Virtual Environments to Manage Module Versions
When working on Python projects, especially larger ones, managing different module versions can become quite tricky. Virtual environments offer a neat solution by allowing you to create isolated spaces for your projects, each with its own set of dependencies. This section will explain why virtual environments are crucial for handling module versions, how to create and activate them, and provide examples using virtualenv and venv.
Importance of Virtual Environments in Large Projects
Virtual environments are essential in Python development for several reasons:
- Isolated Dependencies: Each virtual environment acts like a separate workspace. This isolation means you can have different projects with different dependencies without conflicts. For instance, one project might need
requestsversion 2.25.0, while another project uses version 2.26.0. Virtual environments ensure that these requirements don’t clash. - Consistency Across Development and Production: When you share your code with others or deploy it, you want to ensure that it runs in the same way everywhere. Virtual environments help in maintaining consistency between your development setup and production environment, as you can specify exact package versions.
- Cleaner Development: Working within a virtual environment helps keep your global Python installation clean. Without virtual environments, every new project could clutter the global site-packages directory, potentially leading to messy and hard-to-manage installations.
How to Create and Activate Virtual Environments
Creating and managing virtual environments is straightforward. Let’s look at two popular tools: virtualenv and venv.
Using venv
venv is a module included in the Python standard library (Python 3.3 and newer) and is a great tool for creating virtual environments.
- Create a Virtual Environment:Open your terminal or command line and navigate to your project directory. Then run:
python -m venv myenv
Here, myenv is the name of the virtual environment. You can choose any name you prefer.
2. Activate the Virtual Environment:
- On Windows:
myenv\Scripts\activate
- On macOS and Linux:
source myenv/bin/activate
When activated, you’ll see the environment’s name in your terminal prompt, indicating that you’re working inside that virtual environment.
3. Deactivate the Virtual Environment:
To exit the virtual environment and return to your global Python environment, simply run:
deactivate
Using virtualenv
virtualenv is a third-party tool that provides similar functionality to venv. It is often used with older versions of Python or for additional features.
- Install
virtualenv:If you don’t havevirtualenvinstalled, you can add it usingpip:
pip install virtualenv
2. Create a Virtual Environment:
Run the following command:
virtualenv myenv
This creates a new directory called myenv with a copy of the Python interpreter and a clean environment.
3. Activate and Deactivate:The activation and deactivation commands are the same as those used with venv.
Example: Using virtualenv or venv for Isolated Development
Let’s walk through a practical example of setting up a virtual environment using venv for a project that requires specific package versions.
- Setting Up Your Project:Suppose you’re working on a data analysis project that needs
pandasversion 1.3.0. Here’s how you set up your virtual environment:
python -m venv data_analysis_env
source data_analysis_env/bin/activate  # On Windows, use data_analysis_env\Scripts\activate
2. Installing Packages:
Once the virtual environment is active, you can install pandas:
pip install pandas==1.3.0
This ensures that only pandas version 1.3.0 is installed in your isolated environment, preventing conflicts with other projects.
3. Working on Your Project:
You can now start working on your project with pandas installed. Any scripts or notebooks you run will use the packages from this virtual environment.
4. Sharing Your Project:
To ensure that others can replicate your setup, include a requirements.txt file that lists all your dependencies. Generate this file using:
pip freeze > requirements.txt
Others can then install the exact dependencies with:
pip install -r requirements.txt
Importing External Python Modules
When working on Python projects, you often need to use external libraries or modules that are not included in the standard Python library. These external modules can significantly enhance the functionality of your code. This section will guide you through the process of importing external Python modules, from installing them using pip to importing and using them in your code. We’ll also address common issues you might encounter and how to fix them.
From Pip Install to Module Import: A Complete Guide
Pip is the package installer for Python and is essential for managing external libraries. To use an external module, you first need to install it and then import it into your Python script. Here’s how you can do this step by step:
- Install the Module with Pip:Open your terminal or command line interface and use the
pip installcommand to download and install the module. For example, to install therequestslibrary, you would run:
pip install requests
Similarly, to install the pandas library, you would use:
pip install pandas
This command downloads the module from the Python Package Index (PyPI) and installs it in your environment.
2. Import the Module in Your Code:
After installation, you need to import the module to use it in your Python script. Here’s how you do it:
- Importing
requests:
import requests

response = requests.get('https://api.github.com')
print(response.status_code)
- Importing
pandas:
import pandas as pd

data = pd.read_csv('data.csv')
print(data.head())
In these examples, requests is used to make an HTTP request, and pandas is used for data manipulation.
Example: Importing External Libraries Like Requests and Pandas
Let’s walk through how to import and use two popular external libraries: requests and pandas.
- Installing and Using
requests:Therequestslibrary simplifies making HTTP requests. First, ensure it’s installed:
pip install requests
Then, you can use it in your script:
import requests

response = requests.get('https://api.github.com')
print(response.json())  # Print the JSON response from the API
This script fetches data from the GitHub API and prints it in JSON format.
2. Installing and Using pandas:
pandas is a powerful library for data analysis. Install it using:
pip install pandas
To use pandas in your code:
import pandas as pd

# Load a CSV file into a DataFrame
data = pd.read_csv('data.csv')
print(data.head())  # Print the first few rows of the DataFrame
This code reads a CSV file into a DataFrame and displays the first few rows.
How to Fix Import Errors in Python
Sometimes, you might encounter errors when importing modules. Here are some common issues and how to fix them:
- Module Not Found Error:If you see an error like
ModuleNotFoundError: No module named 'requests', it typically means that the module is not installed. To fix this, ensure you’ve installed the module correctly:
pip install requests
2. Version Conflicts:
You might face issues if different versions of a module are required by various parts of your project. Ensure you’re using compatible versions by checking the version in your requirements.txt file or using a virtual environment.
3. Incorrect Python Environment:
Ensure you’re working in the correct Python environment where the module is installed. If you’re using a virtual environment, make sure it’s activated:
source myenv/bin/activate # On Windows, use myenv\Scripts\activate
4. Permission Issues:
Sometimes, permission issues can prevent modules from being installed correctly. Try running the pip command with elevated privileges:
sudo pip install requests # On Windows, run Command Prompt as Administrator
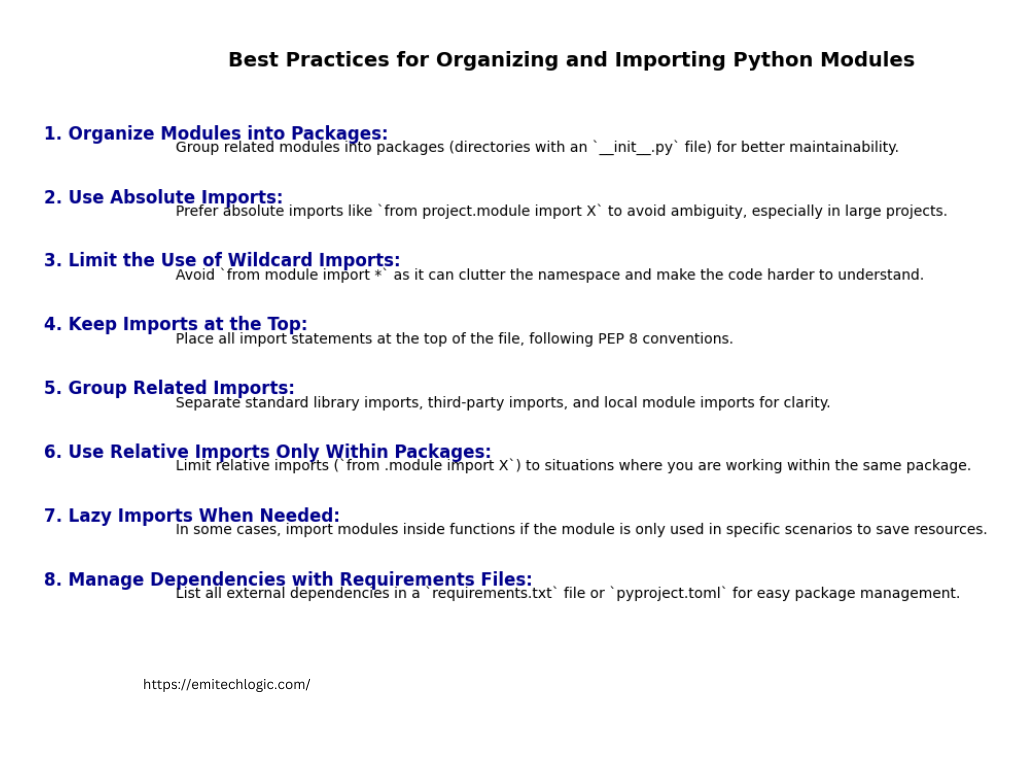
Best Practices for Organizing and Importing Python Modules
When working on Python projects, especially as they grow larger and more complex, organizing your code efficiently becomes crucial. Properly structuring your Python projects and understanding how to import modules effectively can save you time and help avoid errors. This section will guide you through best practices for organizing and importing Python modules, including project structure, the role of __init__.py, and the differences between relative and absolute imports. Following these guidelines will help you manage your code better and ensure smooth, error-free imports.
How to Structure Python Projects for Easy Module Imports
Organizing Code into Packages and Sub-Packages
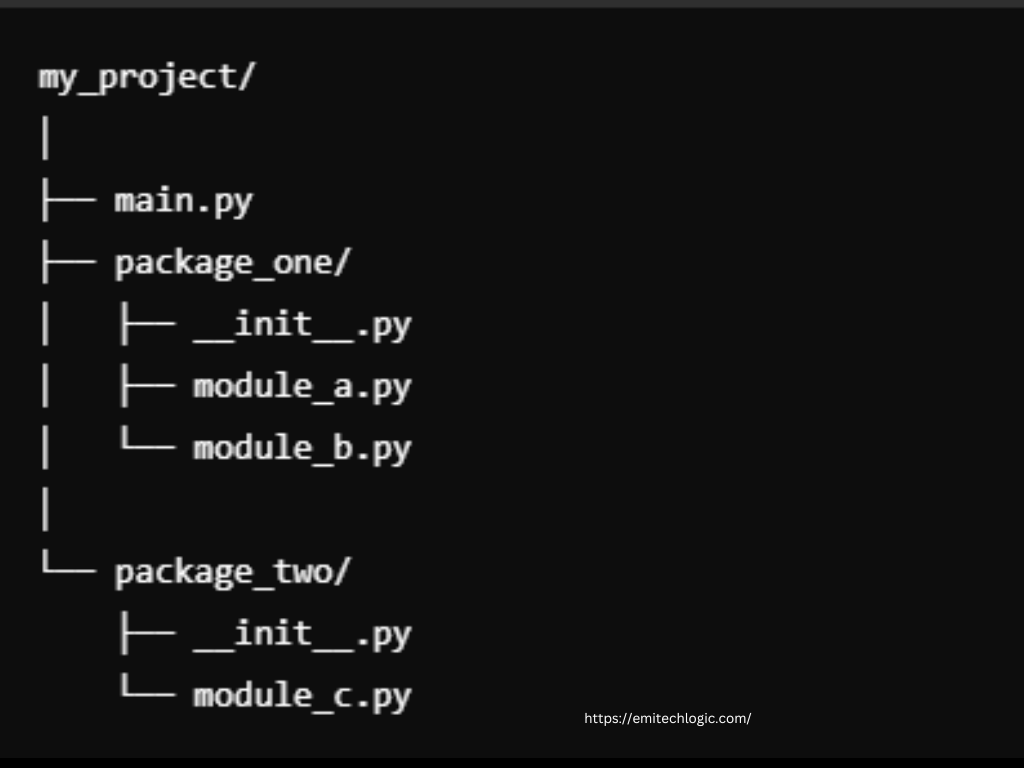
When starting a Python project, it’s essential to organize your code into packages and sub-packages. This structure helps keep your codebase tidy and manageable, especially as your project grows. Here’s a basic structure to consider:
In this example:
package_oneandpackage_twoare directories that act as packages.__init__.pyfiles are present in each package directory, marking them as packages.
The Role of __init__.py in Python Modules
The __init__.py file is crucial in Python packages. It can be empty, but its presence tells Python that the directory should be treated as a package. You can also use __init__.py to initialize package-level variables or import specific modules.
For instance, if you have utility functions in module_a.py and you want them accessible from the package level, you can add imports in __init__.py:
# package_one/__init__.py
from .module_a import useful_function
This allows users to import useful_function directly from package_one:
from package_one import useful_function
By adhering to “Python Package Structure Best Practices”, you’ll ensure that your code is modular and easy to manage.
Understanding Relative vs. Absolute Imports in Python
Differences Between Relative and Absolute Imports
In Python, you can use either relative or absolute imports to access modules within your packages. Here’s what you need to know:
- Absolute Imports: Refer to the module using its full path from the project’s root directory. For example:
# Absolute import
from package_one.module_a import useful_function
Absolute imports are straightforward and make it clear where the module is located.
Relative Imports: Use dot notation to specify the module’s location relative to the current module. For example:
# Relative import
from .module_a import useful_function
Here, the dot . represents the current package. Relative imports can make refactoring easier, as you can move packages around without changing the import statements.
Examples of When to Use Relative Imports
Relative imports are particularly useful in large projects where you might need to reorganize the package structure. For instance, if you have a module in package_two that needs to access a function in package_one, a relative import could look like this:
# In package_two/module_c.py
from ..package_one.module_a import useful_function
This import assumes that package_two is at the same level as package_one.
Avoiding Import Errors with Python Packages
To avoid import errors, follow these tips:
- Ensure
__init__.pyExists: Make sure every package directory contains an__init__.pyfile. - Use Absolute Imports for Clarity: Absolute imports are less prone to errors and easier to understand.
- Be Cautious with Relative Imports: While convenient, relative imports can sometimes lead to confusion, especially if the package structure changes.
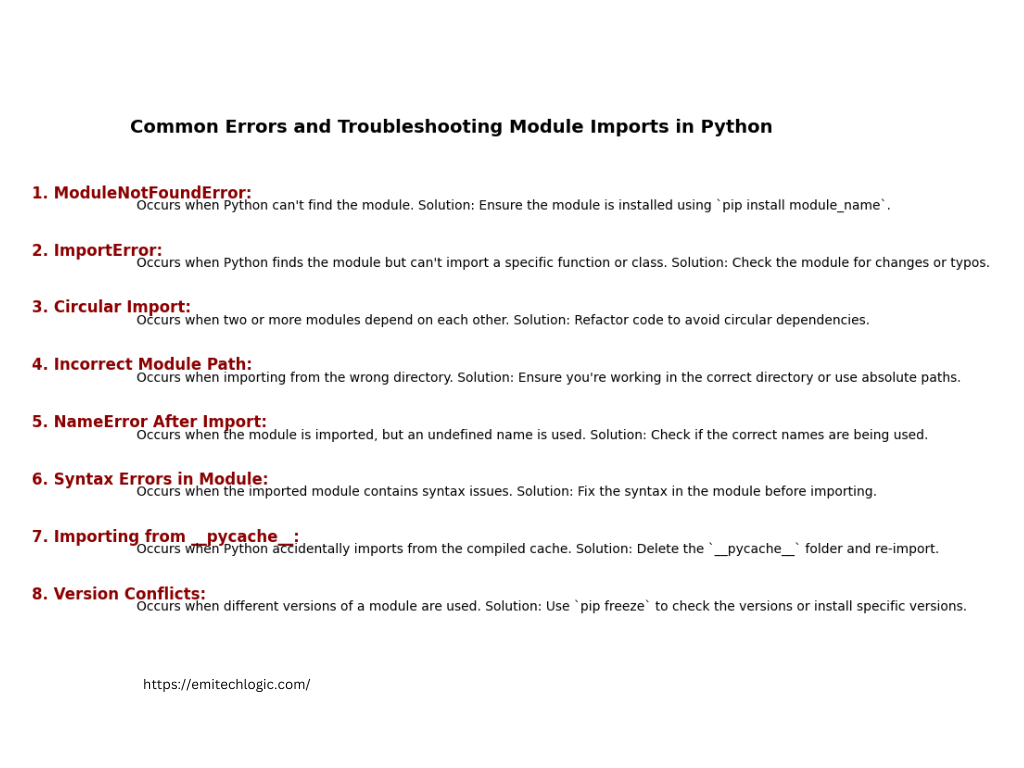
Common Errors and Troubleshooting Module Imports in Python – Modules in Python
Import errors can be frustrating and tricky, especially when they halt your project’s progress. Understanding how to resolve these issues is crucial for maintaining a smooth workflow. This section will cover some common errors you might encounter with Python module imports and provide practical solutions. We’ll explore how to address ‘ModuleNotFoundError’, troubleshoot circular imports, and offer examples to help you resolve these issues effectively. By mastering these troubleshooting techniques, you’ll enhance your ability to manage and debug Python modules, ensuring a more efficient coding experience.
How to Resolve Module Not Found Errors
Why Does ‘ModuleNotFoundError’ Occur?
A ModuleNotFoundError usually happens when Python cannot locate the module you’re trying to import. This error might pop up for several reasons:
- The Module Isn’t Installed: You may be trying to use a module that hasn’t been installed in your Python environment.
- Incorrect Module Path: The module path specified might be incorrect or the module could be located in a different directory.
- Virtual Environment Issues: If you’re working within a virtual environment, the module might not be installed in the currently active environment.
Fixing Import Errors by Adjusting the PYTHONPATH
The PYTHONPATH environment variable helps Python locate modules. Adjusting it might resolve the ModuleNotFoundError. Here’s how:
- Check Your Current PYTHONPATH:
echo $PYTHONPATH
2. Add a Directory to PYTHONPATH: If your module is in a directory not included in PYTHONPATH, add it:
export PYTHONPATH=/path/to/your/module:$PYTHONPATH
You can also modify PYTHONPATH within your script:
import sys
sys.path.append('/path/to/your/module')
Example: Resolving Common Import Issues in Python
Consider the following project structure:
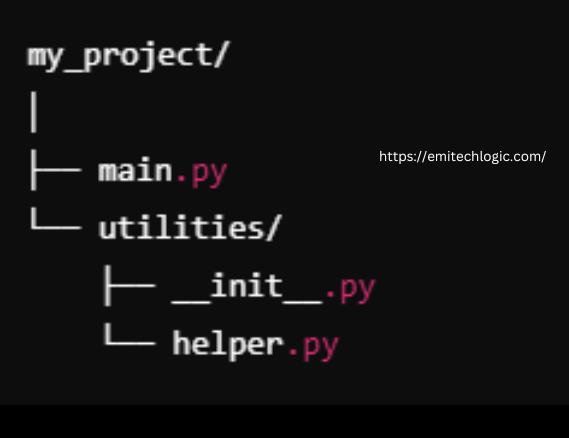
If main.py cannot import helper from utilities, ensure:
- The
utilitiesfolder contains an__init__.pyfile. - Your
PYTHONPATHincludes themy_projectdirectory or add it tosys.pathin your script.
# main.py
import sys
sys.path.append('/path/to/my_project')

from utilities import helper
Debugging Circular Imports in Python
What Is a Circular Import in Python?
A circular import occurs when two or more modules import each other, either directly or indirectly, creating a loop. This situation can lead to import errors or unexpected behavior. For instance:
- module_a.py imports module_b.py.
- module_b.py imports module_a.py.
How to Detect and Fix Circular Import Issues
To detect circular imports, use debugging tools or check for errors indicating cyclic dependencies. Here’s how to fix them:
- Identify the Circular Dependency: Look for import statements that create a loop. Tools like PyCharm or pylint can help pinpoint these issues.
- Refactor Your Code: To address circular imports, you might:
- Reorganize Module Layout: Move shared functionality to a separate module, say shared.py, which can be imported by both module_a.py and module_b.py.
- Use Lazy Imports: Import modules within functions instead of at the top of the file to break the circular dependency.
Example: Refactoring Code to Avoid Circular Imports
Assume you have:
- module_a.py:
from module_b import function_b
- module_b.py:
from module_a import function_a
To resolve this:
- Reorganize: Move shared functionality to a new module, shared.py.
- Lazy Imports: Import inside functions to avoid the import loop:
# module_a.py
def function_a():
    from module_b import function_b
    # Use function_b here
# module_b.py
def function_b():
    from module_a import function_a
    # Use function_a here
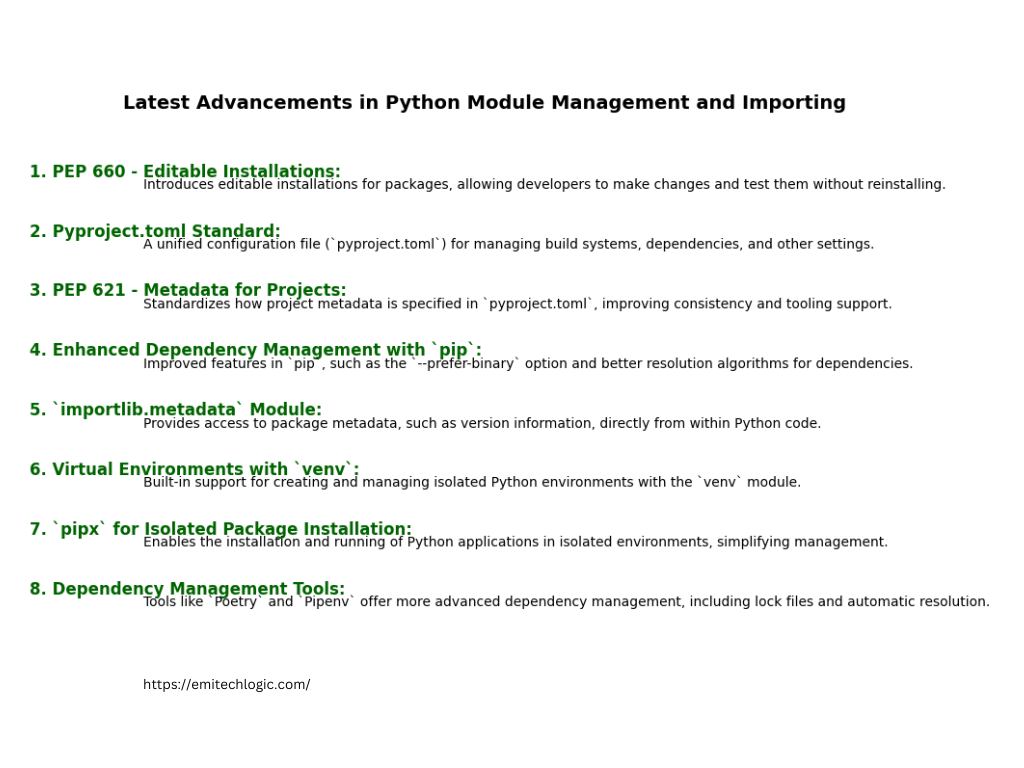
Latest Advancements: Modules in Python Management and Importing
As Python continues to evolve, new features and tools are regularly introduced to enhance how we manage and import modules. Staying updated with these advancements can significantly improve your development workflow and code efficiency.
New Features in Python 3.10 and Python 3.11 for Module Imports
Python continues to evolve, introducing new features that enhance how modules are managed and imported. Python 3.10 and Python 3.11 have brought exciting updates that can make your coding experience more efficient and intuitive. Let’s explore these advancements.
Match Case Statement in Python 3.10: How It Helps With Import Logic
With Python 3.10, the match case statement was introduced, bringing a new way to handle complex conditional logic. This feature is inspired by pattern matching found in other programming languages and offers a clean and readable way to handle multiple conditions.
How It Helps With Import Logic:
For instance, you can use the match case statement to conditionally import modules based on certain criteria. Here’s a simple example to illustrate this:
import sys

def import_module_based_on_os():
    match sys.platform:
        case "win32":
            import windows_specific_module as module
        case "linux":
            import linux_specific_module as module
        case _:
            import default_module as module
    return module
In this example, the match statement helps select and import the appropriate module based on the operating system. This makes your code cleaner and more organized, especially when dealing with multiple platform-specific imports.
Lazy Imports in Python 3.11: Optimizing Modules in Python Import Performance
Python 3.11 introduced lazy imports, a feature designed to improve module import performance. Unlike traditional imports that load modules at the start, lazy imports delay the loading of modules until they are actually needed.
How It Optimizes Performance:
Lazy imports can significantly reduce startup time and memory usage. For example, if you have a large application with many dependencies, you can use lazy imports to ensure that only the modules required for immediate execution are loaded initially. Here’s an example of how you might use lazy imports:
import sys

def perform_task():
    if some_condition():
        from module import function  # Lazy import
        function()
In this code, the module is only imported when some_condition() is true, which can help in reducing the initial load time of your application. This is particularly useful in large projects where performance is a concern.
Latest Tools for Managing Python Dependencies – Modules in Python
Managing Python dependencies effectively is crucial for maintaining a healthy development environment. Several tools can help you handle dependencies and versions with ease.
Using Poetry for Dependency Management
Poetry is a modern tool that simplifies dependency management and packaging in Python. It uses a single configuration file, pyproject.toml, to manage project dependencies and metadata.
Why Use Poetry:
Poetry makes it easy to manage and lock dependencies, ensuring that your project environment is consistent across different setups. Here’s how you might use Poetry to add a dependency:
poetry add requests
This command adds the requests library to your project and updates the pyproject.toml file accordingly. Poetry also creates a poetry.lock file to lock the exact versions of dependencies, which helps in maintaining consistency.
Pyenv and Conda: Tools to Manage Python Versions and Packages
Pyenv and Conda are two popular tools for managing Python versions and packages.
- It allows you to switch between different Python versions easily. This is useful if you need to test your code with multiple Python versions.
pyenv install 3.9.6
pyenv global 3.9.6
This example installs Python 3.9.6 and sets it as the global Python version.
Conda is a package and environment manager that helps you manage both packages and different Python versions. It’s particularly useful in data science and machine learning projects.
conda create --name myenv python=3.9
conda activate myenv
- Here,
conda createcreates a new environment namedmyenvwith Python 3.9, andconda activateactivates that environment.
How to Automatically Handle Dependencies in Python Projects
Automating dependency management can save you time and reduce errors. Tools like Poetry, Pyenv, and Conda automate the process of installing and updating dependencies, ensuring that your projects are always in sync.
By incorporating these tools into your workflow, you can focus more on coding and less on managing dependencies. This approach helps keep your development process smooth and efficient.
By understanding and using these new features and tools, you can enhance your Python projects and make your development process more effective. Whether you’re dealing with module imports or managing dependencies, staying updated with the latest advancements will help you write better and more efficient code.
Conclusion: Mastering Modules in Python Imports for Efficient Coding
As we wrap up our exploration of Python module imports, let’s review the key techniques and best practices that can significantly enhance your coding efficiency and project management.
Summary of Key Importing Techniques
We’ve covered a variety of methods for importing modules in Python, each serving a unique purpose:
- Basic Imports: The standard method for bringing in modules with the
importstatement. - Specific Imports: Importing only the functions or classes you need using the
from module import function_namesyntax. - Wildcard Imports: Though generally avoided, these can import everything from a module using
from module import *. - Dynamic Imports: Leveraging the
importlibmodule to load modules at runtime based on conditions.
Each method has its advantages and specific use cases. For example, specific imports help keep your namespace clean, while dynamic imports can add flexibility to your code.
Importance of Organizing Modules for Better Project Management
Organizing your Python project effectively is crucial for maintaining clarity and manageability. Structuring your code into packages and sub-packages, and understanding the role of __init__.py, can help keep your project modular and easy to navigate.
By using relative and absolute imports appropriately, you can ensure that your modules are accessed correctly without introducing errors. A well-organized project not only makes your codebase easier to understand but also simplifies maintenance and collaboration with others.
Encouraging Best Practices for Future Python Development
As you continue to develop in Python, adopting best practices for module importing and management will contribute to cleaner, more efficient code. Here are a few tips to keep in mind:
- Use Specific Imports: Import only what you need to avoid cluttering the namespace and to make dependencies clearer.
- Leverage Virtual Environments: Manage your project’s dependencies and Python versions with tools like
virtualenvorvenvto avoid conflicts and ensure reproducibility. - Adopt Modern Features: Take advantage of new features in Python versions like 3.10 and 3.11, such as lazy imports, to optimize performance.
By mastering these techniques and following best practices, you’ll be well-equipped to handle complex projects and avoid common pitfalls in Python development. Efficiently managing modules and dependencies not only makes coding smoother but also enhances the overall quality of your projects.
External Resources
Python Documentation: Modules
- Python Modules Documentation
- Overview of Python modules, including import statements, module creation, and best practices.
Python Documentation: The import System
- The import System
- Detailed explanation of Python’s import mechanism and how the import system works.
Python Packaging Authority: Python Packaging User Guide
- Python Packaging User Guide
- Guide on packaging Python projects, which includes insights into module management and dependencies.
FAQs
A: A Python module is a file containing Python code. It can include functions, classes, and variables, which you can import and use in other Python scripts.
A: Use the import statement followed by the module name. For example, import math imports the math module, allowing access to its functions and constants.
A: Use the from module import function_name syntax. For example, from math import sqrt imports only the sqrt function from the math module.
A: Absolute imports specify the full path from the project’s root directory, like import mymodule. Relative imports use a module’s location relative to the current module, such as from . import mymodule.







Leave a Reply