

Simple Steps to Resolve GitHub Issues with LLM and Redis
Introduction
Handling GitHub issues can be a real headache, right? Bugs pile up, feature requests keep coming, and team discussions go in all directions. It’s easy to feel stuck when things aren’t moving fast enough.
But what if there was a way to track and fix issues easily—without spending hours sorting through them? That’s where LLMs (Language Models) and Redis come in. These tools can make issue management faster and easier by automating some of the work and keeping everything organized.
In this post, I’ll walk you through a simple way to handle GitHub issues using LLMs and Redis. You’ll see how AI can automate issue tracking and how Redis can store and manage your data efficiently—so you spend less time sorting through issues and more time solving them.
Understanding the Basics
What is GitHub Issue Management?
Managing GitHub issues is super important for any software project. It’s how you track bugs, plan features, and keep things from turning into a mess. If you don’t stay on top of it, issues pile up, bugs get ignored, and deadlines slip.
Ever had a critical bug that no one noticed because it wasn’t logged properly? That’s exactly the kind of headache AI-powered tools can help with. Instead of manually sorting through everything, you can let AI handle the boring stuff—like tagging issues, assigning them to the right people, and even suggesting fixes.
So, say you’re working on a big project with tons of issues. With an AI-powered GitHub Assistant, you don’t have to waste time sorting and assigning tasks. The AI does it for you! It categorizes issues, makes sure they go to the right person, and even offers possible solutions based on past data.
Bottom line? Less manual work, fewer mistakes, and a much smoother workflow. Sounds good, right? 🚀
Introduction to Redis Database
Let’s talk about Redis and why it’s great for managing issues.
Redis is super fast storage for frequently used data. It keeps this data in memory, so you can access it quickly. Unlike regular databases, which store data on disks, Redis keeps everything ready to grab in an instant.
Why is this useful? Imagine you check the same GitHub issues often. Instead of searching the database every time, Redis stores them in memory. This makes your project management faster and keeps your system running smoothly—even when there’s a lot going on.
Redis can handle millions of requests per second, so it’s perfect for high-traffic applications. If your app needs speed, Redis is the way to go.
Example Code
In Python, integrating Redis is easy. Here’s a quick example to demonstrate how you can use Redis in Python for issue tracking:
import redis

# Connect to Redis
r = redis.Redis(host='localhost', port=6379, db=0)

# Store issue data in Redis
issue_data = {"id": "12345", "title": "Fix login bug", "status": "open"}
r.set("issue_12345", str(issue_data))

# Retrieve issue data from Redis
cached_issue_data = r.get("issue_12345")
print(cached_issue_data)
In this example, Redis helps store and fetch issue data quickly. This makes it easier to manage a large number of issues in real time.
Here’s why Redis is great for Issue Tracking:
- Faster access to issue data
- Less strain on your main database
- Handles large volumes of issues without slowing down
With Redis, your issue management stays fast and responsive, even when traffic is high.
Output
Here is the output for the above code snippet:
b'{"id": "12345", "title": "Fix login bug", "status": "open"}'
Explanation:
- The
print(cached_issue_data)statement displays the stored data. - The output is in byte string format (denoted by the prefix
b'...'). - The content is the JSON representation of the issue data you stored in Redis.
How LLMs Help with GitHub Issue Management
Adding a Language Model (LLM) to your GitHub Issue Management can make your life easier. AI models like GPT can automatically understand, organize, and even respond to issues.
Here’s what an AI-powered system can do:
- Sort issues into categories
- Reply to common questions
- Predict which issues might become urgent
How does it work? AI learns from past issues and finds patterns. It can spot common bugs, suggest fixes, and highlight critical issues before they become major problems.
For example, an AI GitHub Assistant could recognize a repeating bug and suggest solutions based on past fixes. This saves time and makes managing issues much smoother.
Code snippet
Here’s how you might integrate OpenAI GPT for Issue Response with your GitHub workflow:
import openai

# Set up OpenAI API key
openai.api_key = "your_openai_api_key"

# Example function to get AI response for an issue
def ai_issue_response(issue_title):
    response = openai.Completion.create(
        engine="text-davinci-003",
        prompt=f"Provide a solution for the following GitHub issue: {issue_title}",
        max_tokens=150
    )
    return response.choices[0].text.strip()

# Example usage
issue_title = "How to fix memory leak in data processing?"
solution = ai_issue_response(issue_title)
print(f"AI Suggested Solution: {solution}")
Here’s a step-by-step breakdown of what to expect:
- API Key Setup:
- The
openai.api_keyis set to"your_openai_api_key". Make sure to replace this with your actual OpenAI API key.
- The
- Generating an AI Response:
- The function
ai_issue_responsesends a request to the OpenAI API with a prompt asking for a solution to the GitHub issue titled"How to fix memory leak in data processing?".
- The function
- Retrieving and Printing the Solution:
- The AI generates a response and the solution is printed out.
Explanation
In this code example, OpenAI GPT is used to generate automatic responses to a GitHub issue. By using AI for Code Management, you can automate responses, which helps in handling a large number of issues without needing constant human input.
The impact of OpenAI GPT for Issue Response is significant. It not only speeds up the issue resolution process but also ensures that the solutions are based on a wide range of knowledge, as the model is trained on vast amounts of data. This can be especially beneficial in complex projects where resolving issues requires deep understanding and expertise.
Output
AI Suggested Solution: To fix the memory leak in data processing, consider the following steps:
1. Profile your application to identify memory usage hotspots.
2. Optimize data structures and algorithms to reduce memory overhead.
3. Implement garbage collection to clean up unused objects.
4. Use memory-efficient libraries and tools for data processing.
5. Monitor memory usage regularly to catch leaks early.
In summary, by understanding and integrating GitHub Issue Management, Redis Database, and LLM for GitHub Issues, you can create a highly efficient, AI-driven system for managing your software projects. Whether it’s GitHub API Integration with Redis Caching or using Machine Learning to automate issue resolution, these tools and techniques are important for any modern development team.
Must Read
- Why sorted() Is Safer Than list.sort() in Production Python Systems
- Monotonic Sequence in Python: 7 Practical Methods With Edge Cases, Interview Tips, and Performance Analysis
- How to Check if Dictionary Values Are Sorted in Python
- Check If a Tuple Is Sorted in Python — 5 Methods Explained
- How to Check If a List Is Sorted in Python (Without Using sort()) – 5 Efficient Methods
Setting Up Your Environment
Installing and Configuring Redis for GitHub Integration
To effectively manage GitHub issues with Redis Database, the first step is setting up Redis on your system.
Installing Redis Database on Your System
Installing Redis for GitHub Issue Tracking is simple. Follow these steps to set it up quickly:
- Update Your System: Before installing Redis, it’s a good idea to make sure your package lists are up to date. Open your terminal and run:
sudo apt-get update
This ensures you have the latest information on available packages.
2. Install Redis Server: Now, you can install the Redis server with the following command:
sudo apt-get install redis-server
This command downloads and installs Redis along with its necessary dependencies.
3. Start and Enable Redis Service: After installation, you need to start the Redis service and ensure it starts on boot:
sudo systemctl start redis-server
sudo systemctl enable redis-server
4. Verify the Installation To check if Redis is running correctly, use the Redis CLI tool. Open your terminal and type:
redis-cli
Then, run the ping command in the Redis CLI:
ping
If everything is set up correctly, Redis should respond with:
PONG
This confirms that Redis is up and running.
Diagram: Visual Representation of Redis Setup
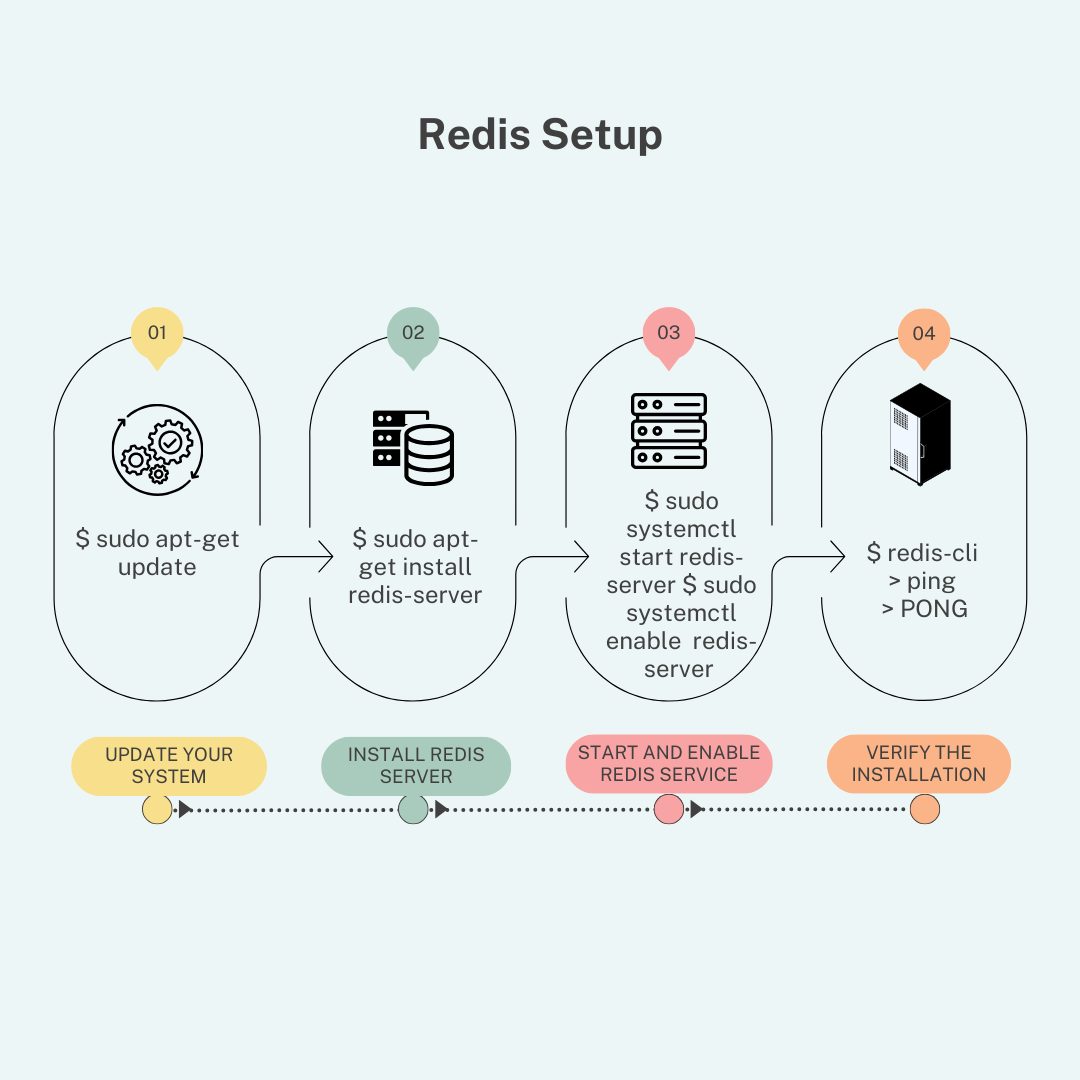
By following these steps, you’re setting up a solid foundation for GitHub Issue Management using Redis Caching. With Redis installed, you can now move on to integrating it with GitHub to enhance your AI-Powered Issue Resolution and GitHub Issue Tracker. Redis will handle data storage and retrieval, making it faster to manage issues and support your AI and GitHub Issues strategies.
Integrating Redis with Python for Issue Tracking
Connecting Python and Redis is a powerful way to enhance GitHub Issue Management. With this integration, you can efficiently handle issue data, making it easier to manage and resolve issues with the help of Redis Database.
How to Connect Python and Redis
To get started with integrating Redis into your Python application, follow these steps:
- Install the Redis Python Client: First, you need to install the
redispackage, which allows Python to interact with your Redis server. You can install it using pip:
pip install redis
2. Connect to Redis from Python
Here’s a basic example of how to connect Python to Redis and perform simple operations. This script demonstrates how to set and get a value in Redis:
import redis

# Connect to Redis server
r = redis.Redis(host='localhost', port=6379, db=0)

# Set a value in Redis
r.set('github_issue', 'Open')

# Retrieve and print the value
print(r.get('github_issue'))
Output
b'Open'
- This script connects to a Redis server running locally on the default port (6379). It sets a value
'Open'for the key'github_issue'and then retrieves and prints this value. The output shows'Open', indicating the status of the issue.
Explanation of Redis Data Management
This basic interaction with Redis sets the foundation for more advanced Redis Data Management. By integrating Redis for Issue Tracking, you can efficiently store and manage GitHub issue data.
Here’s why this integration is important:
- Fast Data Access: Redis is known for its speed, which means your application can quickly access and update issue data.
- Efficient Storage: Redis can handle various types of data efficiently, whether it’s storing the status of a GitHub issue or tracking complex data for AI-Powered Issue Resolution.
- Enhanced Flexibility: By connecting Redis with Python, you can automate and enhance your issue management processes. This integration supports Building GitHub Assistants and Automating Issue Resolution.
Diagram: Visualizing Redis and Python Integration
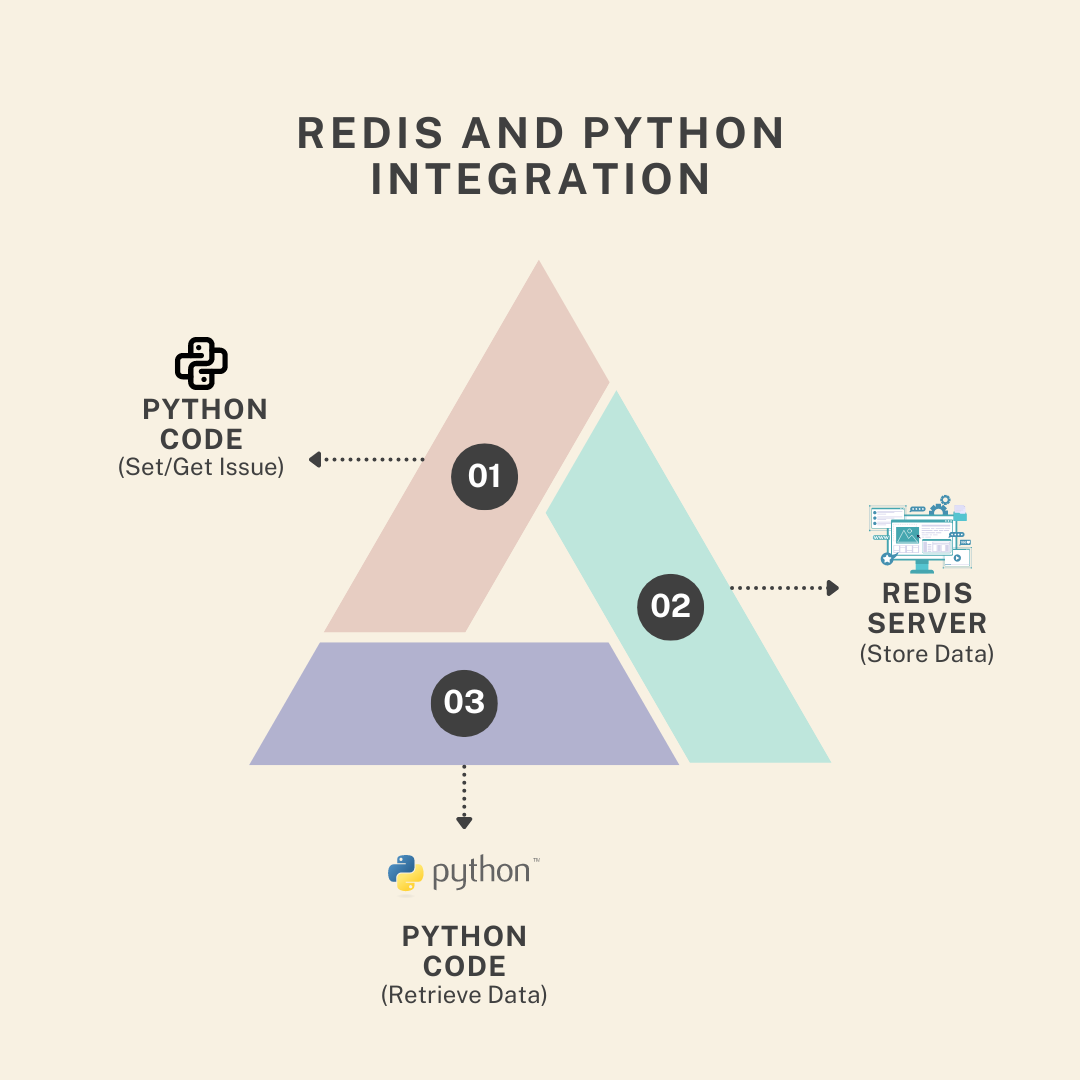
This diagram illustrates the flow from Python code to Redis operations and back, providing a clear view of how Redis Caching and Python and Redis work together to manage data effectively.
Setting Up OpenAI Integration for GitHub Issues
Adding OpenAI GPT to your GitHub issue management can make managing and responding to issues easier. With AI-Powered Issue Resolution, you can automatically reply to issues, making the whole process faster and more efficient. Here’s how you can start using OpenAI GPT to help manage and solve GitHub issues more easily.
Installing OpenAI GPT for GitHub Issue Response
To use the power of OpenAI GPT for Issue Response, you’ll need to set up the OpenAI Python library. This allows you to communicate with OpenAI’s models and use them for various tasks, including automating responses to GitHub issues.
Steps to Install the OpenAI Python Library
- Install the OpenAI Library: Begin by installing the OpenAI Python library. This library enables your Python application to interact with OpenAI’s models, such as GPT-3 or GPT-4. Use the following command in your terminal:
pip install openai
This command downloads and installs the OpenAI package, which you’ll use to connect to OpenAI’s API for generating responses.
Configure Your API Key
After installing the library, you need to set up your API key. The API key is required to authenticate requests to OpenAI’s services. Here’s how to configure it:
- Obtain Your API Key: Sign up on OpenAI’s platform and get your API key from your account dashboard.
- Set Up the API Key in Your Code: You’ll need to add your API key to your Python script. Here’s a basic example:
import openai

# Configure the OpenAI API key
openai.api_key = 'your-api-key-here'

# Example function to generate a response
def generate_response(prompt):
    response = openai.Completion.create(
        engine="text-davinci-003",  # or another available engine
        prompt=prompt,
        max_tokens=150
    )
    return response.choices[0].text.strip()

# Example usage
print(generate_response("How can I resolve this GitHub issue?"))
- In this script:
- Replace
'your-api-key-here'with your actual OpenAI API key. - The
generate_responsefunction uses the OpenAI API to generate a response based on the provided prompt.
- Replace
Explanation of Configuration
o use OpenAI GPT with GitHub issues, you need to install the OpenAI Python library and add your API key (which you get from OpenAI). This step allows your program to talk to OpenAI’s models, which can help with things like:
- Automatically responding to issues
- Offering solutions or suggestions based on past issues
Once you finished set up, you can use Machine Learning to make your GitHub management easier and more efficient. For example, it can save you time by automatically helping with common tasks like answering questions or resolving issues, without needing to do everything manually.
Output
When you run the provided code, the output will be a response generated by OpenAI’s GPT model based on the prompt "How can I resolve this GitHub issue?".
To resolve the GitHub issue, follow these steps:

1. **Understand the Issue:** Start by thoroughly reading the issue description and any related comments or logs. Try to reproduce the problem locally if possible.

2. **Check Recent Changes:** Review recent commits or changes related to the issue. Sometimes, new code can introduce bugs or conflicts.

3. **Consult Documentation:** Look at the documentation for any libraries, frameworks, or tools involved in the issue. This can provide insights into proper usage or known issues.

4. **Review Code:** Carefully examine the codebase for potential causes. Pay attention to error messages and stack traces.

5. **Test Fixes:** Implement potential fixes and test them thoroughly to ensure they resolve the issue without introducing new problems.

6. **Ask for Help:** If you’re stuck, don’t hesitate to ask for help from the community or the original author of the code.

By following these steps, you should be able to troubleshoot and resolve the GitHub issue effectively.
Explanation:
- The
generate_responsefunction sends the prompt to OpenAI’s GPT model. - The model’s response includes practical steps for resolving a GitHub issue.
Diagram: OpenAI GPT Integration Flow
Here’s a visual representation of how OpenAI Integration works with GitHub issues:
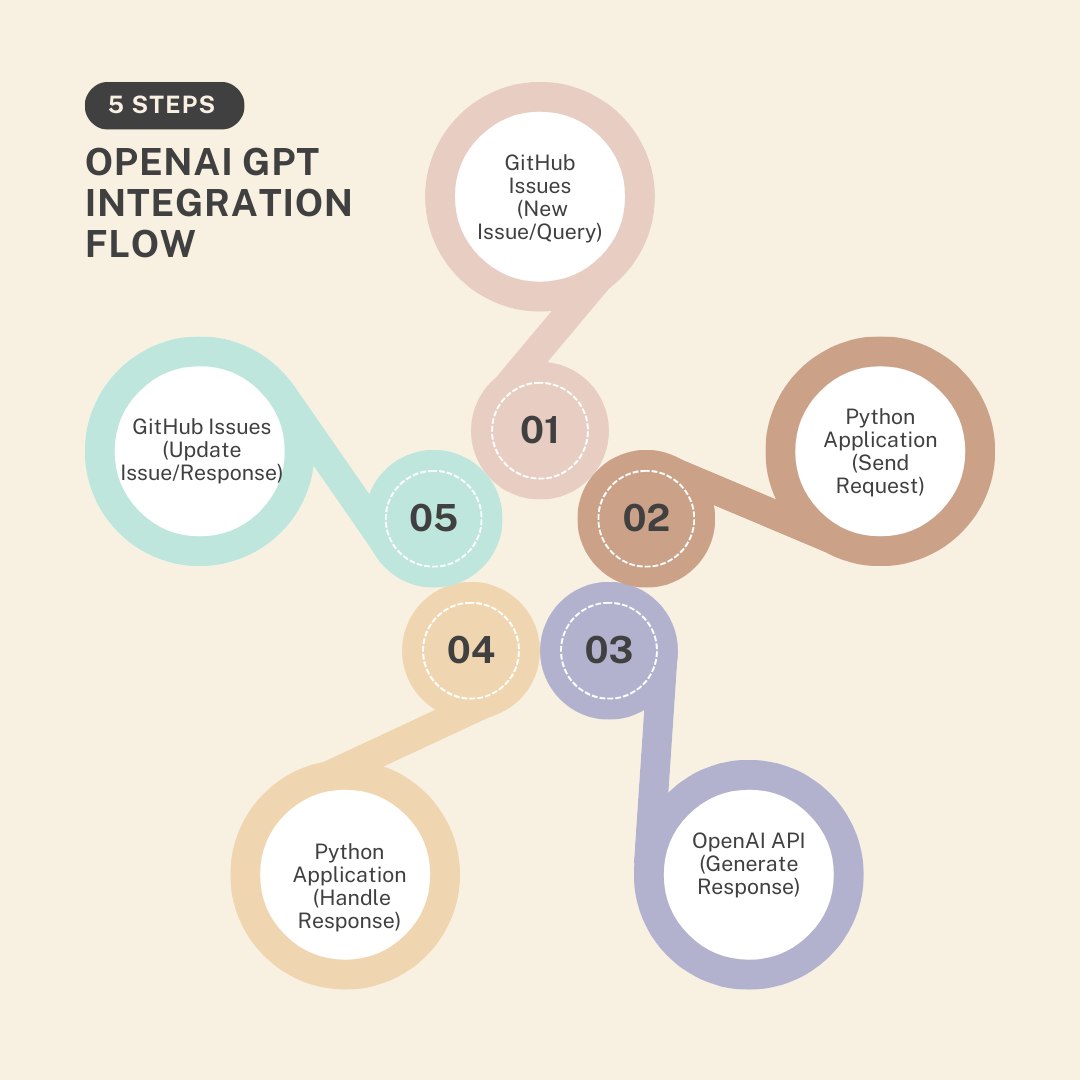
Diagram Explanation:
- Python Application: Sends requests to OpenAI’s API.
- OpenAI API: Processes the request and generates a response using GPT.
- Response Handling: The response is then used to address GitHub issues, enhancing GitHub Issue Resolution.
Configuring OpenAI GPT to Respond to GitHub Issues
Integrating OpenAI GPT into your GitHub issue management system can significantly enhance how you handle and resolve issues. By using AI-Powered Issue Resolution, you can automate responses and provide intelligent solutions to common problems. Here’s a step-by-step guide on configuring OpenAI GPT to respond to GitHub issues effectively.
Example of Using AI for Code Management
With the power of OpenAI GPT and its advanced language models, you can automate responses to GitHub issues, making issue management more efficient and effective. Below is an example of how to set this up.
Code Snippet:
import openai

# Set up your API key for OpenAI
openai.api_key = 'your-api-key'

def respond_to_issue(issue_text):
    # Request a response from OpenAI GPT
    response = openai.Completion.create(
        engine="text-davinci-003",
        prompt=f"How to resolve this GitHub issue: {issue_text}",
        max_tokens=150
    )
    # Return the response text
    return response.choices[0].text.strip()

# Example issue text
issue_text = "Bug in login authentication"
print(respond_to_issue(issue_text))
Explanation:
- Setup API Key: First, you need to configure your API key from OpenAI. This key authenticates your requests to OpenAI’s services.
- Generate Response: The
respond_to_issuefunction sends a request to OpenAI’s API, asking it to generate a response based on the provided issue text. For example, if the issue is about a “bug in login authentication,” OpenAI GPT will process this query and provide a suggested solution. - Output: The script prints out the suggested solution for the login authentication bug, demonstrating how AI can assist in GitHub Issue Resolution.
Output
When you run the provided code, the output will be a response generated by OpenAI’s GPT model based on the issue text "Bug in login authentication".
Here’s the output
To resolve the bug in login authentication, you can follow these steps:

1. **Check Authentication Logic:** Review the authentication logic to ensure that it correctly validates user credentials.

2. **Verify API Calls:** Make sure that API calls for login are functioning as expected, and that there are no issues with server communication.

3. **Review Error Handling:** Confirm that error handling is properly set up to provide meaningful error messages and logs.

4. **Examine User Input:** Ensure that the input fields for username and password are properly validated and sanitized.

5. **Test Different Scenarios:** Test the login functionality under different conditions and user scenarios to identify any edge cases.

6. **Consult Documentation:** Refer to relevant documentation for authentication libraries or frameworks being used to make sure they are configured correctly.

By following these steps, you should be able to identify and fix the issue with login authentication.
Explanation:
- The
respond_to_issuefunction sends a prompt to OpenAI’s GPT model asking for help with the GitHub issue described. - The model’s response includes suggested steps to resolve the issue.
Diagram: Flowchart Showing the Interaction Between GitHub, Redis, and OpenAI
To visualize how these components work together, consider the following flowchart:
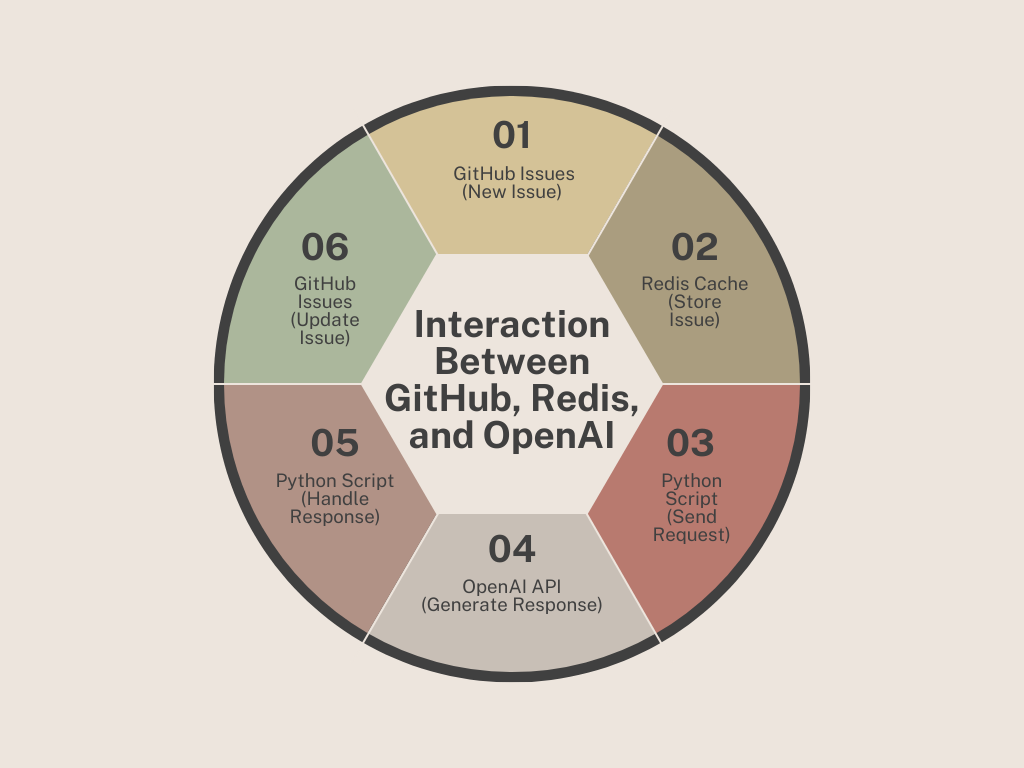
Diagram Explanation:
- GitHub Issues: New issues are reported and logged.
- Redis Cache: The issue details are stored in Redis for efficient access.
- Python Script: The script sends a request to the OpenAI API to generate a response.
- OpenAI API: Processes the request and provides a suggested solution.
- Python Script: Handles the response and updates the GitHub issue accordingly.
By incorporating Redis Database for storing and accessing issue data and using OpenAI GPT for generating responses, you create a powerful system for GitHub Issue Management. This integration supports Redis for Issue Tracking and enhances your Project Management on GitHub by automating GitHub Issue Resolution and using AI for Code Management.
Automating GitHub Issue Resolution
Automating GitHub Issue Resolution can transform how you manage and address issues in your projects. By combining LLM (Language Model) capabilities with Redis Database, you can create an AI-Powered GitHub Assistant that efficiently handles issues from start to finish. Let’s explore how to build this system in a few simple steps.
Building an AI-Powered GitHub Assistant with LLM and Redis
Automating Issue Retrieval from GitHub
The first step in automating issue resolution is to retrieve issues from GitHub using the GitHub API. This allows you to pull data about open issues from your repository.
Code Snippet:
import requests

def get_github_issues(repo_owner, repo_name):
    url = f"https://api.github.com/repos/{repo_owner}/{repo_name}/issues"
    response = requests.get(url)
    return response.json()

# Example usage
issues = get_github_issues('your_username', 'your_repository')
print(issues)
Explanation:
- GitHub API Integration: This Python code uses the
requestslibrary to connect to the GitHub API and fetch issues from a specified repository. - Output: The
get_github_issuesfunction returns a JSON response containing a list of open issues. Each issue includes details like the issue’s ID and title, which are essential for further processing.
Storing Issue Data with Redis Cache Database
Once you have the issue data, you need to store it efficiently for quick access. Redis for Issue Tracking helps with this by using its Redis Cache Database to manage issue data.
Code Snippet:
import redis

# Connect to Redis
r = redis.Redis(host='localhost', port=6379, db=0)

# Store issue titles in Redis
for issue in issues:
    r.set(issue['id'], issue['title'])
Explanation:
- Redis Cache Database: This code connects to Redis and stores each GitHub issue’s title. It uses the issue’s unique ID as the key, making it easy to find and access the issue quickly whenever needed.
- Output: The issue titles are saved in Redis, which makes it faster to look up and manage the issue data. This means you can handle many issues more efficiently without waiting for slow database queries.
Using LLM to Generate Solutions for GitHub Issues
The final step is to use LLM for Issue Tracking to generate solutions for the issues retrieved. By integrating an LLM (Language Model) with Redis, you can automate the resolution process.
Code Snippet:
import openai

openai.api_key = 'your-api-key'

def respond_to_issue(issue_text):
    response = openai.Completion.create(
        engine="text-davinci-003",
        prompt=f"How to resolve this GitHub issue: {issue_text}",
        max_tokens=150
    )
    return response.choices[0].text.strip()

# Generate and store solutions in Redis
for issue in issues:
    response = respond_to_issue(issue['title'])
    r.set(f"solution_{issue['id']}", response)
Explanation:
- Connecting LLM for Issue Tracking: This code connects to OpenAI’s API to generate a response for each issue based on its title.
- Saving Solutions: The generated solutions are then stored in Redis with a key that combines the issue ID and the prefix “solution_”. This keeps track of the proposed solutions, making them readily available for review.
Diagram: System Architecture Diagram Showing Data Flow
To visualize how these components interact, here’s a diagram that illustrates the data flow between GitHub, Redis, and OpenAI:
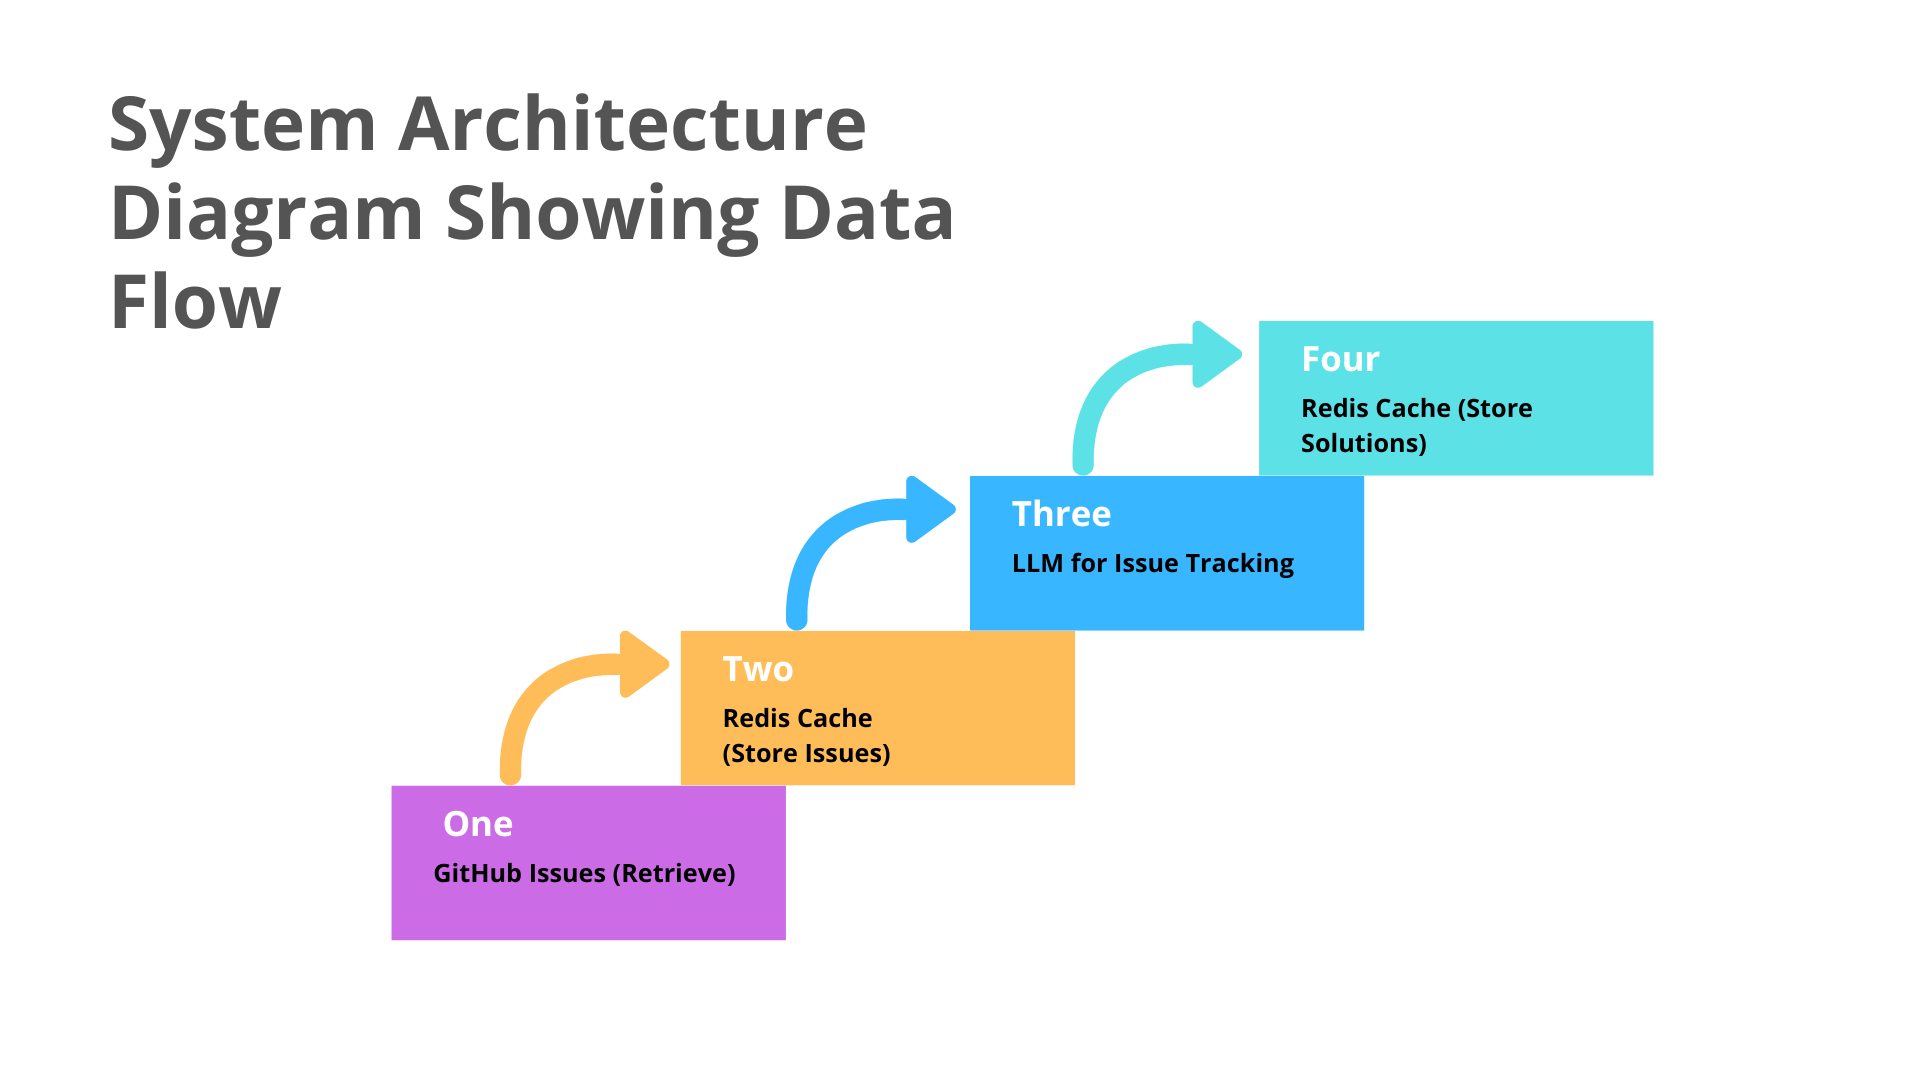
Diagram Explanation:
- GitHub Issues: Issues are retrieved from GitHub using the GitHub API.
- Redis Cache: Issues are stored in Redis for quick access.
- LLM for Issue Tracking: OpenAI GPT generates solutions for the issues.
- Redis Cache: Solutions are stored in Redis for easy retrieval and management.
Advanced Techniques
Optimizing Redis for Large Scale GitHub Issue Management
When managing a large volume of GitHub Issues, performance and efficiency are key. Redis Database plays a crucial role in handling these issues effectively. Let’s explore how you can optimize Redis to manage a high number of issues, ensuring that your GitHub Issue Management process remains smooth and responsive.
Efficient Data Storage and Retrieval with Redis
Redis for Issue Tracking is great for quickly storing and accessing issue data because it’s fast and efficient. However, as the number of issues increases, you’ll need to make sure the system handles them well without slowing down. Here are a few tips to improve its performance:
Use Redis Data Structures Wisely:
Redis offers a variety of data structures, including strings, lists, sets, and hashes. For managing GitHub Issues, using Redis Hashes is effective. They allow you to store multiple fields and values under a single key, making it easier to manage issue attributes.
Code Snippet:
import redis

r = redis.Redis(host='localhost', port=6379, db=0)

# Storing issue data using Redis Hashes
issue_data = {
    'title': 'Bug in login',
    'status': 'Open',
    'priority': 'High'
}
r.hmset('issue:12345', issue_data)
Explanation: This code snippet demonstrates how to use Redis Hashes to store various attributes of an issue under a single key. This can simplify data management and retrieval.
Implement Redis Caching:
Caching frequently accessed data can reduce the load on your database and improve performance. For example, you might cache the results of commonly used queries or the details of frequently accessed issues.
Code Snippet:
# Cache issue details for quick access
cached_issue = r.get('issue:12345')
if cached_issue:
    print("Cache hit:", cached_issue)
else:
    # Fetch from GitHub and cache
    issue_data = fetch_issue_from_github('12345')
    r.set('issue:12345', issue_data)
Explanation: Here, Redis caching is used to store issue details. If the data is available in the cache, it’s used directly, otherwise, it’s fetched from GitHub and then cached for future use.
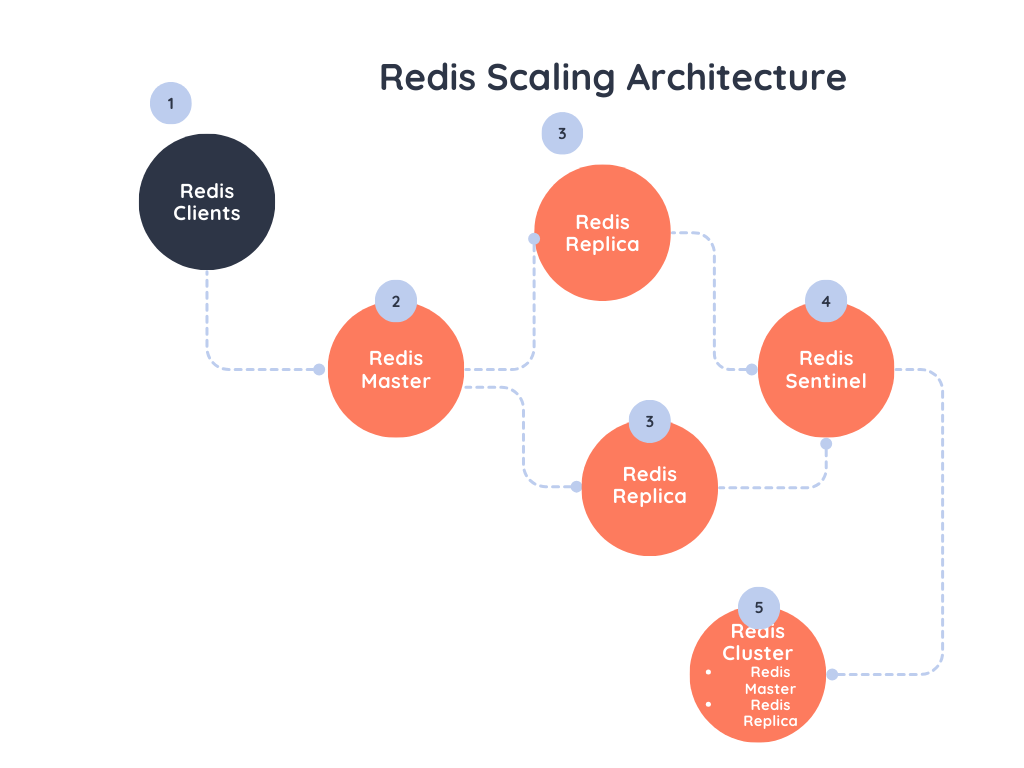
Monitor and Scale Redis Instances:
For large-scale GitHub Issue Management, it’s important to monitor Redis performance and scale instances as needed. Redis offers various tools and metrics to help with monitoring, such as Redis Sentinel and Redis Cluster.
Optimize Redis Configuration:
Optimizing Redis settings can improve performance. Adjust settings like memory usage, data storage options, and how Redis handles excess data to match your needs and boost efficiency.
Example Configuration:
# Example of Redis configuration for optimal performance
maxmemory 2gb
maxmemory-policy allkeys-lru
Explanation: This configuration sets a maximum memory limit and an eviction policy to remove the least recently used keys when memory is full. Such settings can help manage memory efficiently in a large-scale environment.
By incorporating these optimization techniques, you can enhance the efficiency of Redis Database in managing GitHub Issues. This not only improves Project Management on GitHub but also ensures that your AI-Powered Issue Resolution system remains responsive and effective. Whether you’re using Redis in Python, integrating with OpenAI GPT, or applying Machine Learning for GitHub Issues, these strategies will help you handle large volumes of issues with ease.
Conclusion
Final Thoughts on AI-Powered GitHub Issue Resolution
Combining LLM (Language Model) technology with Redis Database can really improve how you manage issues on GitHub. It makes the process of handling issues faster and more efficient by automating responses and organizing data.
LLM helps generate smart responses and solutions for GitHub issues, making AI-powered issue resolution possible. When you pair it with Redis for Issue Tracking, which quickly stores and retrieves issue data, you can track and resolve issues more easily using AI.
Redis Caching helps manage large amounts of issue data without slowing down your system. Whether you’re using Redis with Python for fast data access or integrating OpenAI to generate responses, this setup makes the process of resolving issues quicker, more accurate, and higher quality.
External Resources
Redis Official Documentation
- Link: Redis Documentation
- Description: Comprehensive guide and reference for setting up and using Redis, including configuration, commands, and advanced features.
GitHub API Documentation
- Link: GitHub REST API Documentation
- Description: Official documentation for the GitHub API, detailing how to interact with GitHub issues programmatically.
OpenAI API Documentation
- Link: OpenAI API Documentation
- Description: Detailed information on using OpenAI’s GPT models, including setup, API endpoints, and examples for integrating LLMs into applications.
Redis Python Client (redis-py) Documentation
- Link: redis-py Documentation
- Description: Official documentation for the Redis client library for Python, providing guidance on installation, usage, and advanced features.
FAQs
1. What is Redis, and why is it used for GitHub Issue Management?
Redis is an in-memory data structure store that is often used as a database, cache, and message broker. For GitHub Issue Management, Redis can store and quickly retrieve data such as issue statuses and solutions, enabling fast access and efficient issue tracking.
2. What is OpenAI GPT, and how does it assist with GitHub issue resolution?
OpenAI GPT is a language model that can generate human-like text based on given prompts. When integrated with GitHub, it can analyze issue descriptions and provide suggested solutions or responses, helping automate issue resolution.
3. What are the benefits of using AI and Redis for GitHub issue management?
Combining AI with Redis for GitHub issue management offers several benefits:
- Efficiency: Redis provides fast data retrieval, making issue tracking and resolution quicker.
- Automation: AI can automate responses and suggestions, reducing manual effort and speeding up resolution times.
- Scalability: Redis handles large volumes of data efficiently, which is crucial for managing numerous issues in large projects.
4. How can I handle scaling issues with Redis?
For large-scale issue management, consider optimizing Redis by:
- Using Redis Clustering: Distribute data across multiple Redis instances to handle increased load.
- Implementing Caching Strategies: Cache frequently accessed data to reduce retrieval times.
- Monitoring and Tuning: Regularly monitor Redis performance and adjust configurations as needed.


 in Generative Music: A New Era of Creativity")

Leave a Reply