Top Python OOP Projects with Source Code: A Complete Guide
Introduction
Object-Oriented Programming (OOP) is one of the core principles of Python. It is a key aspect of writing efficient, modular, and scalable code. Once you’ve mastered the basics of OOP (like classes, objects, and inheritance), it’s time to dive deeper into Python OOP Projects that can truly level up your programming skills. In this blog post, we’ll explore advanced OOP techniques and work on practical Python OOP Projects that will help you apply these concepts to real-world scenarios.
By the end of this post, you’ll have a clearer understanding of advanced Python OOP Projects principles and how to implement them in your own Python OOP Projects.
Python OOP Projects Key Advanced Concepts
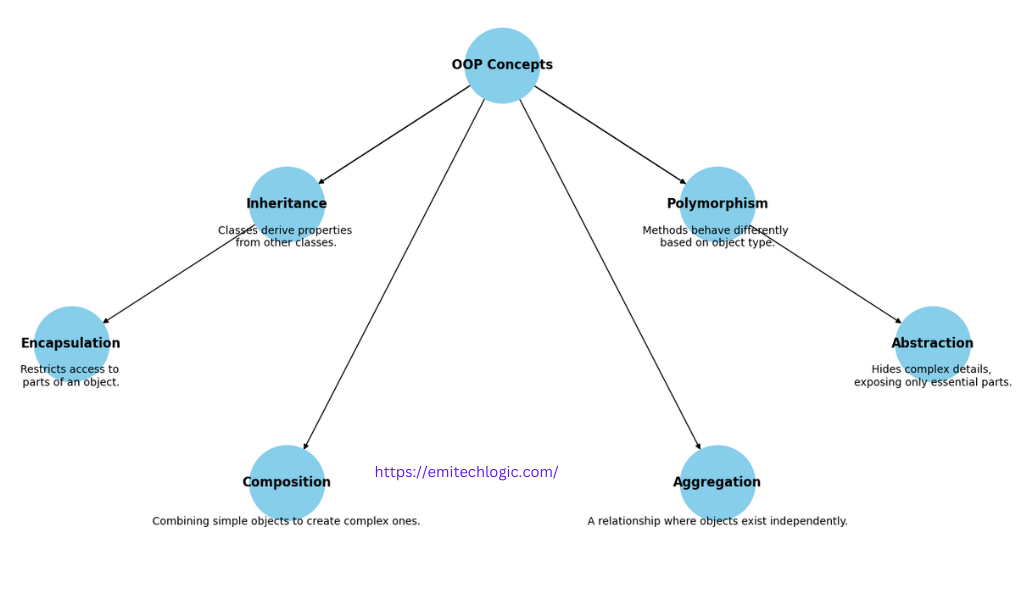
Before we jump into the practical projects, let’s review the core advanced OOP concepts that we’ll be focusing on:
- Polymorphism: The ability to redefine methods in child classes and use the same interface in multiple forms.
- Encapsulation: Restricting access to certain attributes and methods within a class to protect the data.
- Abstraction: Simplifying complex realities by modeling classes appropriate to the problem.
- Inheritance: The ability to create a new class that inherits attributes and behaviors from another class.
- Composition: Building more complex classes by combining other classes as components.
- Magic Methods (Dunder Methods): Special methods in Python that begin and end with double underscores (like
__init__,__str__, etc.). And allow custom behavior for built-in operations.
Now, let’s explore practical projects that apply these concepts!
Project 1: Building a Shopping Cart System
Problem Statement:
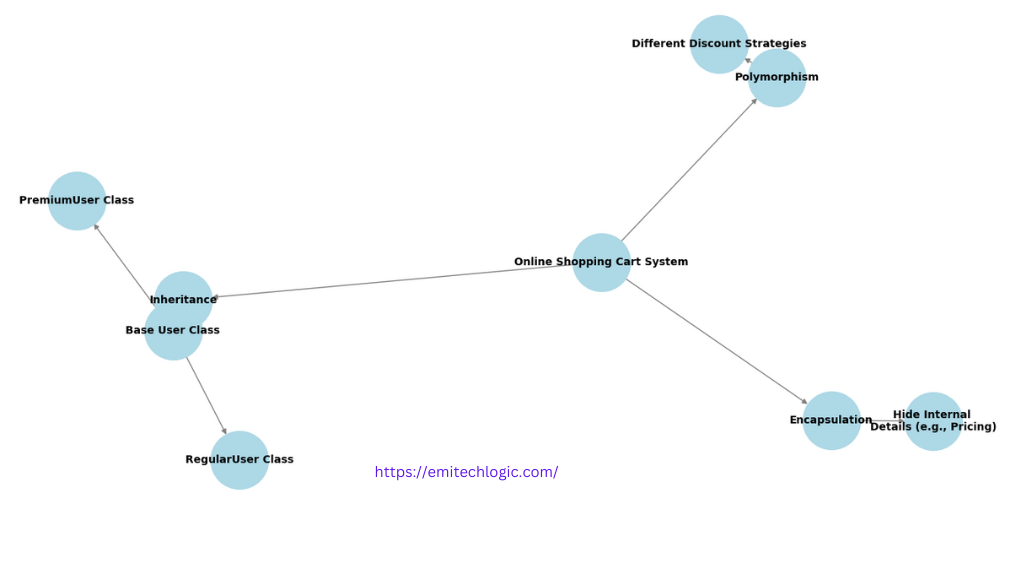
We’re tasked with creating an online shopping cart system where users can add items to their cart, view the total cost, and apply discounts based on their membership type.
Key OOP Concepts:
- Polymorphism: Implement different discount strategies based on user membership type.
- Encapsulation: Hide internal details like product pricing from the user.
- Inheritance: Create a base
Userclass and extend it forRegularUserandPremiumUser.
Code Example:
class User:
    def __init__(self, name, membership):
        self.name = name
        self.membership = membership

    def apply_discount(self, total):
        return total

class RegularUser(User):
    def apply_discount(self, total):
        return total  # No discount for regular users

class PremiumUser(User):
    def apply_discount(self, total):
        return total * 0.90  # 10% discount for premium users

class ShoppingCart:
    def __init__(self):
        self.items = []

    def add_item(self, item, price):
        self.items.append({'item': item, 'price': price})

    def calculate_total(self, user):
        total = sum(item['price'] for item in self.items)
        return user.apply_discount(total)

# Usage
user1 = PremiumUser("Alice", "Premium")
cart = ShoppingCart()
cart.add_item("Laptop", 1500)
cart.add_item("Mouse", 50)
print(f"Total with discount: ${cart.calculate_total(user1):.2f}")
In this Python code example, we’re exploring advanced object-oriented programming (OOP) concepts by implementing a practical project involving user discounts in an online shopping cart system. This will give you a hands-on look at how inheritance and polymorphism can be used effectively in Python.
Breakdown of the Code: Python OOP Projects
1. The User Class
The User class is a base class that represents a user with two attributes: name and membership. The constructor (__init__) initializes these attributes when a new User object is created.
class User:
    def __init__(self, name, membership):
        self.name = name
        self.membership = membership
name: Stores the name of the user.membership: Stores the type of membership, such as ‘Regular’ or ‘Premium.’
2. Polymorphism with apply_discount Method
The apply_discount method in the User class defines the basic interface that child classes can override. It takes a total (the total amount to be paid) and returns it unchanged (since the base User class doesn’t apply any discounts).
    def apply_discount(self, total):
        return total
3. The RegularUser and PremiumUser Classes
These classes inherit from the User class and each override the apply_discount method to implement their own discount policies.
RegularUser: In this class, theapply_discountmethod doesn’t alter the total price, since regular users get no discounts.
class RegularUser(User):
    def apply_discount(self, total):
        return total
PremiumUser: For premium users, theapply_discountmethod applies a 10% discount to the total.
class PremiumUser(User):
    def apply_discount(self, total):
        return total * 0.90  # 10% discount
This is a great example of polymorphism, where the same method (apply_discount) behaves differently based on the type of user.
4. The ShoppingCart Class
The ShoppingCart class manages the items and their prices. It has two main methods:
add_item: Adds items to the cart along with their price.calculate_total: Calculates the total cost of all items in the cart and applies the discount based on the user type.
class ShoppingCart:
    def __init__(self):
        self.items = []  # A list to store items and their prices

    def add_item(self, item, price):
        self.items.append({'item': item, 'price': price})

    def calculate_total(self, user):
        total = sum(item['price'] for item in self.items)  # Sum of item prices
        return user.apply_discount(total)  # Apply discount based on user type
5. Usage Example
In this example, we create a PremiumUser named Alice and a shopping cart with two items: a laptop and a mouse. The total price before discount is $1500 for the laptop and $50 for the mouse, making a total of $1550.
user1 = PremiumUser("Alice", "Premium")
cart = ShoppingCart()
cart.add_item("Laptop", 1500)
cart.add_item("Mouse", 50)
print(f"Total with discount: ${cart.calculate_total(user1):.2f}")
Since Alice is a premium user, the apply_discount method in the PremiumUser class is invoked, applying a 10% discount. The total after the discount is:
- Total: $1500 (Laptop) + $50 (Mouse) = $1550
- 10% Discount: $1550 * 0.90 = $1395.00
Final Output:
Total with discount: $1395.00Key OOP Concepts in Action Of Python OOP Projects
- Inheritance: The
RegularUserandPremiumUserclasses inherit from theUserbase class, reducing code duplication. - Polymorphism: The
apply_discountmethod behaves differently depending on the type of user, without the need to check user types explicitly. - Encapsulation: The user details and cart items are hidden inside their respective classes, only accessed through methods.
This project showcases how object-oriented programming can be applied to real-world scenarios like a shopping cart system with various membership levels.
Project 2: Creating a Simple Bank System – Python OOP Projects
Problem Statement:
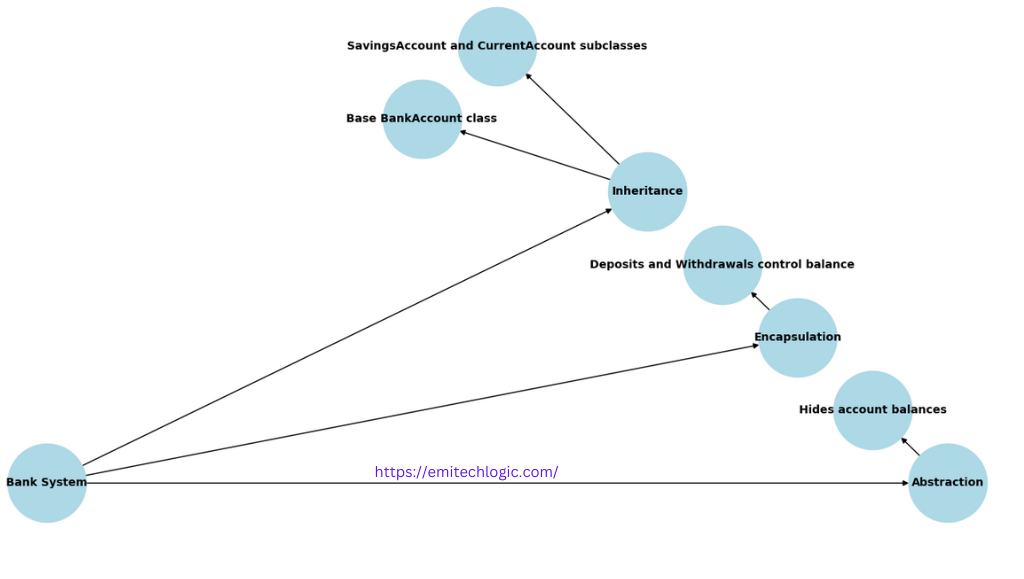
Build a bank system where users can create accounts, deposit or withdraw money, and check their balance. There should be different types of accounts like Savings and Current accounts.
Python OOP Projects Key OOP Concepts:
- Abstraction: Hide internal workings like account balances.
- Inheritance: Use a common base
BankAccountclass and extend it forSavingsAccountandCurrentAccount. - Encapsulation: Ensure account balance can only be modified through deposits and withdrawals.
Code Example:
class BankAccount:
    def __init__(self, owner, balance=0):
        self.owner = owner
        self._balance = balance  # Encapsulated attribute

    def deposit(self, amount):
        if amount > 0:
            self._balance += amount

    def withdraw(self, amount):
        if 0 < amount <= self._balance:
            self._balance -= amount
        else:
            print("Insufficient funds")

    def get_balance(self):
        return self._balance

class SavingsAccount(BankAccount):
    def withdraw(self, amount):
        if amount > 1000:
            print("Cannot withdraw more than $1000 from a Savings Account.")
        else:
            super().withdraw(amount)

class CurrentAccount(BankAccount):
    def withdraw(self, amount):
        super().withdraw(amount)  # No restrictions

# Usage
savings = SavingsAccount("John", 5000)
savings.withdraw(1500)
print(f"Savings Account Balance: ${savings.get_balance()}")

current = CurrentAccount("Jane", 3000)
current.withdraw(2000)
print(f"Current Account Balance: ${current.get_balance()}")
This code demonstrates advanced object-oriented programming (OOP) concepts by building a simple bank account system. Here, we focus on the use of inheritance, method overriding, and encapsulation to model a realistic scenario of two types of bank accounts: SavingsAccount and CurrentAccount.
Breakdown of the Code:
1. The BankAccount Class
The BankAccount class is the base class, representing a generic bank account. It includes the account owner’s name and their account balance, with methods to handle deposits, withdrawals, and balance checks.
class BankAccount:
    def __init__(self, owner, balance=0):
        self.owner = owner
        self._balance = balance  # Encapsulated attribute
- Encapsulation: The
_balanceattribute is prefixed with an underscore to indicate that it is intended to be protected from direct access outside the class, encouraging the use of getter and setter methods likedeposit,withdraw, andget_balanceto interact with it.
2. Deposit and Withdraw Methods
The BankAccount class has two key methods for handling money transactions:
deposit: Increases the balance by the amount specified.withdraw: Decreases the balance by the amount specified, but only if sufficient funds are available. If there are not enough funds, it prints an “Insufficient funds” message.
    def deposit(self, amount):
        if amount > 0:
            self._balance += amount

    def withdraw(self, amount):
        if 0 < amount <= self._balance:
            self._balance -= amount
        else:
            print("Insufficient funds")
3. The get_balance Method
This method simply returns the current balance, allowing external code to safely access the _balance attribute without directly modifying it.
    def get_balance(self):
        return self._balance
4. The SavingsAccount Class
The SavingsAccount class inherits from BankAccount and overrides the withdraw method to impose a specific restriction: users cannot withdraw more than $1000 at a time. This is a common feature in many real-world savings accounts.
class SavingsAccount(BankAccount):
    def withdraw(self, amount):
        if amount > 1000:
            print("Cannot withdraw more than $1000 from a Savings Account.")
        else:
            super().withdraw(amount)
- Method Overriding: This override introduces new behavior to the
withdrawmethod, preventing large withdrawals. It uses thesuper()function to call the parent class’swithdrawmethod if the withdrawal amount is within the allowed limit.
5. The CurrentAccount Class
The CurrentAccount class also inherits from BankAccount, but does not impose any special restrictions on withdrawals. It simply uses the withdraw method from the base class without additional rules.
class CurrentAccount(BankAccount):
    def withdraw(self, amount):
        super().withdraw(amount)  # No restrictions
6. Usage Example
In the example provided, two types of accounts are created: a SavingsAccount for John and a CurrentAccount for Jane.
- John’s SavingsAccount:
- John tries to withdraw $1500, but since this exceeds the limit of $1000 for a savings account, the program prints:
Cannot withdraw more than $1000 from a Savings Account. - The balance remains unchanged at $5000, as the withdrawal was not allowed.
- John tries to withdraw $1500, but since this exceeds the limit of $1000 for a savings account, the program prints:
savings = SavingsAccount("John", 5000)
savings.withdraw(1500)  # Output: Cannot withdraw more than $1000
print(f"Savings Account Balance: ${savings.get_balance()}")
Jane’s CurrentAccount:
- Jane successfully withdraws $2000 from her account, which had an initial balance of $3000.
- After the withdrawal, the balance is updated to $1000.
current = CurrentAccount("Jane", 3000)
current.withdraw(2000)
print(f"Current Account Balance: ${current.get_balance()}")
Output:
Cannot withdraw more than $1000 from a Savings Account.
Savings Account Balance: $5000
Current Account Balance: $1000
Python OOP Projects Key OOP Concepts in Action:
- Inheritance: The
SavingsAccountandCurrentAccountclasses inherit from theBankAccountclass, reusing its functionality for deposits, withdrawals, and balance checking. - Polymorphism (Method Overriding): The
withdrawmethod is overridden in theSavingsAccountclass to implement specific rules, demonstrating polymorphism. The same method behaves differently for different account types. - Encapsulation: The
_balanceattribute is encapsulated, ensuring it’s accessed only through defined methods likedeposit,withdraw, andget_balance, protecting it from unintended modifications.
This code illustrates how to apply advanced OOP principles in Python to solve practical problems such as handling different types of bank accounts with varying rules for transactions.
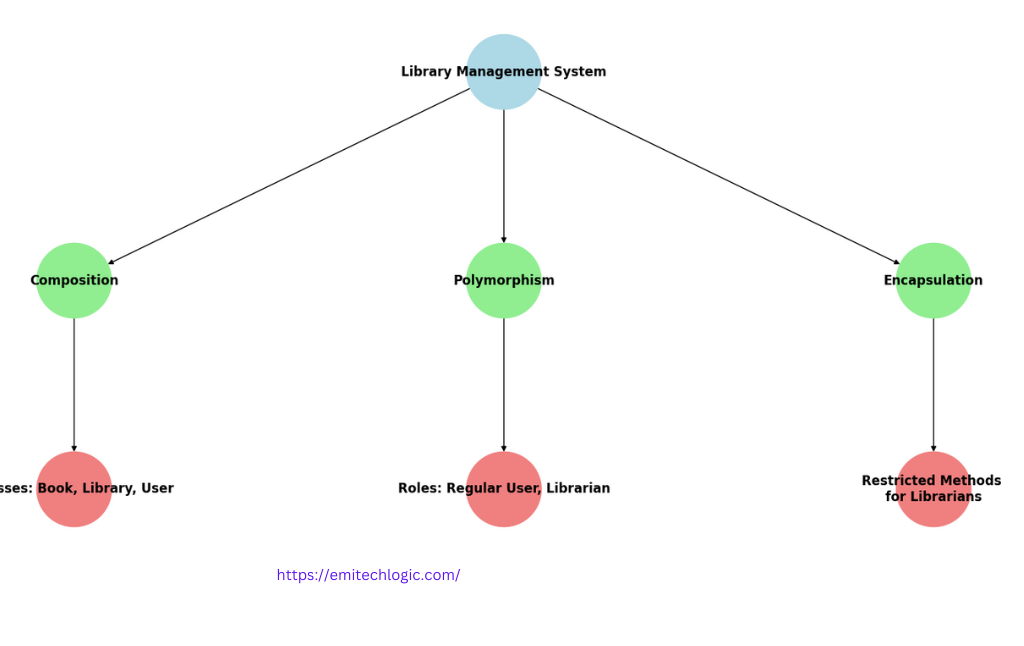
Project 3: Design a Library Management System – Python OOP Projects
Problem Statement:
Design a library management system where books can be borrowed, returned, and cataloged. Users should have different types of access (regular users and librarians), and the system should ensure that borrowed books are marked unavailable.
Python OOP Projects Key OOP Concepts:
- Composition: Use different classes for
Book,Library, andUser. - Polymorphism: Different user roles have different permissions.
- Encapsulation: Restrict certain methods to be accessible only by librarians.
Code Example:
class Book:
    def __init__(self, title, author):
        self.title = title
        self.author = author
        self.available = True

    def borrow(self):
        if self.available:
            self.available = False
            return True
        return False

    def return_book(self):
        self.available = True

class Library:
    def __init__(self):
        self.catalog = []

    def add_book(self, book):
        self.catalog.append(book)

    def list_available_books(self):
        return [book for book in self.catalog if book.available]

class User:
    def __init__(self, name):
        self.name = name

    def borrow_book(self, book):
        if book.borrow():
            print(f"{self.name} borrowed {book.title}")
        else:
            print(f"{book.title} is unavailable")

class Librarian(User):
    def add_book_to_library(self, book, library):
        library.add_book(book)
        print(f"{self.name} added {book.title} to the library")

# Usage
library = Library()
librarian = Librarian("Alex")
book1 = Book("1984", "George Orwell")

librarian.add_book_to_library(book1, library)

user = User("Emily")
user.borrow_book(book1)
print(f"Available books: {[book.title for book in library.list_available_books()]}")
This code showcases advanced object-oriented programming (OOP) concepts through the simulation of a library system. The system involves different types of users (regular users and librarians) and books, demonstrating principles like inheritance, encapsulation, and method overriding. Below is an explanation of how this code works and how OOP concepts are applied.
Code Breakdown
1. The Book Class
The Book class models a book in the library with two main attributes: the title and the author. It also includes a boolean flag called available, which indicates whether the book is available for borrowing.
borrow()method: This method changes the availability of the book when a user borrows it. If the book is available, it is marked as unavailable (setsavailabletoFalse) and returnsTrue. If not, it returnsFalse.return_book()method: This method resets the availability of the book when it’s returned, settingavailableback toTrue.
class Book:
    def __init__(self, title, author):
        self.title = title
        self.author = author
        self.available = True

    def borrow(self):
        if self.available:
            self.available = False
            return True
        return False

    def return_book(self):
        self.available = True
2. The Library Class
The Library class holds the collection of books in a catalog, which is represented as a list.
add_book()method: Adds aBookobject to the library’s catalog.list_available_books()method: Returns a list of all books in the catalog that are currently available for borrowing.
class Library:
    def __init__(self):
        self.catalog = []

    def add_book(self, book):
        self.catalog.append(book)

    def list_available_books(self):
        return [book for book in self.catalog if book.available]
3. The User Class
The User class models a person who can borrow books from the library. Each user has a name attribute.
borrow_book()method: This method allows a user to borrow a book. If the book is available, it prints a message indicating that the user successfully borrowed the book. If not, it informs the user that the book is unavailable.
class User:
    def __init__(self, name):
        self.name = name

    def borrow_book(self, book):
        if book.borrow():
            print(f"{self.name} borrowed {book.title}")
        else:
            print(f"{book.title} is unavailable")
4. The Librarian Class
The Librarian class inherits from the User class, adding specialized behavior. In this case, librarians can add books to the library.
add_book_to_library()method: This method allows a librarian to add a book to the library’s catalog. It prints a message confirming that the librarian has successfully added the book.
class Librarian(User):
    def add_book_to_library(self, book, library):
        library.add_book(book)
        print(f"{self.name} added {book.title} to the library")
5. Usage Example
This section demonstrates how the classes interact with each other:
- A
Libraryinstance is created. - A
Librariannamed Alex is created, and they add a book (1984by George Orwell) to the library. - A regular
Usernamed Emily attempts to borrow the book from the library. - The available books in the library are printed after the borrowing process.
library = Library()                     # Create a library
librarian = Librarian("Alex")            # Create a librarian named Alex
book1 = Book("1984", "George Orwell")    # Create a book object for "1984"

librarian.add_book_to_library(book1, library)  # Alex adds "1984" to the library

user = User("Emily")                     # Create a user named Emily
user.borrow_book(book1)                  # Emily borrows "1984"
print(f"Available books: {[book.title for book in library.list_available_books()]}")  # Check available books
6. Output Explanation
Alex added 1984 to the library
Emily borrowed 1984
Available books: []
Alex added 1984 to the library: The librarian Alex successfully adds the book 1984 to the library’s catalog. The method add_book_to_library() prints this message.
Emily borrowed 1984: Emily borrows the book, and since it is available, the borrow() method sets the book’s available flag to False. The borrow_book() method prints that Emily has successfully borrowed the book.
Available books: []: After Emily borrows the book, the library’s list of available books is empty, as 1984 is now unavailable. The method list_available_books() returns an empty list.
This project illustrates the power of OOP in Python by organizing complex behaviors like book borrowing, cataloging, and user roles into clear, reusable components.
Project 4: Inventory Management System – Python OOP Projects
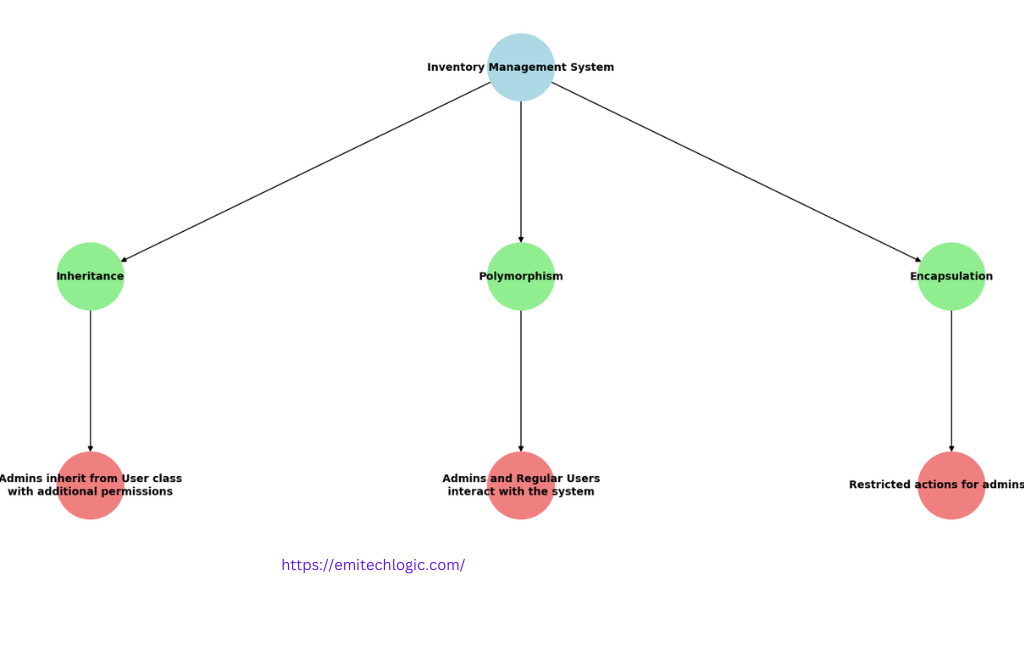
Let’s design an Inventory Management System applying key OOP concepts like inheritance, polymorphism, and encapsulation. The system will allow users to manage stock levels, add new items, and check item availability. It will include two types of users: admins (with full permissions) and regular users (with limited permissions).
Python OOP Projects Key OOP Concepts:
- Inheritance: Admins inherit from a base
Userclass and gain additional permissions. - Polymorphism: Both admin and regular users interact with the system but have different access to its features.
- Encapsulation: Certain actions, like adding or removing inventory items, will be restricted to admins, ensuring controlled access.
Python Code Example:
class Item:
    def __init__(self, name, quantity):
        self.name = name
        self.quantity = quantity

    def is_available(self):
        return self.quantity > 0

    def update_quantity(self, amount):
        self.quantity += amount

class Inventory:
    def __init__(self):
        self.items = {}

    def add_item(self, item):
        self.items[item.name] = item

    def check_availability(self, item_name):
        if item_name in self.items and self.items[item_name].is_available():
            return True
        return False

    def get_stock(self, item_name):
        if item_name in self.items:
            return self.items[item_name].quantity
        return 0

class User:
    def __init__(self, name):
        self.name = name

    def view_item(self, item_name, inventory):
        if inventory.check_availability(item_name):
            print(f"{item_name} is available with {inventory.get_stock(item_name)} in stock.")
        else:
            print(f"{item_name} is out of stock.")

class Admin(User):
    def add_new_item(self, item, inventory):
        inventory.add_item(item)
        print(f"{item.name} added to inventory with {item.quantity} in stock.")

    def update_item_stock(self, item_name, quantity, inventory):
        if item_name in inventory.items:
            inventory.items[item_name].update_quantity(quantity)
            print(f"Updated {item_name}'s stock by {quantity}. Current stock: {inventory.get_stock(item_name)}")
        else:
            print(f"{item_name} is not found in the inventory.")
Example usage
# Example Usage
inventory = Inventory()

# Admin actions
admin = Admin("Alice")
item1 = Item("Laptop", 10)
item2 = Item("Mouse", 50)

admin.add_new_item(item1, inventory)
admin.add_new_item(item2, inventory)

# Regular User actions
user = User("Bob")
user.view_item("Laptop", inventory)
user.view_item("Mouse", inventory)

# Admin updates stock
admin.update_item_stock("Laptop", 5, inventory)
user.view_item("Laptop", inventory)
This code demonstrates an inventory management system using object-oriented programming (OOP) principles in Python. It showcases concepts like class hierarchy, inheritance, and encapsulation by modeling an inventory system where users can view stock and admins can update it. Let’s break down the code and understand the key concepts in action.
Code Breakdown
1. The Item Class
The Item class models an item in the inventory. Each item has two attributes: name and quantity.
is_available()method: This checks whether the item’s quantity is greater than zero, indicating it is available for purchase or use.update_quantity()method: This method allows modifying the quantity of the item by adding a specifiedamountto the current quantity. This will be useful when the admin wants to restock items.
class Item:
    def __init__(self, name, quantity):
        self.name = name
        self.quantity = quantity

    def is_available(self):
        return self.quantity > 0

    def update_quantity(self, amount):
        self.quantity += amount
2. The Inventory Class
The Inventory class manages a collection of items using a dictionary where the key is the item name, and the value is the Item object itself.
add_item()method: This adds anItemobject to the inventory’s dictionary, storing it by its name.check_availability()method: This checks if the item is in stock and available. It returnsTrueif the item exists in the inventory and has a quantity greater than zero.get_stock()method: This method returns the current stock (quantity) of a specific item. If the item is not found, it returns0.
class Inventory:
    def __init__(self):
        self.items = {}

    def add_item(self, item):
        self.items[item.name] = item

    def check_availability(self, item_name):
        if item_name in self.items and self.items[item_name].is_available():
            return True
        return False

    def get_stock(self, item_name):
        if item_name in self.items:
            return self.items[item_name].quantity
        return 0
3. The User Class
The User class represents a regular user who can view the availability of items in the inventory. Each user has a name attribute.
view_item()method: This allows a user to view the stock of a specific item. It interacts with the inventory by callingcheck_availability()andget_stock(). Depending on the stock status, it prints a message indicating whether the item is available or out of stock.
class User:
    def __init__(self, name):
        self.name = name

    def view_item(self, item_name, inventory):
        if inventory.check_availability(item_name):
            print(f"{item_name} is available with {inventory.get_stock(item_name)} in stock.")
        else:
            print(f"{item_name} is out of stock.")
4. The Admin Class (Inheritance from User)
The Admin class inherits from the User class and extends the functionality. An admin can not only view items but also add new items and update stock in the inventory.
add_new_item()method: This allows the admin to add an item to the inventory by calling theadd_item()method of theInventoryclass.update_item_stock()method: This allows the admin to update the stock of an item by modifying its quantity. It checks if the item exists in the inventory, and if so, updates the stock by callingupdate_quantity(). If the item is not found, it prints an error message.
class Admin(User):
    def add_new_item(self, item, inventory):
        inventory.add_item(item)
        print(f"{item.name} added to inventory with {item.quantity} in stock.")

    def update_item_stock(self, item_name, quantity, inventory):
        if item_name in inventory.items:
            inventory.items[item_name].update_quantity(quantity)
            print(f"Updated {item_name}'s stock by {quantity}. Current stock: {inventory.get_stock(item_name)}")
        else:
            print(f"{item_name} is not found in the inventory.")
5. Usage Example
The usage section shows how the classes interact in practice:
- An
Inventoryobject is created. - An
Adminnamed Alice adds two items, Laptop and Mouse, to the inventory. - A regular user named Bob views the stock of these items.
- Alice updates the stock of the Laptop, adding 5 more units to the inventory.
- Bob views the updated stock of the Laptop.
# Example Usage
inventory = Inventory()

# Admin actions
admin = Admin("Alice")
item1 = Item("Laptop", 10)
item2 = Item("Mouse", 50)

admin.add_new_item(item1, inventory)
admin.add_new_item(item2, inventory)

# Regular User actions
user = User("Bob")
user.view_item("Laptop", inventory)
user.view_item("Mouse", inventory)

# Admin updates stock
admin.update_item_stock("Laptop", 5, inventory)
user.view_item("Laptop", inventory)
6. Output Explanation
Laptop added to inventory with 10 in stock.
Mouse added to inventory with 50 in stock.
Laptop is available with 10 in stock.
Mouse is available with 50 in stock.
Updated Laptop's stock by 5. Current stock: 15
Laptop is available with 15 in stock.
Laptop added to inventory with 10 in stock.: Alice, the admin, adds the Laptop item to the inventory with an initial quantity of 10.
Mouse added to inventory with 50 in stock.: Alice adds the Mouse item to the inventory with 50 units.
Laptop is available with 10 in stock.: Bob, the regular user, checks the availability of the Laptop and sees that there are 10 units available.
Mouse is available with 50 in stock.: Bob checks the availability of the Mouse, and the inventory confirms there are 50 units in stock.
Updated Laptop's stock by 5. Current stock: 15: Alice updates the stock of the Laptop by adding 5 more units, bringing the total to 15.
Laptop is available with 15 in stock.: Bob views the Laptop stock again and sees that it now has 15 units.
Project 5: Hospital Management System – Python OOP Projects
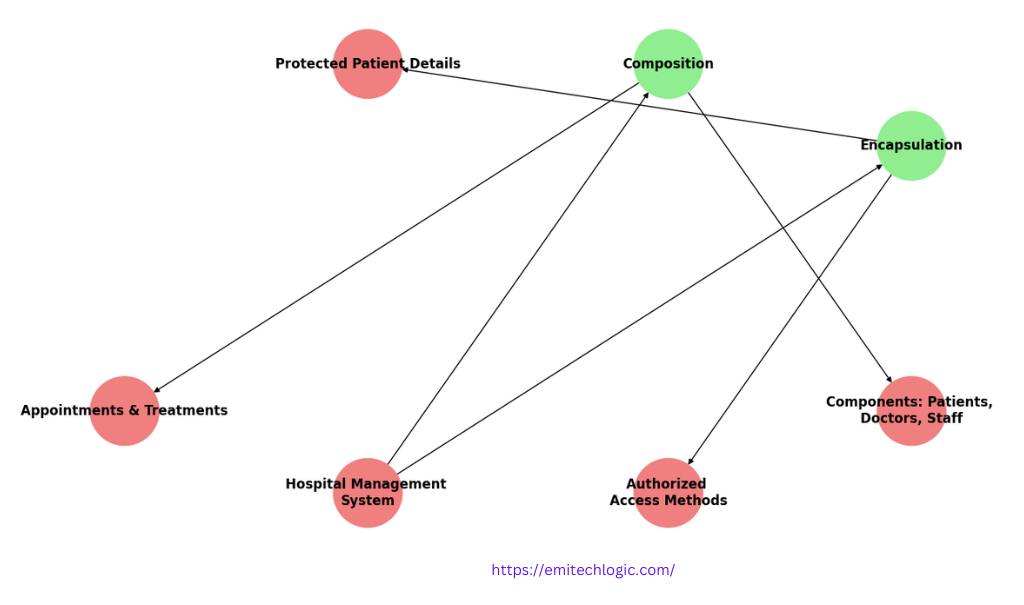
In this Hospital Management System, we’ll build a system to manage patient data, appointments, doctors, and treatments. We’ll implement different classes for patients, doctors, and staff, ensuring proper data access through encapsulation and using composition to organize these components.
Python OOP Projects Key OOP Concepts:
- Encapsulation: Sensitive data like patient details and medical records will be protected and only accessible through authorized methods.
- Composition: A hospital is composed of patients, doctors, staff, appointments, and treatments, showing how these objects work together.
Python Code Example:
class Patient:
    def __init__(self, patient_id, name, age, medical_history=None):
        self.__patient_id = patient_id  # Encapsulated patient ID
        self.name = name
        self.age = age
        self.__medical_history = medical_history or []

    def add_medical_record(self, record):
        self.__medical_history.append(record)

    def get_medical_history(self):
        return self.__medical_history

class Doctor:
    def __init__(self, doctor_id, name, specialty):
        self.__doctor_id = doctor_id  # Encapsulated doctor ID
        self.name = name
        self.specialty = specialty

    def diagnose(self, patient, diagnosis):
        patient.add_medical_record(f"Diagnosis: {diagnosis} by Dr. {self.name} ({self.specialty})")

class Appointment:
    def __init__(self, patient, doctor, date, time):
        self.patient = patient
        self.doctor = doctor
        self.date = date
        self.time = time

    def get_details(self):
        return f"Appointment: {self.date} at {self.time} - Patient: {self.patient.name}, Doctor: {self.doctor.name}"

class Hospital:
    def __init__(self):
        self.patients = []
        self.doctors = []
        self.appointments = []

    def add_patient(self, patient):
        self.patients.append(patient)

    def add_doctor(self, doctor):
        self.doctors.append(doctor)

    def schedule_appointment(self, appointment):
        self.appointments.append(appointment)

    def list_appointments(self):
        return [appointment.get_details() for appointment in self.appointments]

# Example Usage

# Hospital creation
hospital = Hospital()

# Adding doctors
doctor1 = Doctor(1, "Dr. Smith", "Cardiology")
doctor2 = Doctor(2, "Dr. Emily", "Neurology")
hospital.add_doctor(doctor1)
hospital.add_doctor(doctor2)

# Adding patients
patient1 = Patient(101, "John Doe", 45)
patient2 = Patient(102, "Jane Roe", 30)
hospital.add_patient(patient1)
hospital.add_patient(patient2)

# Scheduling appointments
appointment1 = Appointment(patient1, doctor1, "2024-10-05", "10:00 AM")
appointment2 = Appointment(patient2, doctor2, "2024-10-06", "11:00 AM")
hospital.schedule_appointment(appointment1)
hospital.schedule_appointment(appointment2)

# Doctor diagnoses
doctor1.diagnose(patient1, "Hypertension")
doctor2.diagnose(patient2, "Migraine")

# View appointments
for details in hospital.list_appointments():
    print(details)

# Viewing patient medical history
print(patient1.get_medical_history())
print(patient2.get_medical_history())
This code simulates a hospital management system where doctors, patients, and appointments are represented using object-oriented programming (OOP). It models interactions between doctors and patients, including diagnoses and appointments, with an emphasis on data encapsulation.
Code Breakdown
1. The Patient Class
The Patient class represents a patient in the hospital system. It stores the patient’s ID, name, age, and their medical history.
- Encapsulation: The patient ID (
__patient_id) and medical history (__medical_history) are encapsulated to ensure that they are only accessible through the provided methods. add_medical_record()method: Allows adding a new record (e.g., a diagnosis) to the patient’s medical history.get_medical_history()method: Returns the patient’s medical history for viewing.
class Patient:
    def __init__(self, patient_id, name, age, medical_history=None):
        self.__patient_id = patient_id  # Encapsulated patient ID
        self.name = name
        self.age = age
        self.__medical_history = medical_history or []

    def add_medical_record(self, record):
        self.__medical_history.append(record)

    def get_medical_history(self):
        return self.__medical_history
2. The Doctor Class
The Doctor class represents a doctor in the system. Each doctor has an ID, name, and specialty.
- Encapsulation: The doctor ID (
__doctor_id) is encapsulated to prevent external modification. diagnose()method: Allows the doctor to diagnose a patient by adding a diagnosis to the patient’s medical history. The diagnosis includes the doctor’s name and specialty for reference.
class Doctor:
    def __init__(self, doctor_id, name, specialty):
        self.__doctor_id = doctor_id  # Encapsulated doctor ID
        self.name = name
        self.specialty = specialty

    def diagnose(self, patient, diagnosis):
        patient.add_medical_record(f"Diagnosis: {diagnosis} by Dr. {self.name} ({self.specialty})")
3. The Appointment Class
The Appointment class models a scheduled appointment between a patient and a doctor. Each appointment includes the patient, doctor, date, and time.
get_details()method: Returns a human-readable string with details of the appointment, including the patient’s and doctor’s names, as well as the date and time.
class Appointment:
    def __init__(self, patient, doctor, date, time):
        self.patient = patient
        self.doctor = doctor
        self.date = date
        self.time = time

    def get_details(self):
        return f"Appointment: {self.date} at {self.time} - Patient: {self.patient.name}, Doctor: {self.doctor.name}"
4. The Hospital Class
The Hospital class manages the system, storing lists of patients, doctors, and appointments.
add_patient()method: Adds a patient to the hospital’s list of patients.add_doctor()method: Adds a doctor to the hospital’s list of doctors.schedule_appointment()method: Adds an appointment to the hospital’s list of scheduled appointments.list_appointments()method: Returns a list of appointment details by callingget_details()on each appointment in the system.
class Hospital:
    def __init__(self):
        self.patients = []
        self.doctors = []
        self.appointments = []

    def add_patient(self, patient):
        self.patients.append(patient)

    def add_doctor(self, doctor):
        self.doctors.append(doctor)

    def schedule_appointment(self, appointment):
        self.appointments.append(appointment)

    def list_appointments(self):
        return [appointment.get_details() for appointment in self.appointments]
Example Usage – Python OOP Projects
In the usage example, we demonstrate how doctors, patients, and appointments interact within the hospital system:
- Hospital Creation: A
Hospitalobject is created to manage the doctors, patients, and appointments. - Adding Doctors: Two doctors, “Dr. Smith” (Cardiology) and “Dr. Emily” (Neurology), are added to the hospital.
- Adding Patients: Two patients, John Doe and Jane Roe, are added to the hospital.
- Scheduling Appointments: Appointments are created for each patient with their respective doctor and scheduled in the system.
- Doctor Diagnoses: Each doctor makes a diagnosis for their patient, which gets recorded in the patient’s medical history.
- Viewing Appointments and Medical History: The scheduled appointments are printed, followed by the medical history of each patient.
# Example Usage

# Hospital creation
hospital = Hospital()

# Adding doctors
doctor1 = Doctor(1, "Dr. Smith", "Cardiology")
doctor2 = Doctor(2, "Dr. Emily", "Neurology")
hospital.add_doctor(doctor1)
hospital.add_doctor(doctor2)

# Adding patients
patient1 = Patient(101, "John Doe", 45)
patient2 = Patient(102, "Jane Roe", 30)
hospital.add_patient(patient1)
hospital.add_patient(patient2)

# Scheduling appointments
appointment1 = Appointment(patient1, doctor1, "2024-10-05", "10:00 AM")
appointment2 = Appointment(patient2, doctor2, "2024-10-06", "11:00 AM")
hospital.schedule_appointment(appointment1)
hospital.schedule_appointment(appointment2)

# Doctor diagnoses
doctor1.diagnose(patient1, "Hypertension")
doctor2.diagnose(patient2, "Migraine")

# View appointments
for details in hospital.list_appointments():
    print(details)

# Viewing patient medical history
print(patient1.get_medical_history())
print(patient2.get_medical_history())
Output Explanation
Appointment: 2024-10-05 at 10:00 AM - Patient: John Doe, Doctor: Dr. Smith
Appointment: 2024-10-06 at 11:00 AM - Patient: Jane Roe, Doctor: Dr. Emily
['Diagnosis: Hypertension by Dr. Smith (Cardiology)']
['Diagnosis: Migraine by Dr. Emily (Neurology)']
Appointment Listings: The details of the scheduled appointments for John Doe and Jane Roe are printed, showing the date, time, patient name, and doctor name.
Medical History: Each patient’s medical history is printed, including the diagnosis made by their respective doctor. For John Doe, the diagnosis is Hypertension, and for Jane Roe, it’s Migraine.
Project 6: Role-Based Access Control (RBAC) System – Python OOP Projects
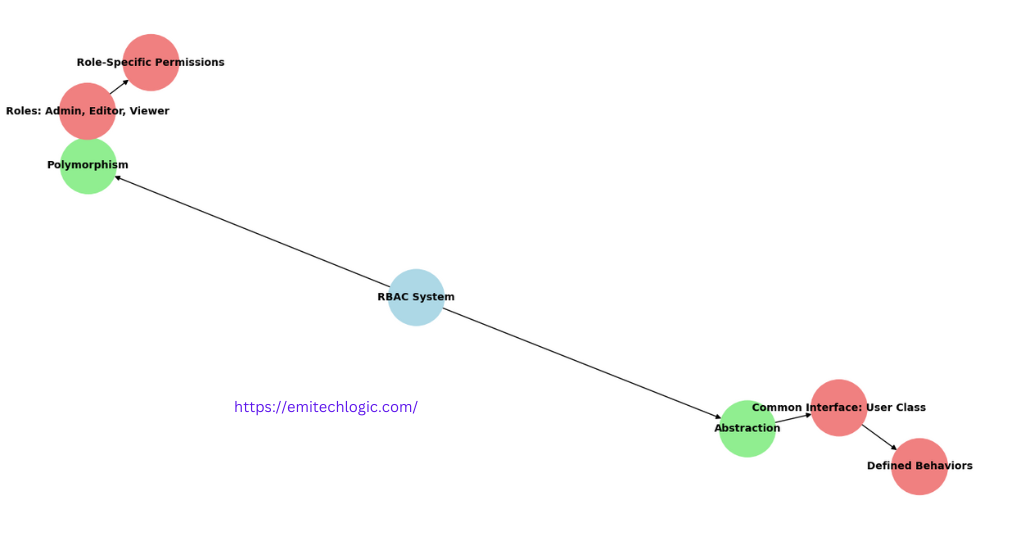
A Role-Based Access Control (RBAC) System manages users with different roles and permissions (e.g., Admin, Editor, Viewer). The system restricts actions based on the user’s role, ensuring that only authorized users can perform certain operations. This will be achieved through polymorphism to define role-specific behaviors and abstraction to provide a common interface for accessing resources.
Key OOP Concepts:
- Polymorphism: Different roles (Admin, Editor, Viewer) will have their own implementation of permissions and actions, but they all interact with the system through a common interface.
- Abstraction: A base class (
User) will provide an abstract interface for the different roles to define their specific behaviors.
Python Code Example:
from abc import ABC, abstractmethod

# Abstract base class for User
class User(ABC):
    def __init__(self, username):
        self.username = username

    @abstractmethod
    def view_content(self):
        pass

    @abstractmethod
    def edit_content(self):
        pass

    @abstractmethod
    def delete_content(self):
        pass

# Admin role with full permissions
class Admin(User):
    def view_content(self):
        print(f"{self.username} (Admin) is viewing content.")

    def edit_content(self):
        print(f"{self.username} (Admin) is editing content.")

    def delete_content(self):
        print(f"{self.username} (Admin) is deleting content.")

# Editor role with limited permissions
class Editor(User):
    def view_content(self):
        print(f"{self.username} (Editor) is viewing content.")

    def edit_content(self):
        print(f"{self.username} (Editor) is editing content.")

    def delete_content(self):
        print(f"{self.username} (Editor) is not allowed to delete content.")

# Viewer role with view-only permissions
class Viewer(User):
    def view_content(self):
        print(f"{self.username} (Viewer) is viewing content.")

    def edit_content(self):
        print(f"{self.username} (Viewer) is not allowed to edit content.")

    def delete_content(self):
        print(f"{self.username} (Viewer) is not allowed to delete content.")

# Role-Based Access Control (RBAC) System
class AccessControlSystem:
    def __init__(self):
        self.users = []

    def add_user(self, user):
        self.users.append(user)

    def perform_actions(self):
        for user in self.users:
            print(f"\nActions for {user.username}:")
            user.view_content()
            user.edit_content()
            user.delete_content()

# Example Usage

# Create Access Control System
rbac_system = AccessControlSystem()

# Add users with different roles
admin_user = Admin("Alice")
editor_user = Editor("Bob")
viewer_user = Viewer("Charlie")

rbac_system.add_user(admin_user)
rbac_system.add_user(editor_user)
rbac_system.add_user(viewer_user)

# Perform actions for each user
rbac_system.perform_actions()
This code demonstrates a Role-Based Access Control (RBAC) system using object-oriented programming principles in Python. It organizes users into different roles (Admin, Editor, and Viewer) with varying levels of permissions to perform actions like viewing, editing, and deleting content.
Python OOP Projects Key Concepts
1. Abstract Base Class (User)
The User class is an abstract base class (ABC) that defines the common structure for different types of users. It has three abstract methods that every user role must implement:
view_content()edit_content()delete_content()
These methods define the behaviors each user type should provide but leave the specifics to the derived classes (Admin, Editor, and Viewer).
from abc import ABC, abstractmethod

class User(ABC):
    def __init__(self, username):
        self.username = username

    @abstractmethod
    def view_content(self):
        pass

    @abstractmethod
    def edit_content(self):
        pass

    @abstractmethod
    def delete_content(self):
        pass
2. Admin, Editor, and Viewer Classes
These classes inherit from User and implement the abstract methods with different levels of permissions. Each role is granted specific access rights:
- Admin: Has full access (view, edit, and delete).
- Editor: Can view and edit but not delete content.
- Viewer: Can only view content, with no rights to edit or delete.
Each role implements the abstract methods with role-specific behavior.
class Admin(User):
    def view_content(self):
        print(f"{self.username} (Admin) is viewing content.")

    def edit_content(self):
        print(f"{self.username} (Admin) is editing content.")

    def delete_content(self):
        print(f"{self.username} (Admin) is deleting content.")


class Editor(User):
    def view_content(self):
        print(f"{self.username} (Editor) is viewing content.")

    def edit_content(self):
        print(f"{self.username} (Editor) is editing content.")

    def delete_content(self):
        print(f"{self.username} (Editor) is not allowed to delete content.")


class Viewer(User):
    def view_content(self):
        print(f"{self.username} (Viewer) is viewing content.")

    def edit_content(self):
        print(f"{self.username} (Viewer) is not allowed to edit content.")

    def delete_content(self):
        print(f"{self.username} (Viewer) is not allowed to delete content.")
3. Access Control System (AccessControlSystem)
The AccessControlSystem class manages users and enforces their roles in the system. It stores a list of users and iterates over them to perform actions like viewing, editing, and deleting content.
add_user()method: Adds a user to the system.perform_actions()method: Iterates through each user, invoking their role-specific actions.
class AccessControlSystem:
    def __init__(self):
        self.users = []

    def add_user(self, user):
        self.users.append(user)

    def perform_actions(self):
        for user in self.users:
            print(f"\nActions for {user.username}:")
            user.view_content()
            user.edit_content()
            user.delete_content()
Example Usage
In the example, three users (Admin, Editor, and Viewer) are created, and their actions are evaluated by the system based on their roles.
- An Admin named “Alice” can perform all actions: view, edit, and delete content.
- An Editor named “Bob” can only view and edit but cannot delete.
- A Viewer named “Charlie” can only view content, with no rights to edit or delete.
# Example Usage

# Create Access Control System
rbac_system = AccessControlSystem()

# Add users with different roles
admin_user = Admin("Alice")
editor_user = Editor("Bob")
viewer_user = Viewer("Charlie")

rbac_system.add_user(admin_user)
rbac_system.add_user(editor_user)
rbac_system.add_user(viewer_user)

# Perform actions for each user
rbac_system.perform_actions()
Output:
Actions for Alice:
Alice (Admin) is viewing content.
Alice (Admin) is editing content.
Alice (Admin) is deleting content.

Actions for Bob:
Bob (Editor) is viewing content.
Bob (Editor) is editing content.
Bob (Editor) is not allowed to delete content.

Actions for Charlie:
Charlie (Viewer) is viewing content.
Charlie (Viewer) is not allowed to edit content.
Charlie (Viewer) is not allowed to delete content.
This system shows how to use OOP principles to create a flexible, scalable system for managing user permissions based on roles.
Project 7: Restaurant Management System – Python OOP Projects
In this Restaurant Management System, we’ll develop a system where customers can place orders, waiters can serve orders, and managers can update the menu. We’ll use inheritance to define different types of users with distinct permissions, encapsulation to protect sensitive data, and composition to organize classes for orders, menu items, and users.
Key OOP Concepts:
- Inheritance: Different user types (Customer, Waiter, Manager) will inherit common behavior from a base
Userclass but have distinct actions and permissions. - Encapsulation: Sensitive data such as order details and menu items will be kept private and accessible only through well-defined methods.
- Composition: The restaurant is composed of multiple objects like
Menu,Order, andUser.
Python Code Example:
# Class for Menu Items
class MenuItem:
    def __init__(self, name, price):
        self.name = name
        self.price = price

# Class for Menu, which manages MenuItems
class Menu:
    def __init__(self):
        self.__items = []  # Encapsulated list of menu items

    def add_item(self, item):
        self.__items.append(item)

    def remove_item(self, item_name):
        self.__items = [item for item in self.__items if item.name != item_name]

    def view_menu(self):
        return [(item.name, item.price) for item in self.__items]

# Class for Orders
class Order:
    def __init__(self, customer):
        self.customer = customer
        self.__items = []  # Encapsulated list of order items

    def add_item(self, menu_item):
        self.__items.append(menu_item)

    def get_order_details(self):
        total = sum(item.price for item in self.__items)
        return [(item.name, item.price) for item in self.__items], total

# Base Class for Users (Customer, Waiter, Manager)
class User:
    def __init__(self, name):
        self.name = name

# Customer Class
class Customer(User):
    def place_order(self, order, menu, item_names):
        for item_name in item_names:
            for item in menu.view_menu():
                if item[0] == item_name:
                    order.add_item(MenuItem(item_name, item[1]))
        print(f"{self.name} placed an order.")

# Waiter Class
class Waiter(User):
    def serve_order(self, order):
        items, total = order.get_order_details()
        print(f"Order served by {self.name}: {items}. Total: ${total}")

# Manager Class
class Manager(User):
    def update_menu(self, menu, action, item=None):
        if action == "add" and item:
            menu.add_item(item)
            print(f"{self.name} added {item.name} to the menu.")
        elif action == "remove" and item:
            menu.remove_item(item.name)
            print(f"{self.name} removed {item.name} from the menu.")

# Example Usage

# Create Menu and add initial items
menu = Menu()
manager = Manager("Alex")
manager.update_menu(menu, "add", MenuItem("Pasta", 12.99))
manager.update_menu(menu, "add", MenuItem("Pizza", 9.99))
manager.update_menu(menu, "add", MenuItem("Salad", 5.99))

# Customer placing an order
customer = Customer("Emily")
order = Order(customer)
customer.place_order(order, menu, ["Pasta", "Salad"])

# Waiter serving the order
waiter = Waiter("John")
waiter.serve_order(order)

# Manager updates the menu
manager.update_menu(menu, "remove", MenuItem("Salad", 5.99))
print("Updated Menu:", menu.view_menu())
This Python program models a simple restaurant management system with classes for Menu Items, Orders, and Users (Customer, Waiter, Manager). Each role has specific responsibilities, allowing for dynamic interactions such as placing orders, serving them, and updating the menu.
Key Classes and Methods
1. MenuItem Class
Represents individual items on the menu, defined by name and price.
class MenuItem:
    def __init__(self, name, price):
        self.name = name
        self.price = price
2. Menu Class
This class encapsulates the list of menu items and provides methods to add, remove, and view items. It ensures that the internal list of items is protected by using encapsulation (__items).
add_item(): Adds an item to the menu.remove_item(): Removes an item by name.view_menu(): Returns a list of items (name and price).
class Menu:
    def __init__(self):
        self.__items = []

    def add_item(self, item):
        self.__items.append(item)

    def remove_item(self, item_name):
        self.__items = [item for item in self.__items if item.name != item_name]

    def view_menu(self):
        return [(item.name, item.price) for item in self.__items]
3. Order Class
Represents a customer’s order, with an encapsulated list of order items. It provides methods to add items to the order and retrieve order details, including a total price.
add_item(): Adds a menu item to the order.get_order_details(): Returns the list of items and the total cost.
class Order:
    def __init__(self, customer):
        self.customer = customer
        self.__items = []

    def add_item(self, menu_item):
        self.__items.append(menu_item)

    def get_order_details(self):
        total = sum(item.price for item in self.__items)
        return [(item.name, item.price) for item in self.__items], total
4. User Class and Derived Roles (Customer, Waiter, Manager)
The User class is a base class for the three roles in the system. Each subclass has specific functionalities:
- Customer: Can place an order by selecting items from the menu.
- Waiter: Can serve the order and display the details, including total cost.
- Manager: Can update the menu by adding or removing items.
class User:
    def __init__(self, name):
        self.name = name

class Customer(User):
    def place_order(self, order, menu, item_names):
        for item_name in item_names:
            for item in menu.view_menu():
                if item[0] == item_name:
                    order.add_item(MenuItem(item_name, item[1]))
        print(f"{self.name} placed an order.")

class Waiter(User):
    def serve_order(self, order):
        items, total = order.get_order_details()
        print(f"Order served by {self.name}: {items}. Total: ${total}")

class Manager(User):
    def update_menu(self, menu, action, item=None):
        if action == "add" and item:
            menu.add_item(item)
            print(f"{self.name} added {item.name} to the menu.")
        elif action == "remove" and item:
            menu.remove_item(item.name)
            print(f"{self.name} removed {item.name} from the menu.")
Example Usage
This example demonstrates how different roles interact with the system:
- Manager Alex adds menu items (Pasta, Pizza, Salad).
- Customer Emily places an order for “Pasta” and “Salad.”
- Waiter John serves the order and prints the order details.
- Manager Alex updates the menu by removing the “Salad.”
# Example Usage

# Create Menu and add initial items
menu = Menu()
manager = Manager("Alex")
manager.update_menu(menu, "add", MenuItem("Pasta", 12.99))
manager.update_menu(menu, "add", MenuItem("Pizza", 9.99))
manager.update_menu(menu, "add", MenuItem("Salad", 5.99))

# Customer placing an order
customer = Customer("Emily")
order = Order(customer)
customer.place_order(order, menu, ["Pasta", "Salad"])

# Waiter serving the order
waiter = Waiter("John")
waiter.serve_order(order)

# Manager updates the menu
manager.update_menu(menu, "remove", MenuItem("Salad", 5.99))
print("Updated Menu:", menu.view_menu())
Output
Alex added Pasta to the menu.
Alex added Pizza to the menu.
Alex added Salad to the menu.
Emily placed an order.
Order served by John: [('Pasta', 12.99), ('Salad', 5.99)]. Total: $18.98
Alex removed Salad from the menu.
Updated Menu: [('Pasta', 12.99), ('Pizza', 9.99)]
Summary:
- Menu Management: The
Managercan add or remove items from the menu. - Order Placement: The
Customerselects items from the menu, which are then added to theOrder. - Order Serving: The
Waiterserves the order and calculates the total. - Encapsulation: Sensitive data such as menu items and order details are kept private and managed through methods, enforcing good design practices.
This system showcases encapsulation, inheritance, and role-specific behavior in a dynamic restaurant management scenario.
Conclusion
Mastering advanced OOP concepts like polymorphism, inheritance, encapsulation, and abstraction opens up a whole new level of power in Python programming. By working through practical projects like the shopping cart system, bank system, and library management system, you’ll develop the skills needed to apply these principles to real-world applications.
If you’re ready to take your Python skills further, consider checking out our full online Python course, where we cover OOP from beginner to advanced levels with more projects, challenges, and deep dives into advanced concepts.
FAQ
Advanced OOP concepts include inheritance, polymorphism, encapsulation, abstraction, method overloading, method overriding, and design patterns. These concepts help create modular, reusable, and maintainable code, enabling developers to manage complex software systems effectively.
The guide includes projects such as:
A library management system showcasing inheritance and polymorphism.
An inventory management system demonstrating encapsulation and abstraction.
A game development project illustrating design patterns and advanced data handling.
While a basic understanding of OOP principles is beneficial, the guide provides clear explanations and examples to help readers grasp advanced concepts. Beginners can follow along, but having some familiarity with Python is recommended.
The primary tool required is Python itself. For specific projects, you might need additional libraries such as:
Pygame for game development projects.
Tkinter for creating GUI applications.
SQLAlchemy for database interactions in management systems.
Absolutely! The advanced OOP concepts covered in this guide are widely applicable in various industries, including software development, data anhttps://emitechlogic.com/unlock-the-power-of-generative-ai-in-game-development/https://emitechlogic.com/unlock-the-power-of-generative-ai-in-game-development/https://emitechlogic.com/unlock-the-power-of-generative-ai-in-game-development/https://emitechlogic.com/unlock-the-power-of-generative-ai-in-game-development/alysis, web development, and game design. Understanding these principles will significantly enhance your coding skills and enable you to tackle real-world challenges effectively.
External Resources
Python’s Official Documentation
Python’s official documentation on object-oriented programming provides a detailed explanation of OOP principles like classes, inheritance, and encapsulation.
Python OOP Documentation






Leave a Reply