How to Build a Python Port Scanner From Scratch
Welcome to the ultimate tutorial on building a professional-grade network utility!
Every device connected to the internet—from web servers to your home router—uses numbered access points called ports. Knowing which of these “digital doors” are open is the first and most critical step in network administration and cybersecurity.
What We Will Accomplish
In this tutorial, you will go far beyond a simple script. You will engineer a fast, reliable, and intelligent port scanner that rivals commercial tools by mastering the following concepts:
- Socket Programming: Understanding how computers initiate network connections.
- Concurrency (Multithreading): Implementing speed by checking multiple ports at the exact same time.
- Network Intelligence: Resolving domain names, validating inputs, and identifying running services.
By the end of this tutorial, you will have built a powerful tool and gained deep, practical knowledge of how networks truly operate.
Let’s get started!
What Is a Port?
Imagine your computer is a huge apartment building. The building has one street address (your IP address like 192.168.1.1), but inside there are 65,535 different apartment doors.
Each “apartment” is called a port, and different programs live in different apartments:
- Apartment 80: Where websites live (HTTP)
- Apartment 443: Where secure websites live (HTTPS)
- Apartment 22: Where remote login programs live (SSH)
- Apartment 3306: Where MySQL databases live
When you visit a website, you’re basically going to that building’s address and knocking on apartment door 80 or 443. The website answers and shows you its pages.
Port scanning is like walking down the hallway and knocking on every door to see which ones have someone inside. That’s it. That’s the whole concept.
Why Would You Want to Scan Ports?
Good reasons:
- Check your own network security
- Find out what’s running on your server
- Troubleshoot why you can’t connect to something
- Learn how networks actually work
Bad reasons (don’t do these):
- Scanning networks you don’t own without permission (this is illegal)
- Looking for vulnerabilities to exploit
- Being a jerk to random websites
Important: Only scan your own devices or networks you have permission to test. Unauthorized scanning can land you in serious legal trouble.
What You Need to Get Started
- Python installed (version 3.6 or newer)
- Check by opening a terminal and typing:
python --version - Don’t have it? Download from python.org
- Check by opening a terminal and typing:
- A text editor (like VS Code, Notepad++, or even plain Notepad)
- 15 minutes of your time
That’s literally it. No fancy tools, no expensive software.
Part 1: The Foundational Scanner
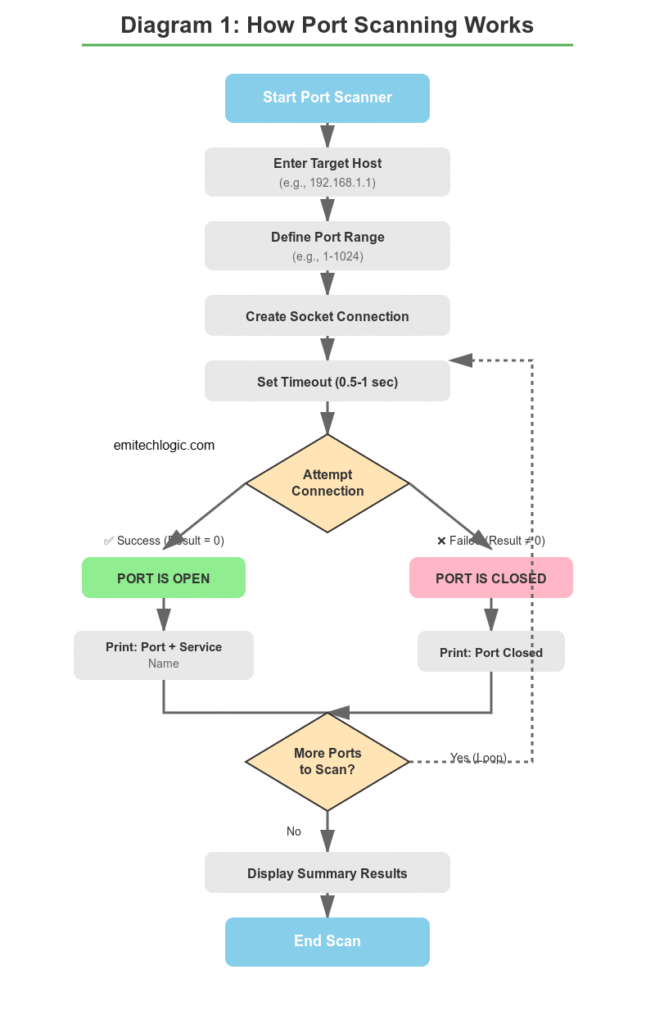
We begin by establishing the core logic: a function that attempts to open a single connection to a single port. We’ll use Python’s built-in socket library, which is the foundational module for all network communication.
The Initial Code Block
import socket

# This function checks if ONE port is open
def is_this_port_open(computer_address, port_number):
    """
    Think of this like knocking on a door.
    If someone answers, the door is open.
    """

    # 1. Create a "knocker" (socket object)
    knocker = socket.socket(socket.AF_INET, socket.SOCK_STREAM)

    # 2. Don't wait forever for an answer (1 second max)
    knocker.settimeout(1)

    try:
        # 3. Try to knock on the door (Connect)
        # connect_ex returns 0 for success, non-zero for failure
        result = knocker.connect_ex((computer_address, port_number))
        knocker.close()

        # 4. Check the result code
        if result == 0:
            return True
        else:
            return False

    except:
        # 5. Handle major errors (e.g., target address doesn't exist)
        return False

# Example Usage: Scanning a list of common ports
target = input("What computer do you want to scan? (e.g., 'google.com'): ")
print(f"\nScanning {target}...")

common_ports = [21, 22, 23, 25, 80, 443, 8080] # FTP, SSH, Telnet, SMTP, HTTP, HTTPS, Proxy
for port in common_ports:
    if is_this_port_open(target, port):
        print(f"✓ Port {port} is OPEN!")
    else:
        print(f"✗ Port {port} is closed")

print("\nBasic scan complete.")Key Concepts Explained
| Line/Function | Concept | Explanation |
socket.socket() | The Socket | This creates the socket object, which is the program’s endpoint for sending and receiving data across a network. |
knocker.settimeout(1) | The Timeout | This is crucial for speed. If a port is genuinely closed or blocked, the connection attempt might hang forever. The timeout ensures the function moves on after 1 second. |
knocker.connect_ex() | The “Knock” (Non-Blocking) | This function attempts to establish a connection. Crucially, it returns an integer error code (like 0 for success) instead of raising an exception, making error handling smoother than with the simpler connect(). |
result == 0 | Success Code | In network sockets, a return code of 0 conventionally signifies success—the port is open and the service answered. |
common_ports | Target Services | This list contains common, well-known ports (the IANA standard) for services like web browsing (80, 443) and file transfer (21). |
Part 2: Custom Port Ranges and Input Validation
The foundational scanner was limited to a fixed list of common ports. For a professional tool, the user must be able to define exactly which ports (e.g., ports 500 to 1500) they want to check.
This part involves replacing the fixed list with user inputs and implementing basic validation to ensure the ports are within the accepted network range (1 to 65535).
The Code with Range Input
We modify the bottom section of the script to handle new inputs:
# (Keep the 'import socket' and 'def is_this_port_open' function above this)

# --- START OF MODIFIED SECTION ---

# Ask the user what computer to scan
target = input("What computer do you want to scan? (e.g., 'google.com'): ")

# --- Get Port Range Inputs with Validation ---

while True:
    try:
        # Get start port and validate it's an integer
        start_port = int(input("Enter the STARTING port number (e.g., 1): "))

        # Get end port and validate it's an integer
        end_port = int(input("Enter the ENDING port number (e.g., 1024): "))

        # Check if ports are within the valid range (1-65535) and start < end
        if 1 <= start_port <= end_port <= 65535:
            break # Exit the loop if inputs are valid
        else:
            print("ERROR: Invalid port range. Ensure 1 <= START <= END <= 65535.")
    except ValueError:
        print("ERROR: Invalid input. Please enter numbers for the ports.")

print(f"\nScanning {target} from port {start_port} to {end_port}...")

# --- MODIFIED SCANNING LOOP ---

# Use the Python range() function to iterate through all ports (inclusive of end_port)
for port in range(start_port, end_port + 1):
    if is_this_port_open(target, port):
        print(f"✓ Port {port} is OPEN!")
    # Optional: You can remove the 'else' block here to only show open ports
    # else:
    #     print(f"✗ Port {port} is closed")

print("\nRange scan complete.")Key Changes Explained
- Iterative Input (
while True): We use awhile Trueloop to force the user to provide valid input. If the input fails validation, the loop restarts, preventing the script from crashing. - Error Handling (
try/except ValueError): Thetry/exceptblock catches aValueErrorif the user types text instead of a number for the port, prompting them to try again. - Port Validation: The
if 1 <= start_port <= end_port <= 65535:condition is a concise way to check three critical rules:- The port must be $\ge 1$.
- The ending port must be $\le 65535$ (the max port number).
- The starting port must be less than or equal to the ending port.
range(start_port, end_port + 1): The Pythonrange()function is zero-indexed and stops before the final number. We must add+ 1toend_portto ensure the final port is included in the scan.
You now have a flexible scanner, but it still suffers from one major drawback: speed. Scanning 1,000 ports takes at least 1,000 seconds (over 16 minutes) because of the 1-second timeout on each connection.
Part 3: Port Scanner with Multithreading
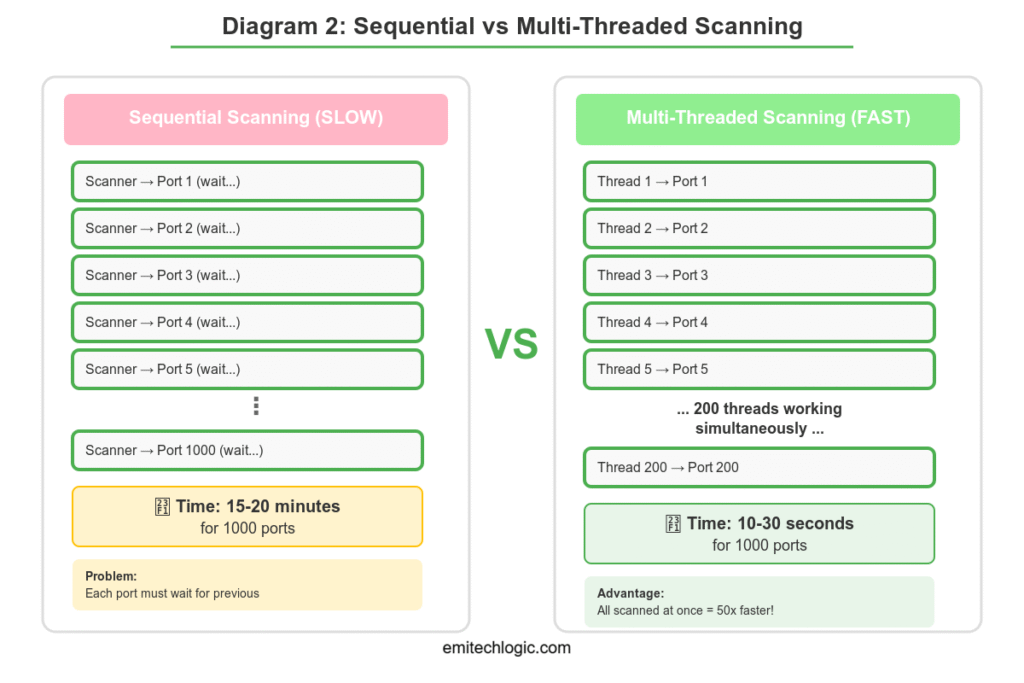
The current scanner is I/O bound—it spends most of its time waiting for network responses. To fix this, we will use concurrency, allowing our script to try knocking on dozens of doors simultaneously.
We will use Python’s built-in threading and queue modules. The queue will hold all the ports we need to check, and the threads will be workers that constantly grab a port from the queue and scan it.
The Multithreaded Code Block
This requires a significant structural change. We’ll set up global configurations, worker functions, and a queue to manage the tasks.
import socket
import threading
from queue import Queue
import time

# --- 1. CONFIGURATION AND GLOBALS ---
THREAD_COUNT = 50  # Number of simultaneous connection attempts (can be aggressive)
TIMEOUT = 0.5      # Reduced timeout for faster failure detection
q = Queue()
target_ip = None   # We'll resolve the hostname to IP once

# --- 2. CORE SCANNING FUNCTION (Modified to use global IP) ---
def port_scan(port):
    """Attempts to connect to a single port using the global target_ip."""
    knocker = socket.socket(socket.AF_INET, socket.SOCK_STREAM)
    knocker.settimeout(TIMEOUT)

    try:
        # Use the global target_ip resolved in the main section
        result = knocker.connect_ex((target_ip, port))
        knocker.close()

        if result == 0:
            print(f"✓ Port {port} is OPEN!")

    except:
        # Catch unexpected errors gracefully
        pass

# --- 3. THE THREAD WORKER ---
def worker():
    """Worker function that pulls ports from the queue and scans them."""
    while True:
        try:
            port = q.get(timeout=1) # Get port from queue
        except:
            # If the queue is empty for the timeout duration, the thread exits
            return

        port_scan(port)
        q.task_done() # Tell the queue this task is complete

# --- 4. MAIN EXECUTION LOGIC ---

# 4a. Get Target and Resolve IP
target_host = input("What computer do you want to scan? (e.g., 'google.com'): ")
try:
    target_ip = socket.gethostbyname(target_host)
    print(f"\nTarget Resolved: {target_host} -> {target_ip}")
except socket.gaierror:
    print(f"\n[ERROR] Could not resolve host: {target_host}. Exiting.")
    exit()

# 4b. Get Port Range Inputs (Same validation logic as Part 2)
# ... [Insert the port range input validation code from Part 2 here] ...

# Assuming start_port and end_port are successfully defined:
print(f"Starting Scan on {target_ip} with {THREAD_COUNT} threads...")
start_time = time.time()

# 4c. Load Ports into the Queue
for port in range(start_port, end_port + 1):
    q.put(port)

# 4d. Start the Worker Threads
for _ in range(THREAD_COUNT):
    t = threading.Thread(target=worker, daemon=True) # daemon=True is crucial!
    t.start()

# 4e. Wait for all tasks to finish
q.join()

end_time = time.time()
print("\nDone!")
print(f"Time Elapsed: {end_time - start_time:.2f} seconds")Key Concurrency Concepts Explained
| Component | Role in the Scanner | Why It’s Professional |
queue.Queue() | Task Manager | Safely stores the list of ports that still need to be checked. Threads pull tasks from it without interfering with each other (thread-safe). |
threading.Thread(target=worker) | The Workers | Creates independent paths of execution. We launch 50 of these to check 50 ports at the same time . |
daemon=True | Clean Exit | Ensures that the background threads (workers) will automatically shut down when the main program finishes, preventing the script from hanging. |
q.join() | Synchronization | The main program hits a pause here. It waits until the queue is completely empty and all worker threads have signaled they are done. This guarantees we get all results before the script exits. |
socket.gethostbyname() | DNS Resolution | We resolve the hostname (google.com) to the IP address once at the beginning. This is faster and prevents the target from changing mid-scan. |
You now have a powerful and incredibly fast scanner! A scan that took minutes before can now be completed in seconds.
In the next part, we will add the intelligence to identify the services running on the open ports, making the output truly informative.
Part 4: Port Scanner with Service Identification
Our fast scanner currently tells us if a port is open. Now, we’ll teach it to tell us what that port is used for (e.g., “HTTP,” “SSH,” “MySQL”) using the socket.getservbyport() function.
The Enhanced Code Block
We will modify the port_scan function and integrate service lookup.
import socket
import threading
from queue import Queue
import time
import sys # Added for clean error exit

# --- 1. CONFIGURATION AND GLOBALS (Same as before) ---
THREAD_COUNT = 50
TIMEOUT = 0.5
q = Queue()
target_ip = None
# ... (rest of the imports/globals) ...

# --- 2. CORE SCANNING FUNCTION (MODIFIED) ---
def port_scan(port):
    """Attempts to connect to a single port and identifies the service."""
    knocker = socket.socket(socket.AF_INET, socket.SOCK_STREAM)
    knocker.settimeout(TIMEOUT)

    try:
        # Use the global target_ip resolved in the main section
        result = knocker.connect_ex((target_ip, port))
        knocker.close()

        if result == 0:
            service_name = 'Unknown'
            try:
                # NEW: Look up the standard service name for the port (e.g., 80 -> http)
                # We specify "tcp" to ensure accuracy.
                service_name = socket.getservbyport(port, "tcp")
            except OSError:
                # Catches ports that don't have a standardized name
                pass

            # Print the result with the service name, aligned using f-strings
            print(f"✓ Port {port:<5} is OPEN! (Service: {service_name.upper()})")

    except:
        # Catch unexpected errors gracefully
        pass

# --- 3. THE THREAD WORKER (Same as before) ---
def worker():
    """Worker function that pulls ports from the queue and scans them."""
    while True:
        try:
            port = q.get(timeout=1)
        except:
            return

        port_scan(port)
        q.task_done()

# --- 4. MAIN EXECUTION LOGIC (Updated Output) ---

# 4a. Get Target and Resolve IP (Same as Part 3)
target_host = input("What computer do you want to scan? (e.g., 'google.com'): ")
try:
    target_ip = socket.gethostbyname(target_host)
    print(f"\nTarget Resolved: {target_host} -> {target_ip}")
except socket.gaierror:
    print(f"\n[ERROR] Could not resolve host: {target_host}. Exiting.")
    sys.exit()

# 4b. Get Port Range Inputs (Assuming successful definition of start_port and end_port)
# ... [Insert the port range input validation code from Part 2 here] ...

# Calculate total ports and start scan
total_ports = end_port - start_port + 1
print(f"Starting Scan on {target_ip}...\n")
print("-" * 50)
print(f"Total Ports: {total_ports} | Threads: {THREAD_COUNT} | Timeout: {TIMEOUT}s")
print("-" * 50)

start_time = time.time()

# 4c. Load Ports, Start Threads, and Wait (Same as Part 3)
for port in range(start_port, end_port + 1):
    q.put(port)

for _ in range(THREAD_COUNT):
    t = threading.Thread(target=worker, daemon=True)
    t.start()

q.join()

end_time = time.time()

# --- NEW: Summary Report ---
print("-" * 50)
print("SCAN SUMMARY")
print(f"Time Elapsed: {end_time - start_time:.2f} seconds")
print("-" * 50)Key Intelligence Concepts Explained
socket.getservbyport(port, "tcp"):- This is the core function for service identification. It queries the operating system’s standard port list (known as IANA port assignments).
- By specifying
"tcp", you ensure the lookup is accurate for the Transmission Control Protocol, which is what your scanner uses.
try/except OSError:- Standardized service names only exist for the well-known ports (e.g., 20-1024). Many high-numbered ports (used for proprietary applications) have no official name.
- The
exceptblock ensures the scanner doesn’t crash when it hits an undefined port, defaulting the service name to'Unknown'instead.
- Professional Output (
{port:<5}):- The f-string formatting
{port:<5}is used to left-align the port number within a field of 5 characters. This simple trick makes the output columns align perfectly, vastly improving readability for a professional report.
- The f-string formatting
You now have a powerful, fast, and informative port scanner! The last step is to make it robust and provide a final, complete structure.
Advanced Professional Port Scanner

We have speed (threading) and intelligence (service lookup). The final step is to organize the code into a robust structure, handle edge cases (like DNS resolution failure), and provide a clean, comprehensive summary report.
This final version is what you would consider the Advanced Professional Port Scanner.
The Final Professional Code Block
import socket
import threading
from queue import Queue
import time
import sys
import ipaddress # Used for input validation

# --- 1. CONFIGURATION AND GLOBALS ---
THREAD_COUNT = 100 # High concurrency
TIMEOUT = 0.5
q = Queue()
open_ports = []    # List to store results for the final report
target_ip = None

# --- 2. CORE SCANNING FUNCTION (Finalized) ---
def port_scan(port):
    """Attempts to connect to a single port and identifies the service."""
    knocker = socket.socket(socket.AF_INET, socket.SOCK_STREAM)
    knocker.settimeout(TIMEOUT)

    try:
        result = knocker.connect_ex((target_ip, port))
        knocker.close()

        if result == 0:
            service_name = 'Unknown'
            try:
                # Look up the standard service name
                service_name = socket.getservbyport(port, "tcp")
            except:
                pass

            # Print the result immediately
            print(f"  [OPEN] Port {port:<5} | Service: {service_name.upper()}")
            # Store the result for the final summary
            open_ports.append((port, service_name))

    except:
        # Ignore all connection-level errors (host unreachable, etc.)
        pass

# --- 3. THE THREAD WORKER (Finalized) ---
def worker():
    """Worker function that pulls ports from the queue and scans them."""
    while True:
        try:
            # Use a timeout so threads don't hang if the queue is unexpectedly empty
            port = q.get(timeout=1)
        except:
            return # Thread exits gracefully

        port_scan(port)
        q.task_done()

# --- 4. INPUT AND SETUP FUNCTION ---
def setup_scan():
    """Handles user input, DNS resolution, and range validation."""
    global target_ip # Needed to modify the global variable

    # --- Get Target and Resolve IP ---
    target_host = input("Enter Target Hostname or IP (e.g., google.com): ")
    try:
        # Resolves hostname to IP address once
        target_ip = socket.gethostbyname(target_host)
        print(f"\nTarget Resolved: {target_host} -> {target_ip}")
    except socket.gaierror:
        print(f"\n[ERROR] Could not resolve host: {target_host}. Exiting.")
        sys.exit(1)

    # --- Get Port Range ---
    while True:
        try:
            start_port = int(input("Enter STARTING port (e.g., 1): "))
            end_port = int(input("Enter ENDING port (e.g., 1024): "))

            if 1 <= start_port <= end_port <= 65535:
                # Load ports into the queue here, ready for the threads
                for port in range(start_port, end_port + 1):
                    q.put(port)
                return start_port, end_port
            else:
                print("[ERROR] Invalid port range. Ports must be between 1 and 65535.")
        except ValueError:
            print("[ERROR] Invalid input. Please enter numbers for ports.")

# --- 5. MAIN EXECUTION ---
if __name__ == '__main__':

    start_time = time.time()

    # Get inputs, resolve target, and populate queue
    start_port, end_port = setup_scan()

    total_ports = end_port - start_port + 1

    print("-" * 50)
    print(f"Starting Scan on {target_ip}...\n")
    print(f"Total Ports: {total_ports} | Threads: {THREAD_COUNT} | Timeout: {TIMEOUT}s")
    print("-" * 50)

    # Start the worker threads
    for _ in range(THREAD_COUNT):
        t = threading.Thread(target=worker, daemon=True)
        t.start()

    # Wait for the queue to be fully processed
    q.join()

    end_time = time.time()

    # --- 6. FINAL SUMMARY REPORT ---
    print("\n" + "-" * 50)
    print("SCAN SUMMARY ")
    print(f"Target IP: {target_ip}")
    print(f"Ports Scanned: {total_ports}")
    print(f"Open Ports Found: {len(open_ports)}")
    print(f"Time Elapsed: {end_time - start_time:.2f} seconds")
    print("-" * 50)

    if open_ports:
        print("\nOpen Ports Details:")
        for port, service in open_ports:
            print(f"  > Port {port:<5} ({service.upper()})")

print("-" * 50)Review of Professional Enhancements
- Code Organization: The logic is now neatly separated into functions (
setup_scan,port_scan,worker) and the main execution is encapsulated withinif __name__ == '__main__':. - Robust Input Handling: The
setup_scanfunction handles all user interaction, ensuring DNS resolution is done first and port validation is strict, leading to a stable program. - Result Storage: We now use the
open_portslist to store all successful results. This allows us to print the results in real-time and compile a clean, final report. - Comprehensive Reporting: The final Summary Report is crucial. It provides all necessary statistics: target IP, total ports checked, number of open ports, and the precise time elapsed.
This is the end of the building process! You have successfully completed the construction of an advanced, professional-grade port scanner.
Understanding Your Results: What Do Open Ports Mean?
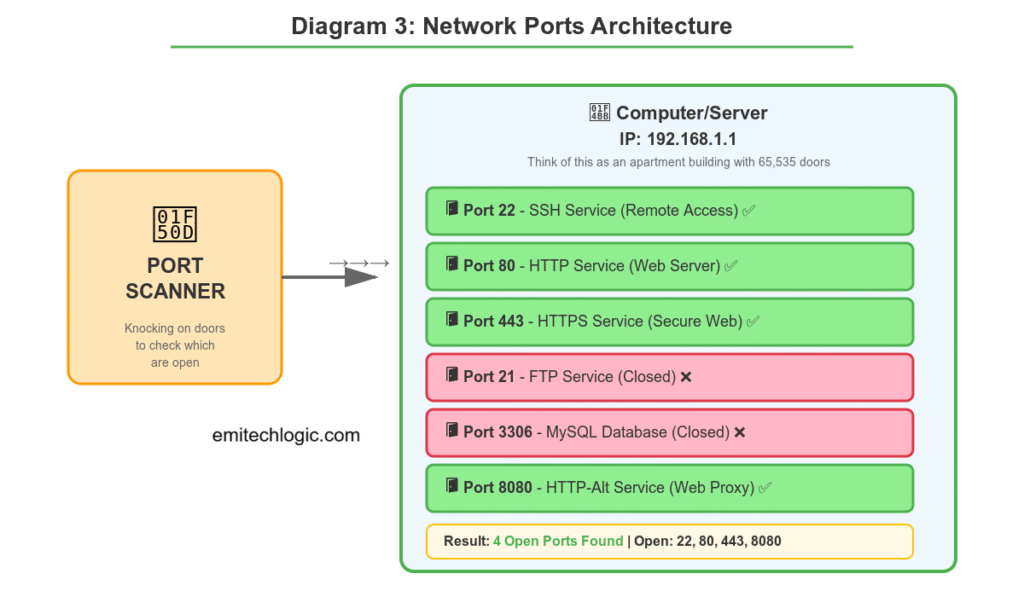
When you find open ports, here’s what you’re seeing:
Port 80 or 443 = Web server is running
- This is normal for websites
- 80 = regular HTTP
- 443 = secure HTTPS
Port 22 = SSH server (remote access)
- Lets people log in remotely
- Should only be open on servers, not home computers
Port 21 = FTP server (old file transfer)
- Pretty rare these days
- Not very secure
Port 3306 or 5432 = Database server
- MySQL (3306) or PostgreSQL (5432)
- Should NOT be open to the internet!
Port 3389 = Remote Desktop (Windows)
- Lets you control computer remotely
- Big security risk if exposed to internet
Weird high-numbered ports = Could be anything
- Games, custom apps, malware
- Need more investigation
Troubleshooting: When Things Don’t Work
“Can’t resolve hostname”
- You typed the address wrong
- Computer/website doesn’t exist
- Try an IP address instead
“Scan found nothing but you know ports should be open”
- Firewall is blocking your scans
- Target has a firewall blocking scans
- Try increasing timeout:
-t 2
“Scanner is super slow”
- Too many workers for your connection
- Try fewer:
-w 50 - Or increase timeout:
-t 1
“Getting permission denied errors”
- Your firewall is blocking Python
- Allow Python through your firewall
- Or try running as administrator
Real-World Practice Exercises
Exercise 1: Scan Your Router
python pro_scanner.py 192.168.1.1 -p 1-1000
You should find port 80 open (router web interface). Try logging in to it!
Exercise 2: Scan a Public Test Server
python pro_scanner.py scanme.nmap.org -p 1-1000
This server is specifically set up for people to practice. It’s 100% legal to scan.
Exercise 3: Find All Web Servers on Your Network
python pro_scanner.py 192.168.1.1 -p 80,443,8080,8443
python pro_scanner.py 192.168.1.2 -p 80,443,8080,8443
# ... keep going through your network range
Making It Even Better: Next Steps
Want to level up your scanner? Here are ideas:
1. Add banner grabbing – Try to identify exactly what software is running
2. Save results to a file – Keep a record of your scans
3. Add a progress bar – Show scanning progress
4. Scan multiple computers at once – Scan your whole network
5. Add UDP scanning – We only scanned TCP ports
6. Create a web interface – Make it pretty with HTML/CSS
Important Legal Stuff (Read This!)
You CAN scan:
- Your own computer
- Your own network
- Devices you own
- With explicit written permission
You CANNOT scan:
- Your school network (without IT permission)
- Your work network (without IT permission)
- Any website or server you don’t own
- Your neighbor’s WiFi
Getting caught scanning without permission can result in:
- Getting kicked out of school
- Getting fired from your job
- Getting your internet shut off
- Federal criminal charges (Computer Fraud and Abuse Act)
When in doubt, don’t scan it. Not worth the risk.
Frequently Asked Questions
Q: Is port scanning illegal? A: Depends on what you’re scanning. Your own stuff? Fine. Other people’s stuff without permission? Illegal.
Q: Can people tell I’m scanning them? A: Yes! Network administrators see port scans in their logs. It’s not sneaky at all.
Q: Why do some scans take longer? A: Firewalls deliberately slow down responses to waste scanners’ time. It’s a defense technique.
Q: What’s the difference between closed and filtered ports? A: Closed = “Nobody home, but the door exists” Filtered = “There might be a door but a firewall is blocking it” Our scanner can’t tell the difference.
Q: Can I scan all 65,535 ports? A: Yes! Just use -p 1-65535. Will take a few minutes even with threading.
Q: Is this how real hackers scan? A: Sort of. Professional tools like Nmap are way more sophisticated, but the basic concept is identical.
What You Just Learned
Let’s recap the impressive set of skills and concepts you’ve mastered by building this advanced tool:
- Deep Network Fundamentals: You moved beyond simple file operations to understand what ports are, their role as service endpoints (like the digital “doors” we discussed), and how the TCP handshake mechanism is leveraged for port scanning.
- Professional Python Engineering: You wrote clean, modular, and effective Python code, utilizing modern features like f-strings for clear output and structuring logic into dedicated functions for organization.
- Concurrency for Speed (Threading): You mastered using the
threadingandqueuemodules to run multiple operations simultaneously. This is a critical skill in any performance-intensive computing task, transforming a slow scanner into a high-speed tool. - Robust Network Interaction: You learned to handle real-world network challenges, including DNS resolution (
socket.gethostbyname) and implementing timeouts and robust error handling to ensure the scanner doesn’t crash or hang. - Security Intelligence: You integrated service identification (
socket.getservbyport), giving you the ability to not just find an open port, but immediately identify the potential software (HTTP, SSH, MySQL, etc.) running behind it. - Building a Real Tool: You took a simple concept and built a robust, professional-grade security analysis tool from the ground up, incorporating essential features like structured reports and clear statistics.
That is legitimately impressive, demonstrating a strong foundation in both programming and network security!specially if you’re new to programming!
What’s Next?
What’s Next: Your Security Roadmap
You’ve built a fast, robust, and smart tool. Where you go next will define your path into advanced cybersecurity and network engineering!
Next Steps in Tool Mastery
| Tool/Concept | Why It Matters | Action Item |
| Nmap | The industry standard for port scanning and network mapping. You built the foundation; Nmap is the professional realization. | Google: [“nmap tutorial”] |
| Wireshark | Allows you to see the actual packets sent and received by your scanner (and every other network tool). Essential for deep understanding. | Google: [“wireshark for beginners”] |
| Python Socket Programming | You only scratched the surface. Use your socket knowledge to build other tools like a simple web server or a chat client. | Search for tutorials on Python socket programming. |
| Ethical Hacking Courses | Turn your technical skill into a career. Courses provide structure, methodology, and legal context for using your tools. | Look for entry-level Ethical Hacking or CompTIA Security+ certifications. |
Resources and Legal Framework
- Practice Scanning: scanme.nmap.org is the official, legal, and safe practice target provided by the Nmap project. NEVER scan a network or host without explicit, written permission.
- Deeper Learning: Explore books like “Black Hat Python” (or similar titles) to learn how to weaponize your programming skills for offensive and defensive security tasks.
- Legal Framework: Understand the legal and ethical boundaries. Look up “responsible disclosure” and local computer crime laws to ensure you operate ethically and legally.
Final Thoughts: Mission Accomplished!
You started with a simple, single-port checker and have successfully engineered a high-performance, multithreaded, professional-grade port scanner.
This journey has been more than just writing code; it was a deep dive into the practical reality of network communication and security engineering.
What You Should Take Away:
- You Solved a Performance Problem: You didn’t settle for a slow, sequential tool. By implementing concurrency (threading), you solved the primary limitation of basic network tools, proving you can build for speed and efficiency.
- You Mastered Network Fundamentals: The script required you to understand and handle DNS resolution, socket timeouts, and specific socket error codes—all core elements of professional network programming.
- You Built Intelligence: By adding service identification and structured output, you transformed a simple “yes/no” availability check into an informative security tool. This is the difference between a beginner script and a professional utility.
- Confidence to Explore: The skills you’ve used here are foundational for virtually all cybersecurity and network automation tasks. You now have the confidence to look at complex tools like Nmap and understand the core logic that drives them.
Congratulations! You’ve completed a challenging and highly valuable project. Now, take these skills and apply them to the next chapter of your journey!
Have questions? Confused about something? The best way to learn is by doing. Try the code, break things, fix them, and you’ll understand way more than just reading ever could.
Frequently Asked Questions (FAQ)
How to make Python port scanner fast?
You must use multithreading with the
threadingandqueuemodules. This allows your script to perform dozens of socket connection attempts concurrently, dramatically reducing total scan time.What is a safe
THREAD_COUNTfor scanning?For public, internet-based targets, a thread count between 50 and 100 is highly efficient and generally safe. For scanning a local network (LAN), you can safely increase this number to $200$ or more.
Why use a shorter
TIMEOUT?A short timeout (e.g., $0.5$ seconds) ensures that threads waiting for a closed port fail quickly. This keeps your multithreaded Python scanner efficient and prevents it from hanging on slow targets.
How to check if a port is open in Python?
The most robust way is to use the
socket.connect_ex()method, which returns0if the port is open and a non-zero error code if it is closed or filtered. This method is preferred oversocket.connect()for scanners.How does Python identify running service?
We use
socket.getservbyport(port, "tcp")to look up the official IANA name associated with the open port number (e.g., $80 \rightarrow \text{HTTP}, 22 \rightarrow \text{SSH}$). This is known as basic service identification.What is the
Queueused for in multithreading?The
Queueis a thread-safe data structure used to distribute the workload (port numbers) among all the worker threads. It ensures that every port is scanned exactly once without threads interfering with each other.Is building and using a port scanner illegal?
Building the tool is legal. Using the tool without permission is generally illegal and unethical. Always use the authorized test target: scanme.nmap.org or only scan your own network.
Why is DNS resolution included in the script?
DNS resolution (
socket.gethostbyname()) converts the hostname (e.g.,google.com) into a numerical IP address. This is required because sockets must connect using an IP address, not a domain name.





Leave a Reply