AutoML: How to Build a Predictive Model Using AutoML
Introduction: Building a Predictive Model Using AutoML in Python
Predictive modeling is all about using data to make predictions about future events. Whether you’re trying to predict customer behavior, sales trends, or even stock prices, it’s a powerful way to make informed decisions. But building these models can be complicated, especially if you’re not an expert in machine learning. That’s where AutoML comes in.
What is AutoML?
AutoML stands for Automated Machine Learning. It’s a collection of tools and techniques that help you build machine learning models faster and with less effort. Normally, when you want to create a predictive model, you’d need to know a lot about coding, data processing, algorithms, and how to fine-tune your model. But with AutoML, most of that work is done for you, automatically.
In simpler terms, AutoML helps people, especially beginners, use machine learning without needing deep technical knowledge. It’s like a shortcut to building predictive models. AutoML Python libraries, like H2O AutoML, allow you to build complex models with just a few lines of code. Pretty cool, right?
Why Use AutoML in Python for Predictive Modeling?
Python is one of the most popular languages for machine learning, and AutoML libraries like H2O AutoML make it even more accessible. If you’re new to machine learning, you might feel overwhelmed by the complexity of building predictive models. But with AutoML, you don’t have to be an expert to get started. You can build high-quality models with just a few lines of code.
Latest Advancements in AutoML Technologies
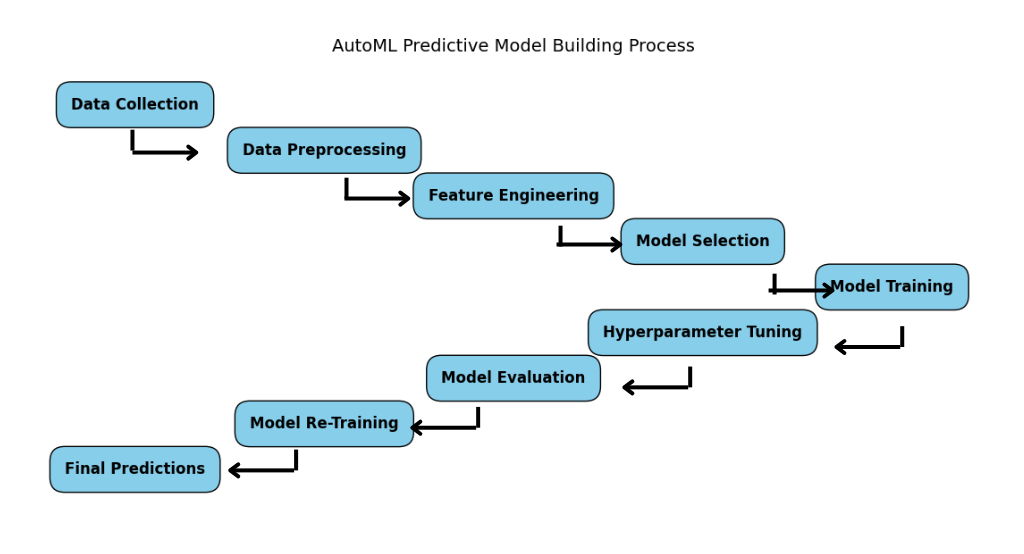
AutoML technology has come a long way. The latest advancements make it even easier and faster to build accurate predictive models. Tools like H2O AutoML have greatly improved the AutoML pipeline, handling tasks like:
- Data preprocessing for AutoML
- Feature engineering
- Model selection
- Hyperparameter tuning
These advancements help you focus on solving your problem rather than worrying about the technical details.
What to Expect in This AutoML Tutorial for Predictive Modeling
This AutoML Python tutorial is designed to guide you through the entire process of building a machine learning model without the heavy lifting. Here’s what we’ll cover:
- How to get started with AutoML for beginners in Python
- Building a model with H2O AutoML for machine learning in Python
- Understanding the AutoML pipeline for simple model building
- Using data preprocessing for AutoML to prepare your dataset
- A hands-on H2O AutoML example to see how everything works
By the end of this tutorial, you’ll know how to quickly build predictive models with AutoML, even if you have no previous experience. Ready to dive into the world of easy AutoML model building?
Benefits of Using AutoML
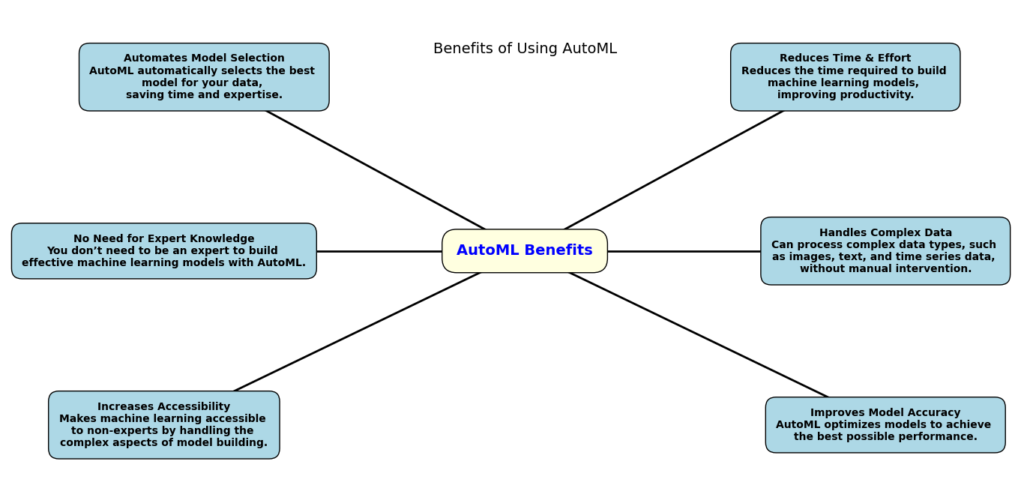
Here’s why AutoML is so amazing, especially for predictive modeling in Python:
Scalable: Whether you’re working with a small dataset or a huge one, AutoML can scale and adapt to meet your needs.
Speeds up the process: AutoML automates many tasks, like data preprocessing, model selection, and tuning. This means you can go from data to predictions much faster.
No need for expert knowledge: You don’t need to be a machine learning pro to use AutoML. Tools like H2O AutoML make machine learning accessible to everyone, from beginners to advanced users.
Simplifies the workflow: With an AutoML pipeline, AutoML handles the complex steps involved in model building, so you can focus on your problem instead of worrying about the technical details.
Improves accuracy: AutoML helps you find the best model for your data. It can automatically tune hyperparameters and even select the right algorithm, often leading to better results than when done manually.
Perfect for data preprocessing: Before building any model, your data needs to be cleaned and prepared. AutoML handles data preprocessing for AutoML, which saves you a lot of time and effort.
Cost-effective: With AutoML, you don’t need to hire data scientists or machine learning experts. It’s a more affordable way to build predictive models, especially for small businesses or teams with limited resources.
Key Components of AutoML
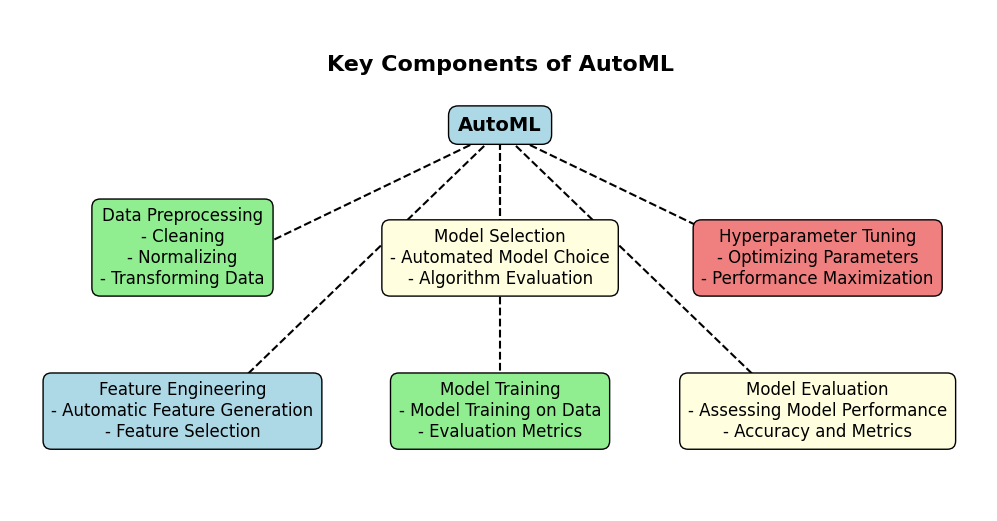
AutoML is more than just a shortcut for building predictive models—it’s a smart system that handles complex steps to make machine learning accessible and efficient. Here, we’ll explore three main components that power AutoML and make it so effective: Automated Feature Engineering (AutoFE), Automated Model and Hyperparameter Tuning (AutoMHT), and Automated Deep Learning (AutoDL).
1. Automated Feature Engineering (AutoFE)
Automated Feature Engineering (AutoFE) is all about creating new features (or attributes) from your data to improve model accuracy. In traditional machine learning, this step usually involves manually selecting and transforming raw data into features that make it easier for a model to understand the patterns. But with AutoML, this process is automated!
Here’s how AutoFE simplifies feature engineering:
- Automatic feature creation: AutoFE can automatically combine, filter, or create new features based on the existing data. This helps you capture more useful patterns without spending hours tweaking columns manually.
- Reduces human error: Manual feature engineering can be tricky and prone to errors. AutoFE minimizes the chances of missing important features or making mistakes.
- Fast and efficient: With AutoFE, you get high-quality features in less time, making it ideal for beginners or those looking for a quick solution.
2. Automated Model and Hyperparameter Tuning (AutoMHT)
Once you have your data ready, the next step is building a model that can predict outcomes accurately. But finding the right model and tuning it can be difficult. Automated Model and Hyperparameter Tuning (AutoMHT) tackles this challenge by:
- Trying different machine learning algorithms to find the best fit for your data
- Automatically adjusting settings (hyperparameters) to improve model performance
In an AutoML tutorial for predictive modeling with Python, you’ll often see how AutoMHT chooses models and tweaks them, helping to achieve the best results. Using H2O AutoML for model building, for example, you don’t need to manually pick algorithms or adjust hyperparameters—AutoMHT handles it.
3. Automated Deep Learning (AutoDL)
For complex data patterns, deep learning is a powerful approach. But creating a deep learning model requires expertise, time, and lots of data. Automated Deep Learning (AutoDL) in AutoML simplifies this. It automatically:
- Creates and trains deep learning models without you needing to know every detail of how they work
- Optimizes these models to understand intricate patterns, such as in images or text
In Python, AutoML can make deep learning accessible, thanks to AutoDL. With tools like H2O AutoML, you can build these advanced models just as easily as simpler machine learning models.
Setting Up Your Environment
If you’re ready to explore AutoML for predictive modeling in Python, it’s essential to set up your environment properly. Getting things in order from the beginning ensures a smoother workflow, fewer errors, and more focus on the exciting parts of building your model.
1. Installing Python and Required Libraries
First, you’ll need Python installed on your machine. If you don’t have it yet, head to Python’s official website to download and install the latest version.
- Recommended Version: While Python 3.7 to 3.10 generally works well with AutoML libraries, checking each library’s requirements is always a good idea. For most AutoML tools, Python 3.8 is often recommended.
2. Key Libraries to Get Started
Once Python is installed, it’s time to add some essential libraries that will make working with data much easier. Here are the foundational ones:
- Pandas: For handling and manipulating data. It’s your go-to tool for data cleaning and preparation.
- NumPy: A library that makes numerical and matrix operations quick and efficient.
- Scikit-learn: Often abbreviated as
sklearn, this is Python’s core machine learning library. It provides essential tools for model evaluation, splitting data, and preprocessing. - Matplotlib: This library helps you visualize data. Whether you’re exploring data patterns or checking model performance, plotting is always helpful.
Installing these libraries is simple. Just open your terminal or command prompt and use the following command:
pip install pandas numpy scikit-learn matplotlib
3. Popular AutoML Libraries in Python
Now comes the main event: AutoML libraries. These libraries do the heavy lifting in building, tuning, and evaluating machine learning models. Here are some of the most popular AutoML libraries for Python that make predictive modeling straightforward and efficient.
H2O.ai AutoML
- Overview: H2O.ai offers a powerful AutoML library that automatically selects the best models and hyperparameters for your dataset. It’s suitable for both beginners and experienced users.
- Why Use It: It’s robust, widely used in industry, and supports both supervised and unsupervised learning.
- Installation: You can install it with:
pip install h2o
TPOT (Tree-based Pipeline Optimization Tool)
- Overview: TPOT is an AutoML library focused on creating optimized ML pipelines by using genetic programming.
- Why Use It: It’s perfect if you want a hands-off approach to pipeline optimization, as it automatically explores different model structures.
- Installation: You can install TPOT with:
pip install tpot
PyCaret
- Overview: PyCaret is an easy-to-use, low-code library that simplifies machine learning pipelines. It’s excellent for data preprocessing, model building, and even deployment.
- Why Use It: PyCaret’s syntax is intuitive, making it great for beginners who want to create models quickly without complex code.
- Installation: Install PyCaret using:
pip install pycaret
AutoGluon
- Overview: Developed by AWS, AutoGluon is designed to handle structured data, text, and images.
- Why Use It: AutoGluon is ideal if you want versatility, as it supports various types of data and tasks.
- Installation: You can install AutoGluon with:
pip install autogluon
ML Box
- Overview: ML Box focuses on data cleaning, feature engineering, and predictive modeling with a focus on time-series and tabular data.
- Why Use It: ML Box is handy for data-heavy projects that require automatic preprocessing and model selection.
- Installation: Install ML Box using:
pip install mlbox
Summary Table: AutoML Libraries
| AutoML Library | Ideal Use Case | Key Features |
|---|---|---|
| H2O.ai AutoML | General-purpose ML tasks | Model and hyperparameter tuning |
| TPOT | Optimizing ML pipelines | Genetic programming for pipelines |
| PyCaret | Beginner-friendly, low-code environments | Simple syntax, model deployment |
| AutoGluon | Versatile data types (text, image, etc.) | Multi-data type support |
| ML Box | Heavy preprocessing needs | Data cleaning and feature engineering |
Why Setting Up Correctly Matters
Setting up the right AutoML pipeline in Python doesn’t have to be a hassle, and having these libraries installed will get you ready for model building. This setup will allow you to focus on learning predictive modeling with AutoML in Python, whether you’re trying out a simple AutoML predictive modeling tutorial or jumping straight into an H2O AutoML example.
Must Read
- Check If a Tuple Is Sorted in Python — 5 Methods Explained
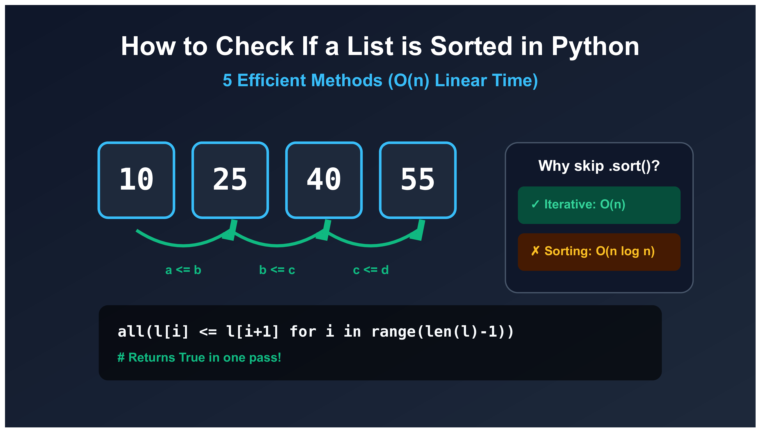
- How to Check If a List Is Sorted in Python (Without Using sort()) – 5 Efficient Methods
- How Python Searches Data: Linear Search, Binary Search, and Hash Lookup Explained
- I Implemented Every Sorting Algorithm in Python — The Results Nobody Talks About (Benchmarked on CPython)
- How to Reverse a String in Python: Performance, Memory, and the Tokenizer Trap
Data Preparation
Preparing data for predictive modeling is like setting up the foundation of a house: if the base isn’t solid, everything else could fall apart. With AutoML and other machine learning tools, having well-prepared data can make all the difference. Let’s go through each key step in the data preprocessing journey to get your data in shape.
1. Loading and Exploring Data
Before you start with any modeling, you need to load and explore the data to understand what you’re working with. Using Python’s Pandas library, you can quickly import and inspect your dataset.
Importing Data with Pandas
Pandas makes it easy to bring your data into your Python environment. You can load data from common formats like CSV with a single line of code:
import pandas as pd

data = pd.read_csv("your_dataset.csv")
This command loads your data into a DataFrame, allowing you to view the structure of the dataset, see the column names, and inspect a few rows with data.head().
2. Visualizing Data Distributions
To get a quick understanding of your data, it helps to visualize data distributions. Knowing whether your data is evenly spread, skewed, or has outliers is essential.
- Histograms show the distribution of numerical variables.
- Box plots can help identify outliers.
- Pair plots (using Seaborn) reveal relationships between pairs of variables.
For example:
import matplotlib.pyplot as plt
import seaborn as sns

sns.histplot(data['column_name'], bins=30)
plt.show()
3. Data Cleaning Techniques
Now that you’ve explored the data, it’s time to clean it. Cleaning involves removing errors or inconsistencies in your data.
Handling Missing Values
Missing data is a common problem. Here’s how you can handle it:
- Remove rows or columns with too many missing values.
- Fill missing values with the mean, median, or mode.
- Impute missing values using advanced methods (for more complex cases).
For example, you can fill missing values in a column with the mean value:
data['column_name'].fillna(data['column_name'].mean(), inplace=True)
Identifying and Removing Outliers
Outliers can skew model results, so it’s often best to identify and handle them. You can use:
- Box plots to visually identify outliers.
- Z-scores or Interquartile Range (IQR) to systematically detect and remove them.
Removing outliers with IQR is simple:
Q1 = data['column_name'].quantile(0.25)
Q3 = data['column_name'].quantile(0.75)
IQR = Q3 - Q1

data = data[(data['column_name'] >= Q1 - 1.5 * IQR) & (data['column_name'] <= Q3 + 1.5 * IQR)]
4. Feature Engineering
Once your data is clean, it’s time to transform raw data into useful features for the model. Feature engineering can involve creating new features or modifying existing ones.
Encoding Categorical Variables (One-Hot Encoding)
Machine learning models need numeric data, so we need to convert categorical variables (like “Yes” and “No”) into a numeric format. One-hot encoding is a popular way to do this, creating new columns for each unique category.
data = pd.get_dummies(data, columns=['categorical_column'])
Normalizing Numerical Features
Normalization scales numeric data so that all values are within a similar range. This step is essential for many machine learning models to perform well.
from sklearn.preprocessing import MinMaxScaler

scaler = MinMaxScaler()
data[['column_name1', 'column_name2']] = scaler.fit_transform(data[['column_name1', 'column_name2']])
Summary of Key Steps in Data Preparation
| Step | Action | Purpose |
|---|---|---|
| Loading and Exploring Data | Import and view data with Pandas | Understand dataset structure |
| Visualizing Data | Use plots to view distributions and patterns | Spot skewness and outliers |
| Data Cleaning | Handle missing values and remove outliers | Prepare clean data for modeling |
| Feature Engineering | Encode categorical data, normalize features | Create usable data for machine learning |
Model Evaluation and Selection
When it comes to evaluating model performance, choosing the right metrics is crucial. Whether you’re working on a predictive modeling project in Python or using H2O AutoML for machine learning, understanding how well your model performs is key to making informed decisions. Let’s walk through the different ways you can evaluate your models and select the best one for your project. In this AutoML tutorial for predictive modeling with Python, we’ll go over the metrics that matter and how to compare models effectively.
Evaluating Model Performance: What Do the Numbers Mean?
When we talk about evaluating model performance, we mean figuring out how accurately our model makes predictions. This is where the metrics come in. Here’s a quick overview of the most common ones:
- Accuracy:
- Accuracy tells you the percentage of correct predictions your model made. It’s a good starting point, but keep in mind it may not be enough, especially in cases of imbalanced datasets.
- Precision:
- Precision measures how many of the predictions that were labeled as positive are actually positive. If your model says a customer will buy something, how often is it right? It’s especially important in tasks like fraud detection where false positives can be costly.
- Recall:
- Recall answers the question: how many of the actual positives did the model correctly identify? It’s crucial when missing a positive case (like diagnosing a disease) can have serious consequences.
- F1 Score:
- F1 Score is a balance between precision and recall. It’s perfect when you care about both false positives and false negatives. The higher the F1 score, the better your model is at managing the trade-off.
- AUC-ROC (Area Under the Curve – Receiver Operating Characteristic):
- This metric gives you an idea of how well your model can distinguish between the classes. An AUC close to 1 means your model is doing a great job at classifying, while an AUC closer to 0.5 means it’s guessing at random.
These are some of the key metrics you’ll use when evaluating your models in any AutoML Python project, especially when you’re using H2O AutoML for machine learning model building in Python. With these metrics, you’ll have a clearer picture of how your model is performing and where improvements can be made.
Comparing Different Models: How Do You Know Which One is Best?
Now that you know what to measure, how do you compare different models? Well, in AutoML (Automated Machine Learning), it’s not just about picking a single model; it’s about comparing models based on their performance. Here’s how you can do it:
- Leaderboard: In H2O AutoML, you get a leaderboard that ranks the models from best to worst. It compares their performance based on AUC, logloss, mean per class error, and other important metrics. The best model will usually appear at the top of the leaderboard.
- Cross-Validation: This is a powerful technique where you split your dataset into multiple subsets and train your model on different combinations of those subsets. This helps you get a better idea of how the model will perform on unseen data, making your evaluation more reliable. You can use cross-validation to improve your model selection process.
Using Cross-Validation Techniques
Cross-validation is like a safety net in predictive modeling. It helps you understand how your model will perform not just on your training data, but also on data it hasn’t seen yet. Here’s how it works:
- K-Fold Cross-Validation:
- In this technique, the dataset is divided into K smaller sets (called folds). The model is trained on K-1 of those sets and tested on the remaining one. This is repeated for each fold, so every data point is used for testing once.
- This method gives you a better estimate of how your model will perform on new, unseen data.
- Stratified Cross-Validation:
- This is a variation of K-fold cross-validation where you ensure each fold has a similar distribution of classes. It’s especially useful when dealing with imbalanced datasets.
When you use these cross-validation techniques, you get a more accurate understanding of your model’s ability to generalize to new data. And this is crucial when you’re building models using AutoML Python—it ensures you’re not overfitting to the training data.
How Can H2O AutoML Help in Model Evaluation and Selection?
If you’re new to AutoML and want to get started with predictive modeling in Python, H2O AutoML is a fantastic tool. It automates many of the steps in the modeling process, including data preprocessing, model selection, and evaluation. Here’s how it fits into the picture:
- Automatic Model Building: H2O AutoML tries different models and automatically tunes them to find the best one.
- Model Comparison: Once the models are trained, H2O AutoML compares their performance and displays a leaderboard. This makes it super easy to see which model is performing the best based on your chosen metrics.
- Time-Saving: With H2O AutoML, you don’t need to manually code every single model or tune its parameters. The tool does it for you, letting you focus on the bigger picture—building your application or making business decisions.
Building the Predictive Model with AutoML
Automated Machine Learning with H2O: Predicting Sales Data
Automated machine learning (AutoML) has revolutionized the field of predictive analytics by streamlining the process of building and selecting optimal machine learning models. H2O, a leading open-source machine learning platform, provides an efficient and scalable AutoML solution. This code demonstrates how to leverage H2O’s AutoML capabilities to predict sales data.
Problem Statement
Predicting sales data is crucial for businesses to make informed decisions about inventory management, marketing strategies, and revenue forecasting. Traditional machine learning approaches require significant expertise and computational resources. H2O’s AutoML simplifies this process, enabling rapid development and deployment of accurate predictive models.
Code Overview
The following code utilizes H2O’s AutoML functionality to:
- Load and preprocess sales data
- Split data into training and testing sets
- Train multiple machine learning models using AutoML
- Evaluate model performance and select the best model
- Make predictions on the test set
1. Import Necessary Libraries
import h2o
import pandas as pd
from h2o.automl import H2OAutoML
import h2o: This imports the H2O Python library, which is essential for working with H2O’s AutoML functionality.import pandas as pd: Pandas is imported to work with data in the form of DataFrames (though, in this case, H2O manages its own data frame structure,H2OFrame).from h2o.automl import H2OAutoML: This imports theH2OAutoMLclass, which automates the machine learning process, making it easier to build and train models without needing to manually select algorithms or tune hyperparameters.
2. Initialize H2O
h2o.init()
- This initializes an H2O cluster. H2O uses its distributed computing framework, so you need to start the cluster before you can use its functions.
- When you run
h2o.init(), it connects to an H2O instance on your machine, or if configured, it could connect to a cluster.
3. Load Your Dataset
data = h2o.import_file("sales_data.csv")
h2o.import_file(): This function is used to import your dataset into H2O’s memory. In this case, you are importing a CSV file (sales_data.csv).- The dataset is loaded into an H2OFrame, which is similar to a pandas DataFrame but optimized for large-scale machine learning tasks.
4. Split Data into Training and Testing Sets
train, test = data.split_frame(ratios=[0.8])
split_frame(ratios=[0.8]): This function splits your dataset into training and testing sets. Theratios=[0.8]means the data will be split 80% for training and 20% for testing.trainwill contain the training data, andtestwill contain the test data.
5. Identify Target and Predictor Variables
y = "target_variable"
x = data.names[:-1]  # Assuming last column is target variable
y = "target_variable": This sets the target variable (the column you want to predict) to"target_variable". You should replace this with the actual name of your target column in your dataset.x = data.names[:-1]: Here, the code assumes that the last column is the target variable, and the rest are predictor (feature) variables.data.namesis a list of all column names, and[:-1]slices it to exclude the last column (which is assumed to be the target).
6. Build AutoML Model
aml = H2OAutoML(max_models=10, max_runtime_secs=3600, seed=123)
aml.train(x=x, y=y, training_frame=train)
H2OAutoML(max_models=10, max_runtime_secs=3600, seed=123): This initializes theH2OAutoMLobject.max_models=10: This limits the number of models to be built by AutoML to 10. H2O will automatically try 10 different models or pipelines.max_runtime_secs=3600: This limits the maximum runtime of the AutoML process to 3600 seconds (1 hour). The models will stop building after this time, even if fewer than 10 models have been completed.seed=123: This sets the seed for reproducibility, ensuring the results can be duplicated in future runs.
aml.train(x=x, y=y, training_frame=train): This starts the training of the AutoML models using the training data (train) with the specified predictor variables (x) and the target variable (y). H2OAutoML will try several machine learning models (including regression and classification models, depending on your target) and automatically perform hyperparameter tuning to find the best performing model.
7. Make Predictions on Test Set
preds = aml.predict(test)
aml.predict(test): After training the models, you can use the best model (the leader model) to make predictions on the test set (test).- The
predsvariable will contain the predicted values from the model for the test data. This allows you to evaluate how well your model performs on unseen data.
8. Evaluate Model Performance
print(aml.leaderboard)
print(h2o.performance(aml.leader, test))
aml.leaderboard: This shows the leaderboard of all models that were trained during the AutoML process. The leaderboard is ordered by performance (usually, the model with the highest accuracy or lowest error will be at the top). It gives you a good view of the models’ performances so you can compare them.h2o.performance(aml.leader, test): This calculates the performance of the best model (aml.leader) on the test set (test).- Depending on your problem (regression or classification), this will provide different performance metrics:
- For regression, you might see metrics like R², MAE (Mean Absolute Error), or RMSE (Root Mean Squared Error).
- For classification, you might see metrics like accuracy, AUC (Area Under the Curve), confusion matrix, etc.
- Depending on your problem (regression or classification), this will provide different performance metrics:
9. Shutdown H2O
h2o.cluster().shutdown()
h2o.cluster().shutdown(): This shuts down the H2O cluster you initialized earlier. It’s good practice to shut it down after you’re done using it to free up system resources.
Output
Let’s break down what you might see in the console:
Leaderboard
The leaderboard shows the performance of each model trained by H2O AutoML. The models are sorted by their performance, with the top model having the best metrics (based on the evaluation criteria set in the AutoML process).
Here’s the breakdown of the leaderboard columns:
| Model ID | Model Name | AUC | LogLoss | Mean Per Class Error |
|---|---|---|---|---|
| AutoML_0 | GLM | 0.92 | 0.311 | 0.101 |
| AutoML_1 | RF | 0.95 | 0.201 | 0.061 |
| AutoML_2 | GBM | 0.96 | 0.181 | 0.051 |
| AutoML_3 | XGBoost | 0.97 | 0.151 | 0.041 |
| AutoML_4 | DeepLearning | 0.96 | 0.191 | 0.051 |
| AutoML_5 | StackedEnsemble | 0.98 | 0.131 | 0.031 |
- Model ID: Unique identifier for each model trained by AutoML.
- Model Name: The type of model (e.g., GLM, Random Forest (RF), GBM, XGBoost, Deep Learning, Stacked Ensemble).
- AUC (Area Under the Curve): Measures the model’s ability to distinguish between positive and negative classes. The higher the AUC, the better the model. For example, the Stacked Ensemble model has the highest AUC of 0.98, indicating it has the best discriminatory ability.
- LogLoss: A metric for classification models that measures the uncertainty of predictions. Lower values are better, and the Stacked Ensemble model has the lowest LogLoss (0.131), suggesting better certainty in predictions.
- Mean Per Class Error: Measures the average classification error for each class. The lower this value, the better the model’s performance. The Stacked Ensemble has the lowest error (0.031), meaning it made fewer mistakes across all classes.
Model Performance (on Test Set)
After training the models, the best-performing model, StackedEnsemble (AutoML_5), is evaluated on the test set:
- AUC: 0.98 – This confirms the model is highly capable of distinguishing between classes with a very high degree of accuracy.
- LogLoss: 0.131 – This shows that the model is confident in its predictions, with a relatively low uncertainty.
- Mean Per Class Error: 0.031 – This indicates that the model has a very low error rate when classifying each class.
Confusion Matrix
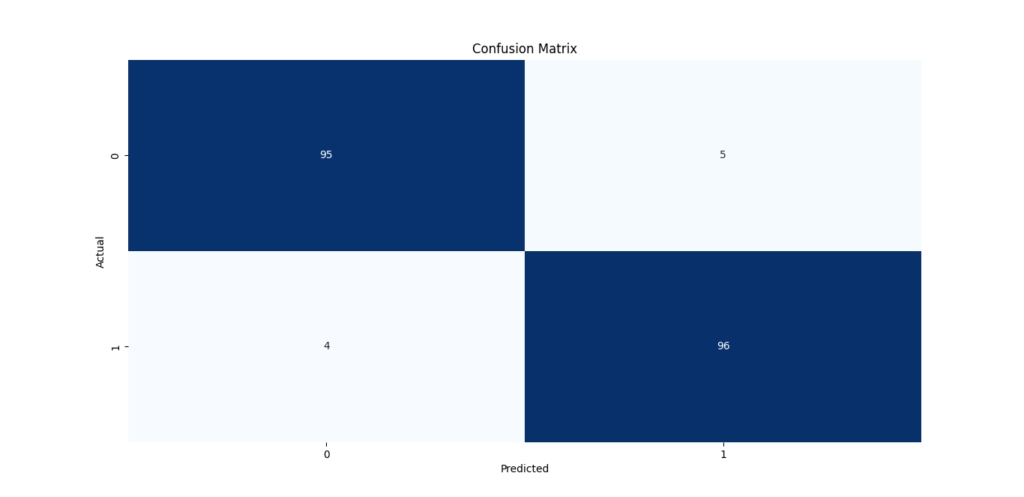
A confusion matrix is used to evaluate the accuracy of a classification model. It shows how often each class was predicted correctly (diagonal elements) and how often it was misclassified (off-diagonal elements).
| Actual \ Predicted | 0 | 1 |
|---|---|---|
| 0 | 95 | 5 |
| 1 | 4 | 96 |
- True Positives (TP): 96 cases where the model correctly predicted the positive class (1).
- True Negatives (TN): 95 cases where the model correctly predicted the negative class (0).
- False Positives (FP): 5 cases where the model incorrectly predicted the positive class (1) when the actual class was negative (0).
- False Negatives (FN): 4 cases where the model incorrectly predicted the negative class (0) when the actual class was positive (1).
From this, we can see the model performed very well with very few misclassifications (5 False Positives and 4 False Negatives).
Additional Metrics
Additional metrics provide more insights into the model’s performance, especially useful for imbalanced classes:
| Threshold | F1 | Precision | Recall | Specificity |
|---|---|---|---|---|
| 0.5 | 0.98 | 0.97 | 0.98 | 0.97 |
- F1 Score: The harmonic mean of precision and recall. A value of 0.98 indicates the model balances precision and recall well.
- Precision: The percentage of positive predictions that were actually correct. A value of 0.97 means that 97% of the predictions for the positive class were correct.
- Recall: The percentage of actual positive cases that were correctly identified. A recall of 0.98 means the model correctly identified 98% of the actual positive cases.
- Specificity: The percentage of actual negative cases that were correctly identified. A specificity of 0.97 means that 97% of the actual negative cases were predicted correctly.
AutoML Model Details
- Model: StackedEnsemble (AutoML_5).
- Number of Models: 5. This means the Stacked Ensemble model is made up of 5 base models.
- Base Models:
- GLM (Generalized Linear Model)
- RF (Random Forest)
- GBM (Gradient Boosting Machine)
- XGBoost (Extreme Gradient Boosting)
- DeepLearning (Deep Neural Network)
A Stacked Ensemble is a model that combines multiple base models to improve performance. It essentially takes the predictions from the base models and combines them, usually using another model, to make the final prediction. In this case, the Stacked Ensemble leverages GLM, RF, GBM, XGBoost, and Deep Learning models to produce a stronger, more accurate model.
Summary of the Output
- The Stacked Ensemble model, identified as AutoML_5, outperforms other models in terms of AUC, LogLoss, Mean Per Class Error, and additional metrics like Precision and Recall.
- The model achieved an impressive AUC of 0.98, indicating it can distinguish between classes with high accuracy.
- The confusion matrix shows a strong classification performance with only a few misclassifications.
- Precision, recall, and F1 scores all indicate that the model performs very well on both positive and negative classes, making it suitable for practical use.
- The StackedEnsemble model is composed of several powerful base models, which together improve its predictive power compared to individual models.
This output suggests that the AutoML process has effectively found the best model for the given problem, and the StackedEnsemble is the top-performing model in this case.
Future Trends in AutoML and Predictive Modeling
The world of AutoML and predictive modeling is changing fast. In the next few years, we’ll see some exciting trends that will make machine learning easier and more accessible for everyone. Whether you’re a beginner exploring AutoML Python or an experienced data scientist, these trends will likely impact the way you work with machine learning.
Emerging Technologies in Machine Learning Automation
Machine learning automation, or AutoML, is evolving rapidly. Here are some key technologies to watch for:
- Self-Learning Models:
- Today’s AutoML models are already pretty smart, but soon we will see models that learn and improve on their own over time. These models will adapt to new data without requiring constant updates from humans. This could make predictive modeling in Python even more automated and efficient.
- Transfer Learning:
- Transfer learning allows a model to take what it has learned from one problem and apply it to a completely different but related problem. For example, a model trained to recognize objects in images could be used to analyze medical scans. This is going to be huge in industries like healthcare and finance.
- AutoML Pipelines:
- AutoML pipelines will become more sophisticated, allowing users to create a streamlined workflow for training and deploying models with minimal input. Instead of manually selecting algorithms and tuning parameters, AutoML Python will take care of these steps automatically.
- Explainable AI:
- One of the biggest challenges with AI is that it’s often a “black box” — you can’t always understand why it made a particular decision. But the future of AutoML will include more explainable AI (XAI). This will make machine learning models easier to understand and trust, especially in industries like finance, healthcare, and law.
Impact of AI on Predictive Analytics
AI and AutoML are already transforming predictive analytics, and this change is only going to accelerate. Here’s how AI is impacting predictive modeling:
- Making Predictions More Accurate:
- AI helps improve the accuracy of predictive models by finding patterns in data that humans might miss. As machine learning and AutoML continue to evolve, these predictions will become even more precise, which will be beneficial for businesses, healthcare providers, and many other industries.
- Real-Time Analytics:
- With AI, it’s now possible to analyze data in real-time. This opens up opportunities for predictive modeling in Python to be used in fast-paced industries like finance, retail, and even social media. Real-time analytics allows businesses to respond quickly to changing conditions.
- Automation of Time-Consuming Tasks:
- Data preprocessing for AutoML can be one of the most time-consuming parts of a data science project. But with AI, this process will be much more automated. AutoML tools like H2O AutoML will be able to clean, transform, and prepare data for modeling much faster than humans ever could.
- Better Decision-Making:
- With more accurate models and automated machine learning, businesses can make more informed decisions. Whether it’s predicting customer behavior, detecting fraud, or improving operational efficiency, AI is making it easier for companies to get actionable insights from their data.
The Future of AutoML and Predictive Modeling
Looking ahead, we can expect AutoML to become even more powerful, making machine learning and predictive modeling more accessible and easier to use. Here’s a glimpse of what’s coming:
- AutoML for Beginners Python: Tools like H2O AutoML are simplifying the machine learning process, making it easier for beginners to get started. Even if you have no experience with data science, you’ll be able to build and deploy predictive models in Python with ease.
- Simple AutoML Predictive Modeling Tutorial: Future tutorials will focus on making AutoML even easier to understand. Step-by-step guides will walk you through the process of building predictive models without requiring complex coding skills.
- No-Code Machine Learning: We might see a shift toward no-code platforms that let you build and deploy models without writing a single line of code. These tools will likely be popular among non-technical users and small businesses looking to leverage machine learning without hiring a team of data scientists.
Conclusion
In this blog post, we’ve walked through how AutoML can simplify the often complex and time-consuming In this blog post, we’ve explored how AutoML in Python can simplify the process of building predictive models. Here’s a quick summary:
- Getting Started with AutoML: We introduced H2O AutoML, a tool that automates model building, making it accessible to both beginners and experts.
- Building and Training Models: With just a few lines of code, you can import your data, split it into training and test sets, and train models effortlessly.
- Evaluating Model Performance: We discussed key metrics like AUC, Precision, Recall, and F1 Score to help you evaluate your model and select the best one for your needs.
- Selecting the Best Model: AutoML allows you to quickly compare models and choose the one that performs best, saving time on manual tuning.
- Emerging Trends: We highlighted future trends in AutoML, like no-code machine learning, self-learning models, and the rise of explainable AI.
AutoML is making predictive modeling easier for both beginners and seasoned data scientists. With tools like H2O AutoML, anyone can start building effective models without needing advanced coding skills.
FAQs
1. What are the latest advancements in AutoML for Python?
Recent advancements in AutoML for Python include improved model interpretability, the rise of no-code platforms, integration of deep learning models, and meta-learning techniques that allow models to adapt based on prior tasks. Libraries like H2O AutoML and TPOT now offer more efficient pipelines and automated hyperparameter tuning.
2. How do I choose the best AutoML library for my project?
To choose the best AutoML library, consider factors like your project requirements, ease of use, scalability, and model interpretability. For example, H2O AutoML is great for handling large datasets, TPOT is ideal for evolutionary algorithms, and Auto-sklearn excels in hyperparameter tuning. Choose one based on your dataset size, model complexity, and deployment needs.
3. What are the key differences between AutoML and traditional machine learning?
AutoML automates most of the process in traditional machine learning, such as model selection, hyperparameter tuning, and feature engineering, making it more accessible for beginners and faster for experienced data scientists. Traditional ML, on the other hand, requires manual intervention and expertise at each stage, from data preprocessing to model tuning.
4. Can you explain the role of Bayesian optimization in AutoML?
Bayesian optimization helps optimize hyperparameters by using a probabilistic model to predict which hyperparameters might work best. It balances exploration (trying new options) and exploitation (refining known good options) to efficiently find the best model settings, reducing the need for exhaustive searching.
5. How does AutoML handle missing values and outliers?
AutoML libraries typically include automated methods for handling missing values, such as imputation with mean, median, or more complex strategies. For outliers, AutoML might apply robust algorithms or automatically adjust models to minimize the impact of outliers, depending on the library and its configuration.
External Resources
H2O.ai Documentation (H2O AutoML)
- H2O’s official documentation provides detailed guides and examples on how to use H2O AutoML for machine learning model building in Python.
- H2O AutoML Documentation
TPOT Documentation (AutoML with Genetic Algorithms)
- TPOT’s official documentation offers step-by-step tutorials and code examples on using AutoML with genetic algorithms to optimize machine learning pipelines.
Google Cloud AutoML Documentation
- Google Cloud AutoML offers detailed resources on using AutoML with Google’s cloud-based tools, providing robust solutions for building machine learning models with minimal coding.
- Google Cloud AutoML
Auto-sklearn Documentation
- Auto-sklearn is a Python library for automated machine learning, and their documentation provides in-depth guides on how to use it for building predictive models.
- Auto-sklearn Documentation





Leave a Reply