How to Build a LangChain Chatbot with Memory
Introduction
In this article, we’ll learn how to create a LangChain chatbot with memory using Python. We’ll start with the basics of LangChain and chatbot development, then move on to adding memory and advanced features. By the end, you’ll be able to build a chatbot that remembers past conversations, making it more engaging and user-friendly.
Understanding Chatbots and Memory
What is a Chatbot?
A chatbot is an AI-powered application that can interact with users through text or voice. They are widely used in customer service, personal assistance, and other applications to provide quick responses and automate tasks.
The Importance of Memory in Chatbots
Memory is an essential feature that allows chatbots like ChatGPT to remember information from past interactions. This helps create a more natural and personalized user experience. When a chatbot has a memory, it can: refer back to previous conversations, remember user preferences, and provide responses that fit the context.
Introduction to LangChain
What is LangChain?
LangChain is a Python library that helps you build powerful and flexible chatbots. It has many features that make developing AI-driven conversational agents easier.
Key Features of LangChain
- Ease of Use: LangChain offers simple APIs that are easy to understand and use. It also provides extensive documentation to guide you through the process. Even if you’re new to chatbot development, you can quickly learn how to use LangChain.
- Flexibility: LangChain supports various backend frameworks and integrations. This means you can use it with different technologies and tools, making it adaptable to your specific needs.
- Scalability: Whether you’re working on a small project or a large-scale application, LangChain can handle it. It’s designed to grow with your needs, ensuring that your chatbot can scale as your project expands.
By using LangChain, you can create chatbots that are easy to develop, flexible in their applications, and scalable for future growth. Before Setting Up Your Development Environment Let’s explore The process How LangChain Chatbot with Memory works.
The Process of the LangChain Chatbot with Memory
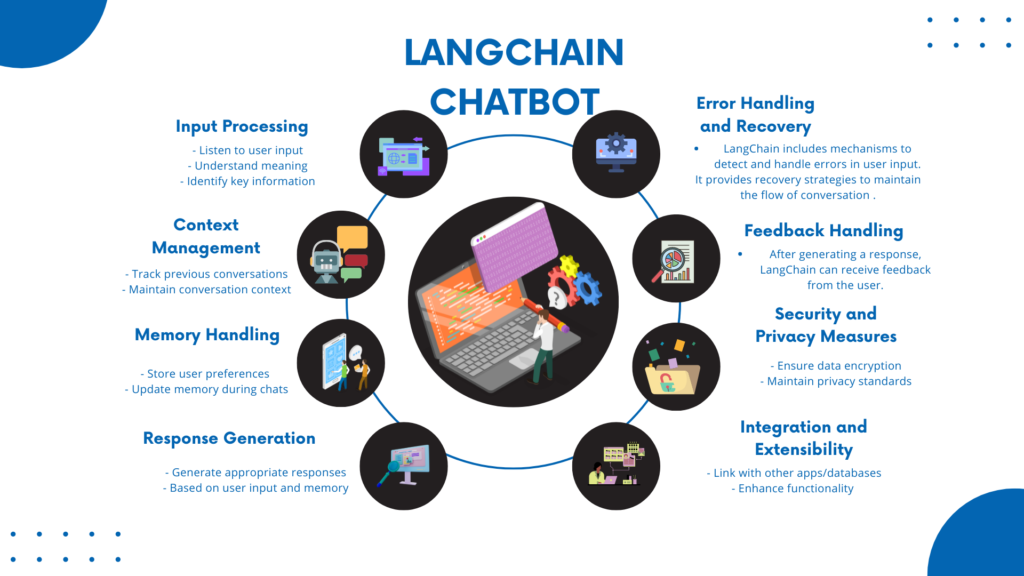
The operational process of a LangChain chatbot with memory involves several key steps:
- Input Processing:
- The chatbot listens to what you say or type.
- Using smart language skills, LangChain figures out what you mean and picks out the important parts.
- Context Management:
- LangChain keeps track of what we’ve talked about before, like details from our earlier chats.
- This memory helps it keep our conversations smooth and personal.
- Memory Handling:
- LangChain stores and remembers specific things about you, like your preferences and our past chats.
- As we chat, it updates its memory to keep our conversations fresh and useful.
- Response Generation:
- With what you’ve said and what it remembers, LangChain comes up with responses that fit your needs.
- It can handle simple answers or more complex discussions, all based on what we’ve talked about.
- Integration and Extensibility:
- LangChain can link up with other apps and databases, which helps it manage its memory better and do more things.
- This makes it easier for us to get information and have more helpful chats.
- Security and Privacy Measures:
- LangChain takes strong steps to keep any personal info safe.
- It uses encryption and strict rules to make sure your details stay private, following the rules to keep everything secure.
Now let’s Build our chatbot with memory
Setting Up Your Development Environment
Prerequisites
Before you start building your chatbot, you need a few things:
- Python: Make sure Python is installed on your computer. Python is the programming language we will use.
- Basic Knowledge: You should know some basic Python programming and understand a few machine learning concepts. This will help you follow along with the tutorial.
Installing LangChain
To get started with LangChain, you need to install it on your system. Follow these steps:
- Open your terminal or command prompt: This is where you will type commands.
- Run the installation command: Type the following command and press Enter:
pip install langchain
- This command tells your system to download and install LangChain. After a few moments, LangChain will be ready to use.
Now you are set up and ready to start building your chatbot with LangChain!
Must Read
- How Python Searches Data: Linear Search, Binary Search, and Hash Lookup Explained
- I Implemented Every Sorting Algorithm in Python — The Results Nobody Talks About (Benchmarked on CPython)
- How to Reverse a String in Python: Performance, Memory, and the Tokenizer Trap
- How to Check Palindrome in Python: 5 Efficient Methods (2026 Guide)
- Mastering Python Regex (Regular Expressions): A Step-by-Step Guide
Basic Structure of a LangChain Chatbot
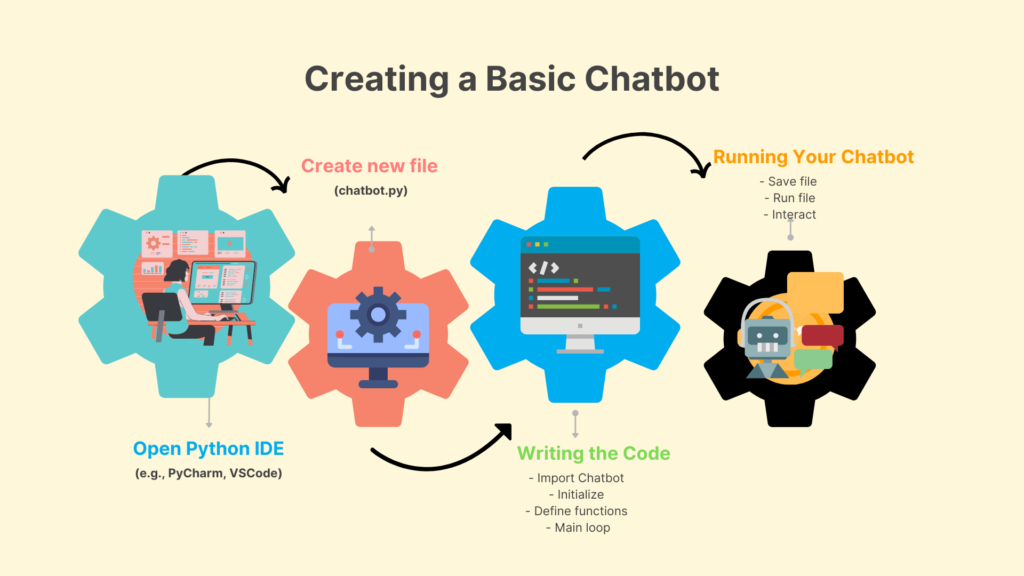
Creating a Basic Chatbot
Let’s start by making a simple LangChain chatbot. Follow these steps:
- Open your Python IDE: This is where you will write and run your Python code.
- Create a new file: Name it
chatbot.py.
Writing the Code
Copy and paste the following code into your chatbot.py file:
from langchain.chatbot import Chatbot

# Initialize the chatbot
chatbot = Chatbot()

# Basic response function
def respond_to_user(input_text):
    response = chatbot.get_response(input_text)
    return response

# Main loop
while True:
    user_input = input("You: ")
    response = respond_to_user(user_input)
    print(f"Bot: {response}")
Here’s what each part of the code does:
- Import the Chatbot class:
from langchain.chatbot import Chatbot
This line tells Python to use the Chatbot class from the LangChain library.
Initialize the chatbot:
chatbot = Chatbot()
This line creates a new chatbot instance that you can interact with.
Define a response function:
def respond_to_user(input_text):
    response = chatbot.get_response(input_text)
    return response
This function takes the user’s input (as input_text), gets a response from the chatbot, and then returns that response.
Create the main loop:
while True:
    user_input = input("You: ")
    response = respond_to_user(user_input)
    print(f"Bot: {response}")
- This loop runs continuously, allowing you to interact with the chatbot. It:
- Takes user input with
input("You: "). - Passes the input to the
respond_to_userfunction to get a response. - Prints the chatbot’s response with
print(f"Bot: {response}").
- Takes user input with
Running Your Chatbot
- Save your file: Make sure to save the
chatbot.pyfile after writing the code. - Run the file: Execute
chatbot.pyfrom your IDE or terminal. You’ll see a prompt asking for your input. - Interact with the chatbot: Type a message and see how the chatbot responds.
Now you have a basic LangChain chatbot that can respond to your inputs.
Implementing Memory in Your Chatbot
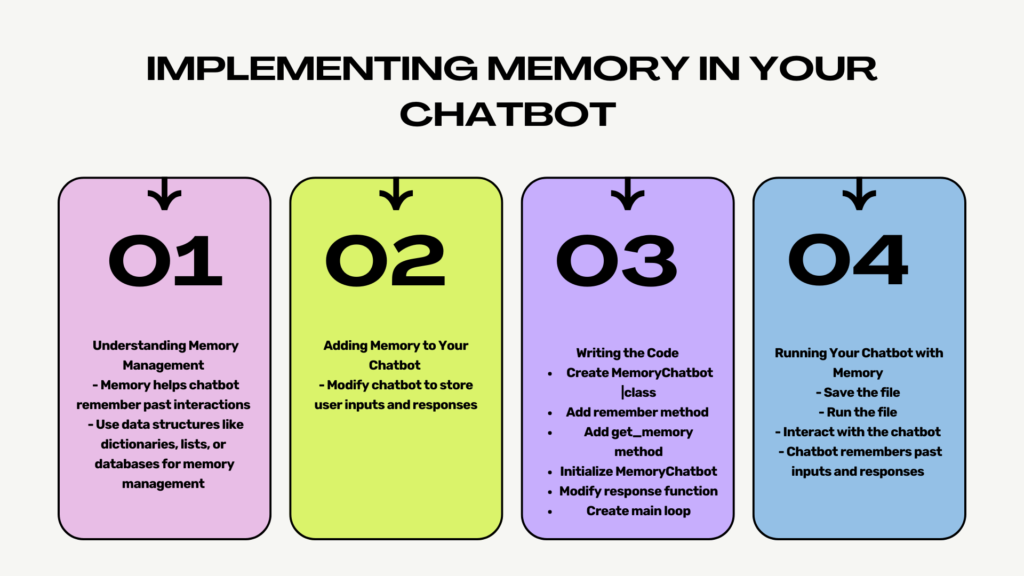
Understanding Memory Management
Memory in chatbots means storing and retrieving information from past conversations. This helps the chatbot remember what was said before and respond more intelligently. You can use different data structures for this, like dictionaries, lists, or even databases for more complex tasks.
Adding Memory to Your Chatbot
To make our chatbot remember past interactions, we’ll modify it to store user inputs and responses.
Writing the Code
Copy and paste the following code into your chatbot.py file:
class MemoryChatbot(Chatbot):
    def __init__(self):
        super().__init__()
        self.memory = []

    def remember(self, user_input, bot_response):
        self.memory.append((user_input, bot_response))

    def get_memory(self):
        return self.memory

# Initialize the memory chatbot
memory_chatbot = MemoryChatbot()

# Modified response function
def respond_with_memory(input_text):
    response = memory_chatbot.get_response(input_text)
    memory_chatbot.remember(input_text, response)
    return response

# Main loop
while True:
    user_input = input("You: ")
    response = respond_with_memory(user_input)
    print(f"Bot: {response}")
Here’s what each part of the code does:
- Create the MemoryChatbot class:
class MemoryChatbot(Chatbot):
    def __init__(self):
        super().__init__()
        self.memory = []
This class inherits from the Chatbot class and adds a memory feature. It initializes with an empty list called memory.
2. Add a remember method:
def remember(self, user_input, bot_response):
    self.memory.append((user_input, bot_response))
This method takes the user’s input and the bot’s response, then stores them as a pair in the memory list.
3. Add a get_memory method:
def get_memory(self):
    return self.memory
This method returns the list of all remembered interactions.
4. Initialize the memory chatbot:
memory_chatbot = MemoryChatbot()
This creates an instance of the MemoryChatbot.
5. Modify the response function:
def respond_with_memory(input_text):
    response = memory_chatbot.get_response(input_text)
    memory_chatbot.remember(input_text, response)
    return response
This function now uses the MemoryChatbot to get responses and remembers each interaction.
6. Create the main loop:
while True:
    user_input = input("You: ")
    response = respond_with_memory(user_input)
    print(f"Bot: {response}")
- This loop runs continuously, allowing you to interact with the chatbot. It:
- Takes user input with
input("You: "). - Passes the input to the
respond_with_memoryfunction to get a response and remember it. - Prints the chatbot’s response with
print(f"Bot: {response}").
- Takes user input with
Running Your Chatbot with Memory
- Save your file: Make sure to save the
chatbot.pyfile after writing the code. - Run the file: Execute
chatbot.pyfrom your IDE or terminal. You’ll see a prompt asking for your input. - Interact with the chatbot: Type a message and see how the chatbot responds. It will remember your past inputs and responses.
Now you have enhanced your LangChain chatbot to remember past interactions, making it more intelligent and responsive.
Advanced Features and Optimizations
Contextual Responses
To make your chatbot smarter, you can use stored memory to provide more relevant responses. This means the chatbot can refer back to past conversations, especially when the user asks a follow-up question.
Adding Contextual Responses
We will modify the chatbot to use past interactions when generating responses.
Writing the Code
Copy and paste the following code into your chatbot.py file:
def contextual_response(input_text):
    past_conversations = memory_chatbot.get_memory()
    # Use past_conversations to generate a more relevant response
    response = memory_chatbot.get_response(input_text, context=past_conversations)
    memory_chatbot.remember(input_text, response)
    return response
Here’s what each part of the code does:
- Define the contextual_response function:
def contextual_response(input_text):
    past_conversations = memory_chatbot.get_memory()
    # Use past_conversations to generate a more relevant response
    response = memory_chatbot.get_response(input_text, context=past_conversations)
    memory_chatbot.remember(input_text, response)
    return response
This function uses the chatbot’s memory to provide better responses. Here’s how it works:
- Get past conversations:
past_conversations = memory_chatbot.get_memory()
This line retrieves the list of past user inputs and bot responses from the chatbot’s memory.
- Generate a response using context:
response = memory_chatbot.get_response(input_text, context=past_conversations)
This line generates a response based on the current user input (input_text) and the past conversations (context=past_conversations). The chatbot can use the context to give a more relevant answer.
- Remember the interaction:
memory_chatbot.remember(input_text, response)
This line stores the current user input and the generated response in the chatbot’s memory.
- Return the response:
return response
Updating the Main Loop
Replace the existing main loop with the following code to use the new contextual_response function:
# Main loop
while True:
    user_input = input("You: ")
    response = contextual_response(user_input)
    print(f"Bot: {response}")
This loop works the same way as before but uses the contextual_response function to handle user inputs and generate responses.
Running Your Chatbot with Contextual Responses
- Save your file: Make sure to save the
chatbot.pyfile after writing the code. - Run the file: Execute
chatbot.pyfrom your IDE or terminal. You’ll see a prompt asking for your input. - Interact with the chatbot: Type messages and see how the chatbot responds. It will now use past interactions to provide more relevant and intelligent answers.
By adding contextual responses, your LangChain chatbot becomes more intelligent and capable of handling follow-up questions better.
Testing and Debugging
Unit Testing
Unit tests help ensure that each part of your chatbot works correctly. You can use Python’s unittest library to create these tests.
Writing Unit Tests
Let’s write a simple unit test for our chatbot:
- Import the unittest library:
import unittest
2. Create a test class:
class TestChatbot(unittest.TestCase):
    def test_response(self):
        test_bot = MemoryChatbot()
        response = test_bot.get_response("Hello")
        self.assertIsNotNone(response)
Testing and Debugging
Unit Testing
Unit tests help ensure that each part of your chatbot works correctly. You can use Python’s unittest library to create these tests.
Writing Unit Tests
Let’s write a simple unit test for our chatbot:
- Import the unittest library:pythonCopy code
import unittest - Create a test class:pythonCopy code
class TestChatbot(unittest.TestCase): def test_response(self): test_bot = MemoryChatbot() response = test_bot.get_response("Hello") self.assertIsNotNone(response)- TestChatbot(unittest.TestCase): This line creates a test class named
TestChatbotthat inherits fromunittest.TestCase. This is where you’ll define your tests. - test_response(self): This is a test method. It creates an instance of
MemoryChatbotand checks if the response to “Hello” is notNone.
- TestChatbot(unittest.TestCase): This line creates a test class named
- Run the tests:
if __name__ == '__main__':
    unittest.main()
- This line runs all the tests in your script when you execute the file.
Full Example
Here’s the full unit test code:
import unittest

class TestChatbot(unittest.TestCase):
    def test_response(self):
        test_bot = MemoryChatbot()
        response = test_bot.get_response("Hello")
        self.assertIsNotNone(response)

if __name__ == '__main__':
    unittest.main()
Save this code in a file, and run it. It will test if the chatbot responds to “Hello” and ensure the response is not None.
Debugging Tips
- Log Interactions:
- Keep a log of all user interactions and responses. This can help you understand what the chatbot is doing and identify any issues.
- Example:
def log_interaction(user_input, bot_response):
    with open("interaction_log.txt", "a") as log_file:
        log_file.write(f"User: {user_input}\nBot: {bot_response}\n\n")

# In your main loop
while True:
    user_input = input("You: ")
    response = contextual_response(user_input)
    print(f"Bot: {response}")
    log_interaction(user_input, response)
2. Verbose Mode:
- Enable verbose mode in LangChain to get detailed output of the chatbot’s processing. This can provide insights into how the chatbot generates responses and help you spot any issues.
- Check LangChain’s documentation for how to enable verbose mode, as it can vary depending on the version and configuration.
Running Your Tests and Debugging
- Save your test file: Make sure to save the unit test script.
- Run the tests: Execute the test script from your IDE or terminal. It will run the tests and show you the results.
- Check the logs: Review the interaction log to see how the chatbot is performing and identify any issues.
- Enable verbose mode: Follow the documentation to enable verbose mode and get more detailed output.
By testing and debugging your chatbot, you ensure it works correctly and can handle various user interactions more effectively.
Deployment and Maintenance
Deploying Your Chatbot
Once you’ve built your chatbot, you can make it available to users by deploying it on different platforms, such as:
- Web Applications: Integrate your chatbot into a website to provide instant support or interactive features.
- Messaging Apps: Deploy your chatbot on platforms like Facebook Messenger, Slack, or WhatsApp for direct interaction with users.
- Standalone Applications: Create a standalone application that users can download and run locally.
Choosing a Deployment Platform
Consider using services like AWS (Amazon Web Services), Google Cloud, or Heroku for hosting your chatbot. These platforms offer scalable solutions with reliable infrastructure and management tools.
Regular Updates and Maintenance
To keep your chatbot effective and responsive, follow these maintenance practices:
- Regular Updates: Update your chatbot regularly to improve its responses and add new features. This ensures that it stays relevant and meets users’ needs over time.
- Bug Fixes: Address any bugs or issues promptly to maintain smooth operation. Monitor user interactions and logs to identify and resolve problems quickly.
- User Feedback: Gather feedback from users to understand how they interact with your chatbot. Use this feedback to make informed updates and enhancements.
Example Approach
- Deployment: Choose AWS for hosting your chatbot on a website. Integrate it using AWS Lambda for serverless execution and Amazon S3 for storing static assets.
- Maintenance: Schedule monthly updates to improve natural language processing capabilities and enhance responses. Use AWS CloudWatch to monitor performance metrics and user engagement.
By deploying your chatbot effectively and maintaining it regularly, you can ensure it provides a reliable and engaging experience for users across different platforms.
Conclusion
To build a LangChain chatbot with memory, you need to:
- Understand the Basics: Learn the fundamentals of chatbot development and how LangChain simplifies the process.
- Implement Memory Management: Use techniques like storing past interactions to improve the chatbot’s ability to provide personalized responses.
- Optimize Performance: Fine-tune your chatbot for better speed and accuracy in responses.
This tutorial has provided a detailed guide on creating an advanced chatbot using Python and LangChain, covering everything from setup to adding memory and optimizing performance.
Further Reading
If you’re interested in exploring further into chatbot development and related topics, consider exploring:
Conclusion and Further Reading
Summary
To build a LangChain chatbot with memory, you need to:
- Understand the Basics: Learn the fundamentals of chatbot development and how LangChain simplifies the process.
- Implement Memory Management: Use techniques like storing past interactions to improve the chatbot’s ability to provide personalized responses.
- Optimize Performance: Fine-tune your chatbot for better speed and accuracy in responses.
This tutorial has provided a detailed guide on creating an advanced chatbot using Python and LangChain, covering everything from setup to adding memory and optimizing performance.
Further Reading
- LangChain Documentation: Refer to the official LangChain documentation for detailed information on its features, APIs, and best practices.
- Python Chatbot Libraries: Explore other Python libraries and frameworks for building chatbots, such as NLTK, SpaCy, or Rasa, to expand your toolkit.
- AI and Machine Learning in Chatbots: Learn more about how artificial intelligence and machine learning techniques are used to enhance chatbot capabilities, including natural language understanding and generation.
By continuing to explore these resources, you can further enhance your skills in chatbot development and create more sophisticated and intelligent conversational agents.






Leave a Reply