How to create PostgreSQL database in Django
Introduction
Thinking about using a PostgreSQL database for your Django project but not sure how to begin? Don’t worry—you’re not the only one! Setting up a database might feel tricky at first, but it’s actually pretty straightforward once you know the steps. This guide will take you through the process step by step.
Why choose PostgreSQL? It’s fast, reliable, and trusted by developers all over the world. Whether you’re working on a small project or a big application, PostgreSQL helps you handle data efficiently, grow your app as needed, and add new features more easily.
In this guide, we’ll start with the basics—installing PostgreSQL and connecting it to Django—and go all the way to writing your first database queries. By the end, you’ll have PostgreSQL set up and working with your Django project, and you’ll also understand how everything works together.
Let’s get started!
Why Use PostgreSQL with Django?
Django comes with its own lightweight database, but when you’re working with larger projects, PostgreSQL is a huge step up. Here’s why:
- Performance: PostgreSQL is built to handle large amounts of data and complex queries. It’s efficient and keeps your app running smoothly, even with heavy data loads.
- Reliability: Known for its data integrity and stability, PostgreSQL can handle a lot of traffic without compromising data accuracy.
- Flexibility: PostgreSQL supports many data types, making it easy to store and organize your data exactly as you need.
Advancements in Django and PostgreSQL Integration
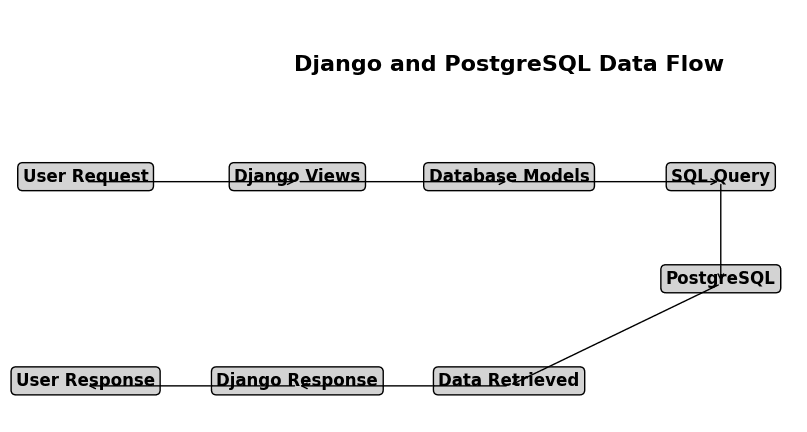
Thanks to recent updates in both Django and PostgreSQL, connecting these tools has become simpler and more powerful than ever. Let’s break it down:
Django 4.0+: The latest versions of Django offer better support for PostgreSQL, including handy features like JSON fields and custom data types. This means you can handle more complex data structures with ease.
PostgreSQL 13 and beyond: Newer PostgreSQL versions bring exciting features like faster indexing and full-text search, making it quicker to retrieve data and more efficient to work with large datasets.
When you put these two together, you’ll get a setup that’s fast, secure, and packed with features. Whether you’re building a small project or a large, scalable app, this combination will help you create something user-friendly and future-ready.
Ready to connect Django with PostgreSQL? Let’s start by making sure your system is ready. Here’s a quick checklist:
- Python installed: You’ll need Python (preferably the latest version).
- Django installed: Make sure Django is set up in your project.
- PostgreSQL installed: Have PostgreSQL installed and running on your system.
- A database management tool (optional): Tools like pgAdmin or DBeaver can make it easier to work with your database.
Once you’ve got these ready, you’re all set to dive into the setup process!
Prerequisites
Before diving in, make sure you meet the following requirements to ensure a smooth setup.
System Requirements
Supported Operating Systems:
- Windows (Windows 10 and above recommended)
- macOS (macOS Catalina and above)
- Linux (Ubuntu, Debian, CentOS, etc.)
Django and PostgreSQL are compatible across all major operating systems, so you’re covered on whichever platform you prefer!
Python Version Compatibility:
- Python 3.8 or newer
For the latest features and security updates, using the latest stable Python version is ideal. Django and PostgreSQL support Python 3.8+, so you’re good as long as your version is recent.
Required Packages and Libraries:
To set up Django with PostgreSQL, you’ll need a few core packages. Here’s a quick overview:
- Django – The web framework itself.
- Psycopg2 – A PostgreSQL adapter that allows Django to connect with a PostgreSQL database.
- pip – Python’s package installer, which is needed for managing dependencies.
Installing PostgreSQL on Different Operating Systems
Windows:
- Go to the PostgreSQL download page and choose Windows.
- Download the installer for the latest version.
- Open the installer and follow the prompts. It will ask you to set a password for the “postgres” user—make sure to remember it!
- Choose your default port (usually 5432) and complete the installation.
macOS:
- Open a terminal and install PostgreSQL with Homebrew by running:
brew install postgresql
2. Start the PostgreSQL service:
brew services start postgresql
3. Set up the default user with:
createuser -s postgres
Linux (Ubuntu/Debian):
- Open your terminal and update your package list:
sudo apt update
2. Install PostgreSQL with:
sudo apt install postgresql postgresql-contrib
3. Set up the default user:
sudo -u postgres psql
4. Inside the PostgreSQL shell, set a password for the “postgres” user:
\password postgres
Verifying the Installation
Once installed, let’s make sure PostgreSQL is running properly on your system:
- Open the PostgreSQL shell by typing
psql -U postgresin your terminal or command prompt. - Enter the password you created during installation.
- You should see a prompt that says
postgres=#, which means PostgreSQL is ready to go!
If you see this prompt, congratulations—you’ve successfully installed PostgreSQL!
Setting up your Python environment is an important step when starting a Django project with PostgreSQL. Don’t worry—this process is simple, and we’ll walk through each part. By creating a virtual environment and installing Django and Psycopg2 (the PostgreSQL adapter), you’ll ensure that your project runs smoothly and stays organized.
Step 1: Creating a Virtual Environment
A virtual environment keeps your project’s dependencies separate, so different projects won’t interfere with each other. Here’s how to set it up:
- Navigate to your project folder (or create a new one).
- Run this command to create a virtual environment:
python3 -m venv env
- This will create a folder named
envwith all the dependencies for your project.
3. Activate the virtual environment:
- Windows:
.\env\Scripts\activate
- macOS/Linux:
source env/bin/activate
You’ll know the virtual environment is active when you see (env) in your terminal prompt.
Step 2: Installing Django and Psycopg2
Now that your virtual environment is set up, let’s install Django and Psycopg2. Psycopg2 is the tool that connects Django to PostgreSQL.
- Run this command to install Django and Psycopg2:
pip install django psycopg2-binary
2. This will download and set up Django and Psycopg2, so your project can communicate with your PostgreSQL database.
Must Read
- How Python Searches Data: Linear Search, Binary Search, and Hash Lookup Explained
- I Implemented Every Sorting Algorithm in Python — The Results Nobody Talks About (Benchmarked on CPython)
- How to Reverse a String in Python: Performance, Memory, and the Tokenizer Trap
- How to Check Palindrome in Python: 5 Efficient Methods (2026 Guide)
- Mastering Python Regex (Regular Expressions): A Step-by-Step Guide
Creating a PostgreSQL Database
Creating a PostgreSQL database is easier than it might seem! In this part, we’ll go through accessing the PostgreSQL command line, starting the service, and logging in.
Step 1: Accessing the PostgreSQL Command Line
To start, we need to access PostgreSQL’s command line. This is where we’ll create and manage our database.
Starting the PostgreSQL Service:
- Linux/macOS: Make sure the PostgreSQL service is running by using:
sudo service postgresql start
- Windows: PostgreSQL typically starts automatically on Windows. But if needed, you can start it via the Services app (search “Services” in the Start menu, then find and start PostgreSQL).
Step 2: Logging in as the Default User
Once PostgreSQL is running, let’s log in as the default PostgreSQL user. Follow these steps:
- Use the following command to log in:
sudo -u postgres psql
- This command will log you in as the “postgres” user, which has administrative privileges in PostgreSQL.
2. Check if you see the prompt postgres=#.
- If so, you’re in! You’re now connected to PostgreSQL’s command line and ready to create a database.
Creating a User and Database
Step 1: Creating a New User
First, let’s create a PostgreSQL user that will manage your project’s database. This user will have its own login and password, adding an extra layer of security.
- In the PostgreSQL command line, run the following command:
CREATE USER your_project_user WITH PASSWORD 'your_secure_password';
Replace your_project_user with a name for your user, and your_secure_password with a strong password.
Step 2: Creating a New Database
Next, we’ll create a database that this new user will control. This is where all your project’s data will be stored.
- Run this command to create your new database:
CREATE DATABASE your_database_name;
- Replace
your_database_namewith a name that fits your project. This will keep things organized and easy to find.
Step 3: Granting Privileges to the User
Now, we need to make sure your new user has the right permissions to manage the database. This will allow the user to read from and write to the database.
- Use this command to give the user full access to the new database:
GRANT ALL PRIVILEGES ON DATABASE your_database_name TO your_project_user;
Configuring Django to Use PostgreSQL
Step 1: Open the settings.py File
- In your Django project folder, navigate to the
settings.pyfile, located inside your project’s main directory. - Open
settings.pyin a code editor to modify the database settings.
Step 2: Update the DATABASES Section
Now, let’s configure Django to connect with PostgreSQL by editing the DATABASES section. Here’s what each part of the configuration means and how to set it up:
DATABASES = {
    'default': {
        'ENGINE': 'django.db.backends.postgresql',  # Specifies PostgreSQL as the database
        'NAME': 'your_database_name',               # Replace with the name of the database you created
        'USER': 'your_project_user',                # Enter the username you created for this project
        'PASSWORD': 'your_secure_password',         # Add the password you set for your project user
        'HOST': 'localhost',                        # Host set to 'localhost' if the database is on your local machine
        'PORT': '5432',                             # Default port for PostgreSQL
    }
}
Here’s a breakdown of each setting:
- ENGINE: This tells Django to use PostgreSQL. Make sure this is set to
'django.db.backends.postgresql'. - NAME: This is the name of the database you created earlier. Replace
'your_database_name'with your actual database name. - USER: Enter the username you set up for this project. Using a dedicated user keeps your setup organized and secure.
- PASSWORD: Add the password you created for the user here. This keeps your database secure.
- HOST: If PostgreSQL is on your local machine, use
'localhost'. If it’s hosted elsewhere, add the server address here. - PORT: PostgreSQL’s default port is
5432, so leave this as is unless you have a custom setup.
Quick Recap
With these settings, Django will know exactly where to find your PostgreSQL database, which user to connect with, and how to access it securely.
- Open
settings.py. - Update the
DATABASESsection with your database information. - Save the file, and you’re all set!
Running Migrations
Running migrations is a crucial step in getting Django and PostgreSQL to work together smoothly. Migrations in Django handle the creation and updating of database tables based on your models.
What Are Migrations in Django?
Migrations are how Django keeps track of changes you make to your database structure, based on updates to your models. You can think of migrations as blueprints that tell Django how to update your database and keep everything in sync.
When you create or modify a model (like adding a table or changing a column), migrations ensure those changes are applied to your PostgreSQL database smoothly. Here’s what this process looks like:
- Creates tables in the database that match your Django models.
- Updates tables whenever you add or modify fields in your models.
- Manages relationships between different tables.
In short, migrations handle the “behind-the-scenes” work for you!
Step 1: Running Initial Migrations
Let’s create and apply our first set of migrations. Here’s how to do it:
- Open your terminal and navigate to your Django project’s root directory.
- Run the following command to create initial migrations for your models:
python manage.py makemigrations
- This command tells Django to “prepare” any changes in your models (if any) as migration files. If it’s the first time you’re running it, Django will set up migrations for default models and any initial models you’ve created.
3. Now, apply these migrations to your database using:
python manage.py migrate
- This command actually applies the migrations to PostgreSQL, creating the tables and structures Django needs. You should see a series of messages that confirm Django is applying each migration successfully.
Why These Commands Are Important
makemigrations:
This command creates migration files based on the changes in your models. Whenever you add, edit, or delete a model, use this command to generate a new migration file.migrate:
After creating the migration files, use this command to apply them to your PostgreSQL database. This updates the database structure to match your models.
By running these commands, you’re setting up a solid foundation for your Django project, allowing it to work smoothly with PostgreSQL. With your database now in sync with your models, you’re ready to build and test your Django app!
Building Your First Django Application
Creating a Django project from scratch is an exciting first step! In this part, we’ll go through the commands you need to set up a new Django project, create an app within it, and make sure everything is set up in the project’s settings.
Step 1: Creating a New Django Project
First, let’s create the Django project itself. This will set up the basic project structure that Django needs.
- Open your terminal and navigate to the directory where you want to create the project.
- Run the following command:
django-admin startproject <project_name>
- Replace
<project_name>with the name you want to give your project. This command will create a new folder with that name, containing all the basic files Django needs.
Example:
django-admin startproject emitechlogic
After this command runs, you’ll see a folder named emitechlogic with files like manage.py and a subfolder with settings, URLs, and other configuration files.
Step 2: Creating an App within the Project
In Django, an app is where you’ll write the actual code for specific functionalities or features (like a blog, store, or user profile). You can create multiple apps within a single project to keep everything organized.
- In the terminal, navigate to your project’s directory (the folder containing
manage.py). - Run the following command to create an app:
python manage.py startapp <app_name>
- Replace
<app_name>with a name that describes the functionality of the app, likeblog,store, oraccounts.
Example:
python manage.py startapp blog
This command will create a new folder named blog (or whatever name you chose) with several files inside to get started with the app, such as models.py, views.py, and tests.py.
Step 3: Registering the App in settings.py
To make sure Django recognizes your new app, you’ll need to add it to the INSTALLED_APPS section in settings.py. This tells Django to include your app when it’s running the project.
- Open the
settings.pyfile in your project’s main folder (you’ll find this inside the subfolder created bystartproject). - Look for the
INSTALLED_APPSlist, which contains all the apps Django knows about. - Add your app’s name to this list as a string. This step is essential to connect the app with the overall project.
Example:
INSTALLED_APPS = [
    'django.contrib.admin',
    'django.contrib.auth',
    'django.contrib.contenttypes',
    'django.contrib.sessions',
    'django.contrib.messages',
    'django.contrib.staticfiles',
    'blog',  # This is the app we just created
]
After you’ve added the app name, save the settings.py file.
Quick Recap
Let’s review what we’ve done:
- Created a new Django project using
django-admin startproject <project_name>. - Created an app within the project using
python manage.py startapp <app_name>. - Registered the app in
settings.pyso that Django recognizes it.
Utilizing PostgreSQL Features in Django
1. Advanced Data Types in PostgreSQL
One of the best parts of PostgreSQL is the variety of data types it offers beyond just strings and integers. Here are a couple of advanced data types you can start using in Django:
- JSONField: This field lets you store JSON data directly in your database. It’s a great choice when you need to save unstructured data that might change over time. For example, if you’re tracking user preferences that could have different fields for each user, JSONField can handle that flexibility.pythonCopy code
from django.db import models

class UserProfile(models.Model):
    preferences = models.JSONField()
- ArrayField: This allows you to store arrays of data directly in your database. It’s useful when you need to save multiple values for a single field, such as tags for a blog post.
from django.contrib.postgres.fields import ArrayField

class BlogPost(models.Model):
    tags = ArrayField(models.CharField(max_length=50), blank=True)
These fields make it easy to work with data that doesn’t fit neatly into rows and columns. Plus, PostgreSQL’s support for these fields ensures that even as your data grows, you can still query and filter it efficiently.
2. Full-Text Search Capabilities
Searching text fields efficiently can be a challenge, but PostgreSQL has built-in support for full-text search, which is extremely handy for applications like blogs, news websites, or product catalogs.
- Why Full-Text Search? Instead of just checking for exact matches, full-text search lets you search for keywords within a large block of text. PostgreSQL can even handle ranking the relevance of each result.
- Implementing Full-Text Search in Django: With Django, you can use PostgreSQL’s full-text search functions to add this feature without much hassle.
from django.contrib.postgres.search import SearchVector
from django.db.models import F

class BlogPost(models.Model):
    title = models.CharField(max_length=200)
    content = models.TextField()

# Running a full-text search
BlogPost.objects.annotate(
    search=SearchVector('title', 'content')
).filter(search='your_keyword')
By adding full-text search, you’re giving users a better way to find exactly what they’re looking for without needing to sift through endless pages of results.
3. Performance Optimization Techniques
No one likes a slow app, and with PostgreSQL’s performance features, you can make sure your app runs smoothly even when your database grows. Here are some easy-to-implement strategies for keeping your app quick and responsive:
- Indexing: Indexing helps the database locate data more quickly, especially when you’re dealing with large tables. Fields that you frequently filter on, like
user_idorcreated_date, are good candidates for indexing.
from django.db import models

class Order(models.Model):
    order_date = models.DateTimeField(db_index=True)  # Adding an index for faster filtering
Using Foreign Keys and Related Models Efficiently: Django’s ORM lets you use select_related and prefetch_related to reduce the number of database queries when working with related models.
select_relatedis good for one-to-one and foreign key relationships.prefetch_relatedis better for many-to-many and reverse relationships.
orders = Order.objects.select_related('customer').all()
By following these optimization techniques, you’re making sure that as your app grows, it stays responsive and enjoyable for your users.
Best Practices for Using PostgreSQL with Django
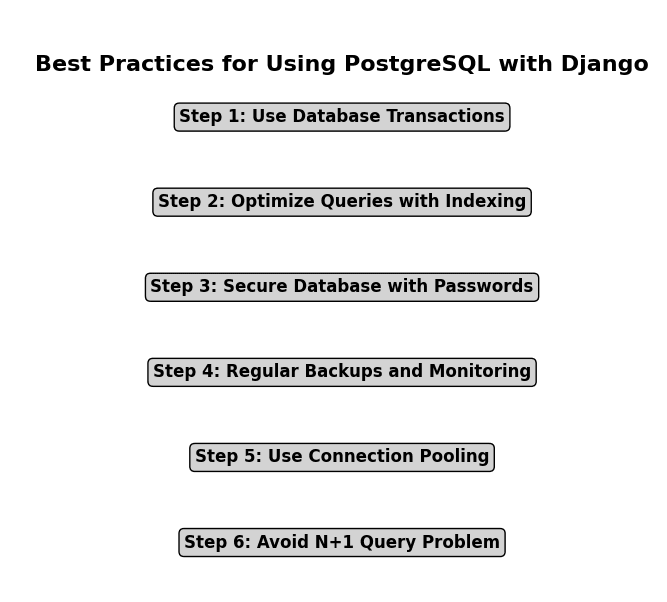
1. Database Configuration Best Practices
To ensure your Django app runs efficiently with PostgreSQL, you’ll want to tweak how the two connect and manage resources.
Connection Pooling
Managing database connections efficiently is key for performance. Connection pooling reuses existing database connections instead of opening a new one for every request, saving resources and speeding up response times. Tools like pgBouncer work seamlessly with Django, making this process easier.
This is especially important for apps with many users or frequent database interactions.
Caching Strategies
Caching reduces the load on your database by storing copies of frequently accessed data. Django offers built-in caching options compatible with backends like Redis and Memcached. Setting up caching for read-heavy queries or static content (like an e-commerce homepage’s product list) can drastically improve your app’s speed.
Example:
Cache a query that fetches a product list:
from django.core.cache import cache

def get_products():
    products = cache.get('product_list')
    if not products:
        products = Product.objects.all()
        cache.set('product_list', products, timeout=3600)  # Cache for 1 hour
    return products
2. Data Integrity and Security Measures
Implementing Constraints
Use constraints like UNIQUE, NOT NULL, and CHECK to ensure data accuracy and prevent invalid entries. Define these directly in your Django models.
Example: Enforce unique email addresses in a User model:
from django.db import models

class User(models.Model):
    email = models.EmailField(unique=True)
Limit database access based on user roles. For example, PostgreSQL allows you to set read-only permissions for certain users while granting full access to admins.
Example: Create a read-only database user in PostgreSQL:
CREATE USER readonly_user WITH PASSWORD 'password';
GRANT CONNECT ON DATABASE your_database TO readonly_user;
GRANT SELECT ON ALL TABLES IN SCHEMA public TO readonly_user;
Secure Credentials with Environment Variables
Never store sensitive database credentials in your code. Use environment variables to keep them secure.
Example: Use the django-environ package to load credentials:
import environ

env = environ.Env()
environ.Env.read_env()

DATABASES = {
    'default': {
        'ENGINE': 'django.db.backends.postgresql',
        'NAME': env('DB_NAME'),
        'USER': env('DB_USER'),
        'PASSWORD': env('DB_PASSWORD'),
        'HOST': env('DB_HOST'),
        'PORT': env('DB_PORT'),
    }
}
3. Regular Backups and Recovery Strategies
Regular backups are your safety net in case of unexpected data loss or system failures.
Backup Methods
- pg_dump: This is a simple way to create a full backup of your PostgreSQL database.
Example Command:
pg_dump -U postgres -d your_database_name -f backup.sql
Automating Backups
Automate backups using tools like cron (Linux) or Task Scheduler (Windows) to ensure regular data protection.
Example cron job (daily backup at midnight):
0 0 * * * pg_dump -U postgres -d your_database_name -f /path/to/backup.sql
Recovery Strategies
Practice restoring backups to ensure you’re prepared for emergencies. Use pg_restore for backups created with pg_dump.
Example Command:
pg_restore -U postgres -d your_database_name backup.sql
Testing your recovery process periodically helps you identify potential issues before they become critical.
Troubleshooting Common Issues
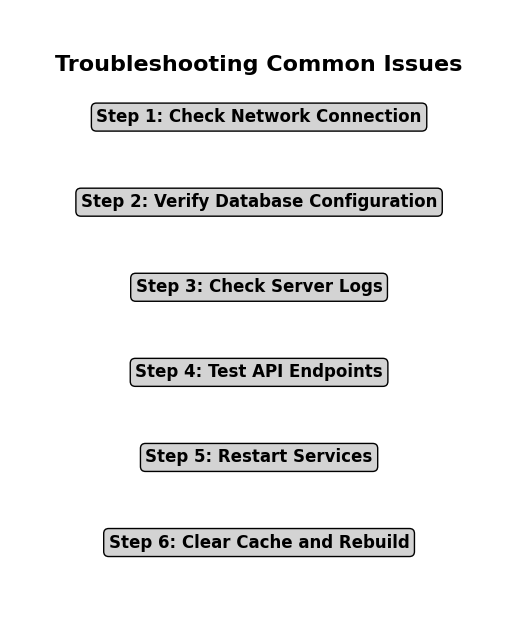
1. Connection Issues
Connection issues are common when setting up Django with PostgreSQL, especially if you’re just starting out. Here’s a look at common errors and ways to fix them:
- “could not connect to server” error: This is usually caused by PostgreSQL not running, or by a configuration problem.
- Solution: Make sure PostgreSQL is running. You can start it with:
- Linux/Mac:
sudo service postgresql start - Windows: Start it through the Services app or check Task Manager.
- Linux/Mac:
- Solution: Make sure PostgreSQL is running. You can start it with:
- Authentication errors (e.g., “password authentication failed”): This error happens if there’s an issue with your username or password.
- Solution: Double-check that the username and password in your Django
settings.pyfile match those in PostgreSQL. Use environment variables for storing these credentials to improve security.
- Solution: Double-check that the username and password in your Django
- Database does not exist error: This error can occur if Django is trying to connect to a PostgreSQL database that hasn’t been created.
- Solution: Log in to PostgreSQL and create the database manually using:sqlCopy code
CREATE DATABASE your_database_name;
Then, update your Django settings if needed.
2. Migration Problems
Migrations are Django’s way of updating the database schema to match your models. Occasionally, you might encounter issues here, especially when you’re actively developing and changing models.
- Common migration errors:
- “no such table” error: This error usually happens if you haven’t applied migrations, or if there was an error during the migration process.
- Solution: Run the following commands to ensure all migrations are applied:bashCopy code
- “no such table” error: This error usually happens if you haven’t applied migrations, or if there was an error during the migration process.
python manage.py makemigrations
python manage.py migrate
Conflict errors: These occur if multiple migration files have changes that can’t be merged directly.
- Solution: Resolve migration conflicts by either merging changes manually or recreating the migration files. Start by deleting conflicting migrations, then run
makemigrationsagain. Alternatively, Django has a--mergeoption:
python manage.py makemigrations --merge
Missing dependencies: Sometimes, you might see errors about missing dependencies between apps or migrations.
- Solution: Make sure all necessary apps are added to
INSTALLED_APPSinsettings.py. Also, confirm that all migrations for each app have been applied in the correct order.
Quick Tips for Preventing Issues
- Always back up your database before making major changes or applying migrations, especially if working with production data.
- Use a virtual environment to avoid package conflicts and maintain a clean workspace for your project.
- Run migrations regularly during development to catch issues early, rather than waiting for a backlog to build up.
Latest Advancements in PostgreSQL and Django Integration
1. New Features in PostgreSQL (Version Updates)
PostgreSQL has seen several recent updates that improve both performance and functionality, making it an even stronger choice for web development with Django. Here are some of the key features from recent PostgreSQL releases:
- JSON and JSONB Data Types:
- PostgreSQL now offers optimized storage for JSON data through
JSONB. This allows you to store and query JSON data with high efficiency, which is perfect if you’re working with semi-structured data in Django.
- PostgreSQL now offers optimized storage for JSON data through
- Parallel Querying:
- Recent versions of PostgreSQL introduced parallel processing for complex queries, which speeds up performance when dealing with large datasets. This means faster response times in Django applications, especially for data-heavy applications.
- Partitioning Improvements:
- PostgreSQL’s latest releases have made table partitioning easier and more powerful. With partitioning, large tables can be divided into smaller, manageable pieces (or partitions). This is ideal for handling high-traffic applications or big data processing.
- Native Full-Text Search:
- Full-text search capabilities have been enhanced, enabling developers to perform search operations directly within PostgreSQL without needing additional tools. This feature is especially useful for applications that need efficient search functionalities, like blogs or e-commerce sites.
2. Enhancements in Django ORM for PostgreSQL Support
Django’s Object-Relational Mapping (ORM) system also keeps up with PostgreSQL’s new features, ensuring smooth integration. Let’s check out some of the recent ORM improvements that enhance how Django interacts with PostgreSQL:
- Support for PostgreSQL’s Advanced Data Types:
- Django’s ORM now fully supports PostgreSQL-specific data types like
ArrayField,JSONField, andHStoreField. These fields allow you to store complex data directly in PostgreSQL while maintaining easy access through Django’s models.
- Django’s ORM now fully supports PostgreSQL-specific data types like
- Indexing and Performance Optimization:
- Django has introduced features to support custom indexing, including support for
GINandGiSTindexes. These indexes boost performance in querying specific types of data, such as full-text search data and JSON fields, making searches faster and more efficient.
- Django has introduced features to support custom indexing, including support for
- Full-Text Search Integration:
- Django’s ORM now has improved support for PostgreSQL’s full-text search, allowing developers to implement search functionality right within their Django code. This means better search accuracy and faster results without third-party search engines.
- Window Functions:
- Window functions, introduced in PostgreSQL and supported by Django, allow you to perform calculations across a set of table rows that are related to the current row. These are particularly useful for advanced analytics, such as ranking data or calculating moving averages.
Why These Advancements Matter
These PostgreSQL and Django improvements are game-changers if you want to build applications that handle complex data and queries efficiently. With these features:
- You get better performance – faster queries and more optimized indexing.
- You can handle complex data types directly in PostgreSQL with the help of Django.
- You’re able to build efficient search features with full-text search and JSON support, which will improve the user experience on your site.
Conclusion
Let’s wrap up with a quick look at what we covered in setting up a PostgreSQL database with Django.
By following this guide, you’ve learned:
- Installing PostgreSQL and setting it up to work seamlessly with Django.
- Configuring Django to use PostgreSQL, allowing your app to handle data efficiently.
- Creating users and databases in PostgreSQL, giving you control over your database’s security and permissions.
- Running migrations to initialize and update your database structure, making development smoother.
- Using advanced PostgreSQL features in Django, like JSON fields and full-text search, to give your app more power and flexibility.
PostgreSQL and Django make a powerful team for handling complex data requirements, building scalable apps, and improving database performance. With PostgreSQL’s advanced features and Django’s ORM capabilities, you now have the foundation to create robust, data-driven applications.
Take some time to explore PostgreSQL and Django even further. Experiment with the advanced features, optimize your queries, and see how you can take your app to the next level.
FAQs
How do I install PostgreSQL for use with Django?
You can install PostgreSQL using package managers like apt for Linux, Homebrew for macOS, or the installer for Windows. Once installed, make sure it’s running and accessible.
How do I connect Django to my PostgreSQL database?
In your Django project’s settings.py, update the DATABASES dictionary with your PostgreSQL database’s name, user, password, host, and port. Be sure to set 'ENGINE': 'django.db.backends.postgresql' to use PostgreSQL.
What is psycopg2, and why is it required?
psycopg2 is the PostgreSQL adapter for Python, which Django uses to communicate with PostgreSQL databases. Install it with pip install psycopg2-binary.
How can I resolve common database connection issues in Django?
Check your database credentials in settings.py, ensure PostgreSQL is running, and confirm your firewall settings allow database connections. You can also inspect error messages for more specific troubleshooting.
External Resources
Django Documentation – Database Setup
- Official guide to configuring a PostgreSQL database in Django, including installation and setup.
- Django Database Setup Documentation
PostgreSQL Official Documentation
- Learn everything about PostgreSQL setup, configuration, and advanced features directly from the official documentation.
- PostgreSQL Documentation
Django and PostgreSQL Integration Guide – Real Python
- A step-by-step guide on how to integrate PostgreSQL with Django, including installation and setup tips.
- Real Python – PostgreSQL with Django
Django Database Migrations Documentation
- An official guide to handling database migrations, which is crucial when using PostgreSQL with Django.
- Django Migrations Documentation




Leave a Reply