Python Documentation: The Ultimate Guide (Part 2)
Introduction to Python Documentation
Welcome to Part 2 of our ultimate guide on Python documentation! Here, we’ll explore advanced techniques for documenting your Python projects. Building on the basics from Part 1, we’ll focus on creating detailed API documentation, applying best practices, and using automation to enhance your documentation process.
We’ll start by examining why API documentation is essential. It offers detailed information on how to use your code’s functionalities, serving as a crucial resource for developers. We’ll cover how to use docstrings for API documentation and explore methods to automate its generation.
Next, we’ll provide an example of creating API documentation for a Python library, showing you how to implement these concepts effectively.
We’ll also discuss best practices for maintaining high-quality documentation, emphasizing consistency, audience-focused writing, and keeping content up-to-date. You’ll learn to structure your documentation for clarity and ease of use.
In the automation segment, we’ll review tools like Travis CI, GitHub Actions, and Read the Docs. We’ll guide you through setting up automated documentation builds with a practical example using GitHub Actions and Sphinx.
Finally, we’ll enhance your documentation with examples and tutorials, providing clear and practical insights. We’ll also cover versioning and managing documentation for multiple project versions to keep your content accurate and relevant.
By the end of Part 2, you’ll have advanced skills to refine your documentation practices, automate processes, and create comprehensive, user-friendly resources for your Python projects.
Creating API Python Documentation
Why API Documentation is Crucial
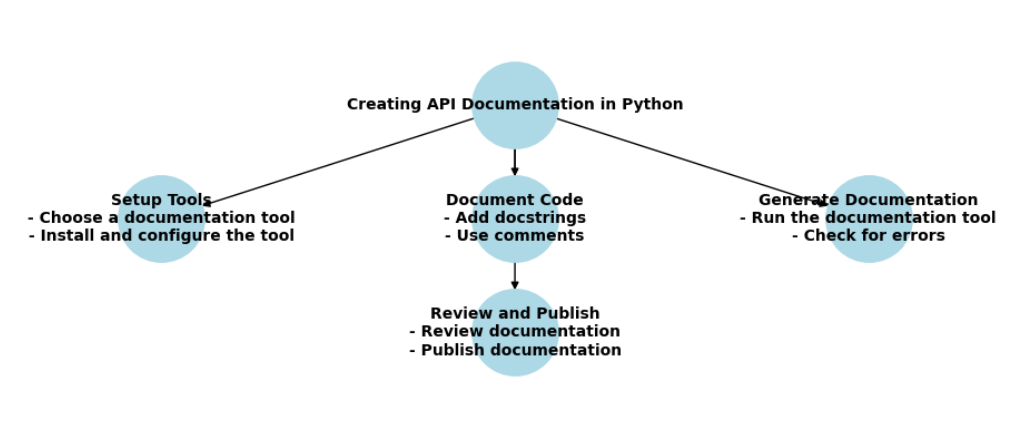
API documentation is essential for several reasons. It serves as the primary resource for developers to understand how to use a given API, which can be a complex set of functions, classes, or services. Without clear and thorough documentation, users of your API might struggle to grasp its purpose or how to effectively integrate it into their own projects.
Good API documentation not only provides a clear explanation of the available functionalities but also includes practical examples and usage guidelines. This helps users avoid errors and improves their efficiency in implementing the API. Additionally, well-documented APIs enhance maintainability and ease of use, leading to better adoption and satisfaction among developers.
Using Docstrings for API Python Documentation
In Python, docstrings are a vital part of API documentation. They are the triple-quoted strings placed at the beginning of modules, classes, and functions to describe their purpose and usage. Here’s how you can use docstrings effectively for API documentation:
- Module Docstrings: Provide an overview of the module’s functionality. For example:
"""
This module provides utility functions for handling data.
Functions include data validation, transformation, and storage.
"""
2. Class Docstrings: Describe the class and its purpose. For instance:
class DataProcessor:
    """
    A class for processing and transforming data.

    Attributes:
        data: A list of data items to be processed.
    """

    def __init__(self, data):
        """
        Initializes the DataProcessor with a list of data.

        Parameters:
            data (list): The data to be processed.
        """
        self.data = data
3. Method Docstrings: Explain the functionality of methods and their parameters:
def transform(self):
    """
    Transforms the data by applying various filters.

    Returns:
        list: A list of transformed data.
    """
    # Implementation here
By including clear and descriptive docstrings, you help users understand the purpose of each component and how to use it effectively.
Automating API Python Documentation Generation
Automating API documentation generation can save time and ensure that your documentation is always up-to-date. Several tools can assist in this process:
Using Sphinx for API Docs
Sphinx is a popular tool for generating documentation from docstrings. It’s widely used in the Python community and supports various output formats, such as HTML and PDF. Here’s a quick guide to using Sphinx for API documentation:
- Install Sphinx: You can install Sphinx using pip:
pip install sphinx
2. Initialize Sphinx: Set up a new Sphinx project with:
sphinx-quickstart
Follow the prompts to configure your documentation.
3. Configure Sphinx: Edit the conf.py file in your Sphinx project directory to include the path to your source code and enable the sphinx.ext.autodoc extension, which pulls in docstrings:
extensions = ['sphinx.ext.autodoc']
4. Generate Documentation: Run the following command to build the documentation:
make html
This command generates HTML documentation in the _build/html directory.
Using pdoc for API Docs
pdoc is another tool for generating API documentation from Python docstrings. It’s simpler than Sphinx and focuses specifically on API documentation. Here’s how to use pdoc:
- Install pdoc:
pip install pdoc
2. Generate Documentation: Run pdoc to generate documentation:
pdoc --html mymodule
This command generates HTML documentation for the mymodule module.
3. View Documentation: Open the generated HTML files in your web browser to view the documentation.
Example: Creating API Documentation for a Python Library
Let’s walk through an example of creating API documentation for a Python library using docstrings and Sphinx.
Assume we have a Python library named mylibrary with the following structure:
mylibrary/
    __init__.py
    module1.py
    module2.py
docs/
    conf.py
    index.rst
1. Add Docstrings to Your Code:
In module1.py, you might have:
"""
Module 1: Provides functionality for data processing.
"""

def process_data(data):
    """
    Process a list of data items.

    Parameters:
        data (list): The data to be processed.

    Returns:
        list: The processed data.
    """
    # Implementation here
2. Configure Sphinx:
In conf.py, set the path to your library and enable autodoc:
import os
import sys
sys.path.insert(0, os.path.abspath('../mylibrary'))

extensions = ['sphinx.ext.autodoc']
3. Create ReStructuredText Files:
Edit index.rst to include:
Welcome to MyLibrary’s documentation!
=====================================

.. automodule:: mylibrary.module1
   :members:
4. Build the Documentation:
Run:
make html
Open the generated HTML files in the _build/html directory to view your documentation.
API documentation is crucial for ensuring that users can understand and effectively use your code. By using docstrings and tools like Sphinx and pdoc, you can automate the generation of comprehensive and up-to-date documentation. This not only improves the usability of your API but also enhances the overall quality of your software.
Must Read
- How to Check if Dictionary Values Are Sorted in Python
- Check If a Tuple Is Sorted in Python — 5 Methods Explained
- How to Check If a List Is Sorted in Python (Without Using sort()) – 5 Efficient Methods
- How Python Searches Data: Linear Search, Binary Search, and Hash Lookup Explained
- I Implemented Every Sorting Algorithm in Python — The Results Nobody Talks About (Benchmarked on CPython)
Automating Python Documentation with Continuous Integration
Why Automate Python Documentation?
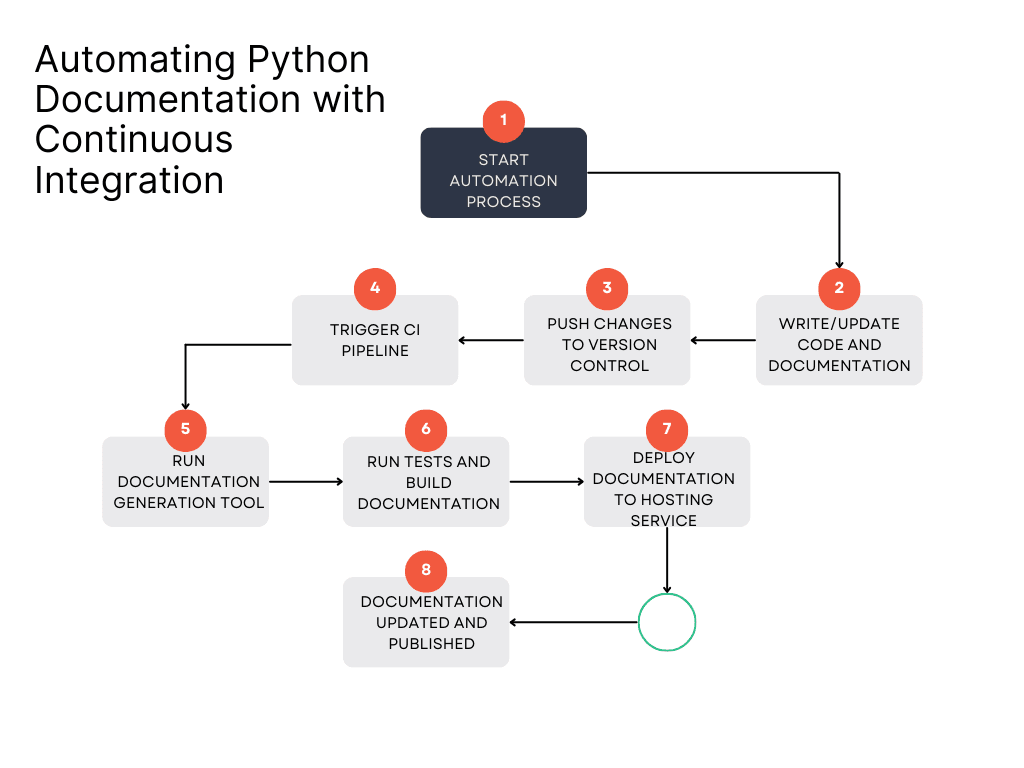
Automating documentation is a powerful practice that can enhance your development workflow in numerous ways. By automating the generation and updating of documentation, you save time, reduce errors, and ensure that your documentation is always up-to-date. Let’s explore why automation is beneficial and how various tools can help you achieve this.
Why Automate Documentation?
- Consistency: Automated documentation tools ensure that your documentation remains consistent with your codebase. Every time you make changes to your code, the documentation can be updated automatically to reflect those changes, reducing the risk of discrepancies between the code and its documentation.
- Efficiency: Manual documentation is time-consuming and prone to errors. Automating this process frees up your time, allowing you to focus on writing and improving code rather than updating documentation.
- Accuracy: Automated tools extract documentation directly from your code and docstrings. This minimizes the chances of missing or incorrect information, leading to more accurate and reliable documentation.
- Integration: Automation tools can be integrated into your continuous integration (CI) pipeline. This means that documentation is updated and published as part of your regular build process, ensuring it always matches the latest version of your code.
Tools for Automation
Several tools can help automate the documentation process. Here’s a look at some popular options:
Travis CI
Overview
Travis CI is a continuous integration service that can be used to automate various tasks, including documentation generation. It integrates with your GitHub repository and automatically builds and tests your code whenever changes are made.
How to Use Travis CI for Documentation
- Set Up Travis CI: First, sign up for Travis CI and connect it to your GitHub repository. You’ll need to create a
.travis.ymlfile in your project root to configure Travis CI. - Configure Documentation Generation: Add a configuration in
.travis.ymlto build and deploy your documentation. For example, if you use Sphinx, your configuration might look like this:
language: python
python:
  - "3.8"

install:
  - pip install sphinx
  - pip install -r requirements.txt

script:
  - sphinx-build -b html docs/source docs/build

deploy:
  provider: pages
  skip_cleanup: true
  local_dir: docs/build
  github_token: $GITHUB_TOKEN
  on:
    branch: main
3. Deploy Documentation: After configuring Travis CI, every push to your repository will trigger a build process that generates and deploys your documentation automatically.
GitHub Actions
Overview
GitHub Actions is another CI/CD tool integrated directly into GitHub. It allows you to create workflows that automate tasks such as testing, building, and deploying your code.
How to Use GitHub Actions for Documentation
- Set Up a Workflow: Create a
.github/workflowsdirectory in your repository and add a YAML file for your workflow. For example:
name: Build and Deploy Docs

on:
  push:
    branches:
      - main

jobs:
  build:
    runs-on: ubuntu-latest
    steps:
      - uses: actions/checkout@v3
      - name: Set up Python
        uses: actions/setup-python@v3
        with:
          python-version: '3.8'
      - name: Install dependencies
        run: |
          pip install sphinx
          pip install -r requirements.txt
      - name: Build documentation
        run: sphinx-build -b html docs/source docs/build
      - name: Deploy documentation
        uses: peaceiris/actions-gh-pages@v3
        with:
          github_token: ${{ secrets.GITHUB_TOKEN }}
          publish_dir: docs/build
2. Deploy Documentation: This workflow will automatically build and deploy your documentation whenever changes are pushed to the main branch.
Read the Docs Integration
Overview
Read the Docs is a popular service for hosting documentation. It integrates well with Python projects and supports various documentation formats like reStructuredText and Markdown.
How to Use Read the Docs for Documentation
- Set Up Read the Docs: Create an account on Read the Docs and connect it to your repository. You’ll need to configure a
readthedocs.ymlfile in your project root. - Configure Documentation Build: In the
readthedocs.ymlfile, specify the build settings and requirements. Here’s an example configuration:
version: 2

sphinx:
  configuration: docs/source/conf.py

python:
  version: 3.8
  install:
    - requirements: docs/requirements.txt
3. Automatic Builds: Read the Docs will automatically build your documentation whenever changes are detected in your repository, providing a live link to the updated documentation.
Setting Up Automated Documentation Builds
Automating documentation builds can greatly enhance your development workflow by ensuring your documentation is always up-to-date with the latest changes. This process involves configuring tools to automatically generate and publish documentation whenever updates are made to your code. In this section, we’ll walk through how to set up automated documentation builds, with a specific example of using GitHub Actions to automate Sphinx documentation.
Example: Automating Sphinx Documentation with GitHub Actions
Sphinx is a powerful tool for generating documentation from reStructuredText or Markdown files. By automating the build process with GitHub Actions, you ensure that your documentation is always current without manual intervention. Here’s a step-by-step guide on how to set this up.
1. Set Up Your Sphinx Documentation
Before configuring GitHub Actions, ensure your Sphinx documentation is set up correctly. If you haven’t already created Sphinx documentation, follow these steps:
- Install Sphinx: You need to install Sphinx and create a basic configuration for your documentation. Run the following commands in your terminal:
pip install sphinx
sphinx-quickstart
- Configure Sphinx: During the setup process, you’ll be prompted to configure your Sphinx documentation. You’ll provide details such as the project name and author, and Sphinx will generate the necessary files and directories.
- Add Content: Create your documentation content by editing the files in the
docs/sourcedirectory. Typically, you’ll work with.rst(reStructuredText) files to write your documentation.
2. Set Up GitHub Actions
GitHub Actions helps automate tasks by running workflows triggered by events such as code pushes. Here’s how to configure GitHub Actions to build and deploy Sphinx documentation:
- Create a Workflow File: In your GitHub repository, create a directory named
.github/workflows. Inside this directory, create a file namedbuild-docs.yml. This YAML file will define the workflow for building your documentation. - Configure the Workflow: Open
build-docs.ymland add the following configuration:
name: Build and Deploy Documentation

on:
  push:
    branches:
      - main  # Trigger the workflow on pushes to the main branch

jobs:
  build:
    runs-on: ubuntu-latest  # Use the latest version of Ubuntu

    steps:
      - uses: actions/checkout@v3  # Check out the repository
      - name: Set up Python
        uses: actions/setup-python@v3
        with:
          python-version: '3.8'  # Specify the Python version to use

      - name: Install dependencies
        run: |
          pip install sphinx
          pip install -r docs/requirements.txt  # Install project dependencies

      - name: Build documentation
        run: sphinx-build -b html docs/source docs/build  # Build the documentation

      - name: Deploy documentation
        uses: peaceiris/actions-gh-pages@v3
        with:
          github_token: ${{ secrets.GITHUB_TOKEN }}
          publish_dir: docs/build  # Directory where the built docs are located
- Explanation:
- Trigger: This workflow triggers on pushes to the
mainbranch. - Python Setup: Python is set up, and dependencies are installed.
- Build Step: Sphinx generates the HTML documentation.
- Deploy Step: The built documentation is deployed to GitHub Pages using the
peaceiris/actions-gh-pagesaction.
- Trigger: This workflow triggers on pushes to the
3. Commit and Push Changes
Once you’ve set up the workflow file, commit and push the changes to your GitHub repository:
git add .github/workflows/build-docs.yml
git commit -m "Add GitHub Actions workflow for Sphinx documentation"
git push origin main
4. Verify the Build
After pushing the changes, GitHub Actions will automatically trigger the workflow. You can monitor the progress and status of the workflow in the “Actions” tab of your GitHub repository. If the build and deployment succeed, your documentation will be available on GitHub Pages.
5. Review Your Documentation
Visit the GitHub Pages URL (usually https://<username>.github.io/<repository>) to review the live version of your documentation. Make sure everything appears as expected and that the updates reflect recent changes.
Enhancing Python Documentation with Examples and Tutorials
Importance of Examples in Documentation
Examples play a crucial role in documentation by providing practical, understandable, and actionable insights into how code or features work. They help users quickly grasp concepts and see how to apply them in real scenarios. Without clear examples, even the best-written documentation might leave users confused or unsure about how to proceed.
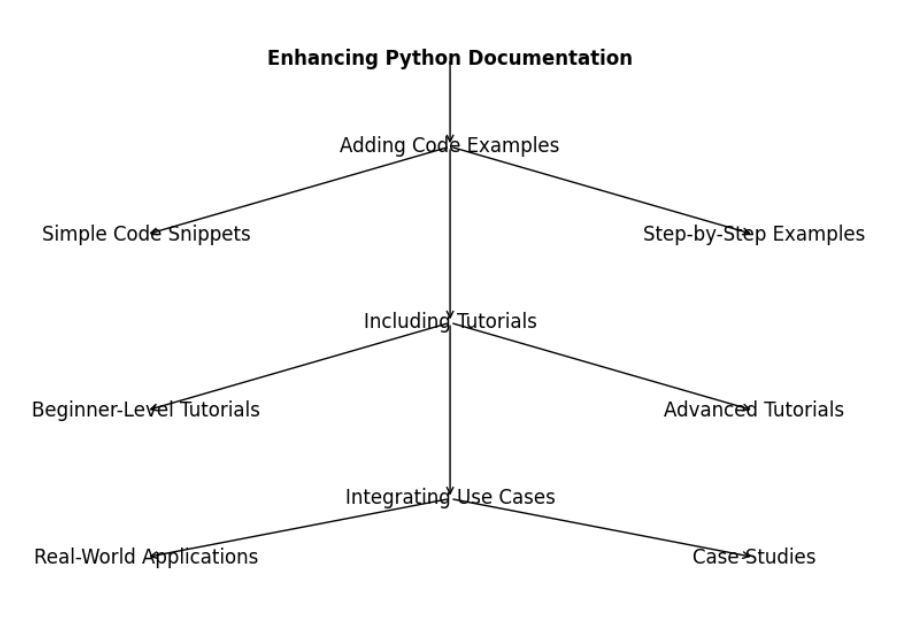
Why Examples Matter:
- Clarify Concepts: Examples illustrate how a feature or function is used in real-world scenarios, making abstract concepts easier to understand.
- Improve Usability: Users are more likely to use and integrate features correctly when they can see concrete examples of how they work.
- Enhance Learning: Practical examples help users learn by doing, which often leads to better retention of information.
In this guide, we’ll explore how to write effective examples that enhance your documentation.
How to Write Effective Examples
Writing effective examples involves clarity, relevance, and simplicity. Here’s how to craft examples that truly help your readers:
1. Simple and Clear Examples
When creating examples, aim for simplicity and clarity. Your goal is to make it easy for readers to understand the concept without getting bogged down in complex code or details.
- Use Minimal Code: Keep the example code as concise as possible while still demonstrating the key concept. Avoid including unnecessary details that might confuse readers.
# Simple example of a function to add two numbers
def add_numbers(a, b):
    return a + b

# Example usage
result = add_numbers(5, 3)
print(result)  # Output: 8
- Explain Each Step: Break down the example into its components and explain what each part does. This helps readers understand not just what the code does, but why it works that way.In the example above:
add_numbersis a function that takes two arguments,aandb.- It returns the sum of these two numbers.
- The
printstatement shows the result of callingadd_numbers(5, 3).
2. Real-World Use Cases
Examples become even more valuable when they reflect real-world use cases. This approach helps users see how they might use a feature or function in their own projects.
- Provide Context: Situate the example in a realistic scenario. For instance, if you’re documenting a library for data analysis, show how to use it with actual datasets.
import pandas as pd

# Example of loading and analyzing a CSV file
data = pd.read_csv('sales_data.csv')
print(data.head())  # Display the first few rows of the dataset
- Describe the Scenario: Clearly explain the context in which the example is used. This might include the problem being solved, the data being used, or the outcome expected.In this case:
- The code snippet shows how to load a CSV file into a DataFrame using pandas.
- The
printstatement displays the first few rows of the loaded data, providing an overview of the dataset.
3. Use Descriptive Comments
Adding comments to your code examples helps readers understand what each part of the code does. This is especially important for beginners who might be unfamiliar with certain functions or methods.
```python
# Function to calculate the factorial of a number
def factorial(n):
    if n == 0:
        return 1
    else:
        return n * factorial(n-1)

# Example usage
print(factorial(5))  # Output: 120
```

**Here’s what the comments explain**:
- The `factorial` function calculates the factorial of a number using recursion.
- The `print` statement shows the result of calculating the factorial of 5.
Versioning and Maintaining Python Documentation
Versioning Your Documentation
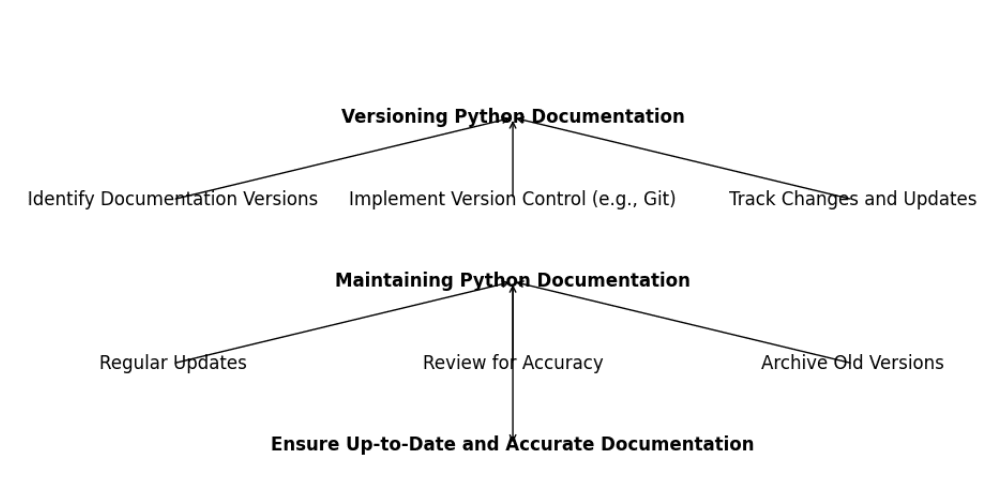
When working with software projects, particularly libraries or APIs, it’s essential to manage documentation alongside your code. Versioning documentation ensures that users have access to accurate information that matches the version of the software they are using. This process involves using version control systems like Git and documenting API changes effectively.
Using Version Control (e.g., Git)
Version control systems (VCS) are vital tools for tracking changes in your code and documentation. Git, one of the most popular version control systems, helps you manage and maintain different versions of your documentation easily. Here’s how you can use Git for versioning your documentation:
1. Initialize a Git Repository:
If you haven’t already, initialize a Git repository for your project. This will allow you to track changes to both your code and documentation.
git init
This command sets up a new Git repository in your project’s directory.
2. Commit Changes Regularly
As you make updates to your documentation, commit these changes to your Git repository. This keeps a history of all modifications, making it easier to track changes and roll back if necessary.
git add docs/
git commit -m "Update documentation for version 1.2.3"
Here, git add docs/ stages your documentation changes, and git commit saves these changes with a descriptive message.
3. Use Branches for Different Versions
Create branches for different versions of your documentation. For example, you might have a branch for version 1.0 and another for version 2.0.
git checkout -b version-1.0
This command creates and switches to a new branch named version-1.0, where you can maintain documentation specific to that version.
4. Merge Changes
When updates are made in one branch (e.g., a new feature is added), merge those changes into the relevant branches. This helps keep documentation up-to-date across different versions.
git checkout version-2.0
git merge version-1.0
Here, git merge integrates changes from version-1.0 into version-2.0.
5. Tag Releases
Tagging releases in Git helps you mark specific points in your documentation history. Tags are often used to denote software releases.
git tag -a v1.2.3 -m "Documentation for version 1.2.3"
git push origin v1.2.3
This tags the current commit as v1.2.3 and pushes it to the remote repository.
Documenting API Changes
As software evolves, so do APIs. It’s crucial to document changes in your API to help users adapt to new versions and understand updates. Here’s how you can effectively document API changes:
1. Maintain a Changelog:
A changelog is a file that lists all changes made in each version of your API. It helps users track new features, bug fixes, and other updates. Create a CHANGELOG.md file in your project and keep it updated.
Changelog Example:
# Changelog

## [1.2.3] - 2024-08-25
- Added new `search()` function.
- Fixed bug in `login()` method affecting user sessions.
- Updated `authenticate()` method to support OAuth 2.0.

## [1.2.2] - 2024-07-15
- Minor bug fixes and performance improvements.
This example lists changes for version 1.2.3 and 1.2.2, making it clear what has been updated.
2. Update Documentation for Each API Version
For each version of your API, update the documentation to reflect changes. This includes updating function signatures, adding new parameters, and describing changes in behavior.
Updated Function Example:
def authenticate(user: str, password: str, oauth_token: str = None) -> bool:
    """
    Authenticate a user with optional OAuth 2.0 support.

    :param user: Username of the user.
    :param password: Password of the user.
    :param oauth_token: Optional OAuth 2.0 token for authentication.
    :return: True if authentication is successful, False otherwise.
    """
In this updated function example, the parameter oauth_token is introduced with a description.
3. Use Versioned Documentation
Provide different versions of your documentation so users can access information relevant to the version of the API they are using. This can be done by maintaining versioned documentation in separate branches or directories.
Directory Structure Example:
docs/
├── version-1.0/
├── version-1.1/
├── version-1.2/
This structure allows users to access documentation specific to each version.
4. Communicate Changes Effectively
Ensure that any major changes are communicated clearly to users. This can be done through release notes, blog posts, or direct notifications.
Release Note Example:
# Release Note for Version 1.2.3

## New Features
- Introduced `search()` function for advanced queries.

## Bug Fixes
- Fixed issue with `login()` method causing session drops.

## Breaking Changes
- `authenticate()` method now supports OAuth 2.0.
This example outlines new features, bug fixes, and breaking changes in the release.
Managing Documentation for Multiple Versions
When working on a software project that evolves over time, managing documentation for multiple versions becomes crucial. This process ensures that users have access to accurate and relevant information corresponding to the version of the software they are using. Here’s a detailed guide on how to effectively manage documentation for various versions of your project.
Organizing Documentation for Different Versions
1. Create Separate Documentation for Each Version
To keep documentation clear and relevant, it is essential to maintain separate documents or directories for each version of your project. This allows users to access information that matches the specific version they are working with.
Directory Structure Example:
docs/
├── version-1.0/
│   ├── index.md
│   ├── api_reference.md
│   └── user_guide.md
├── version-1.1/
│   ├── index.md
│   ├── api_reference.md
│   └── user_guide.md
├── version-2.0/
│   ├── index.md
│   ├── api_reference.md
│   └── user_guide.md
In this structure, separate folders are used for different versions of the documentation. Each folder contains its own set of documents.
2. Use Version Control to Track Changes
Version control systems like Git are invaluable for managing changes across different versions of your documentation. By using Git, you can maintain and update documentation specific to each release efficiently.
Branching Strategy Example:
- Main Branch: Contains the latest stable release.
- Version Branches: Each branch represents a different version (e.g.,
version-1.0,version-1.1).
Git Commands:
# Create a branch for version 1.0
git checkout -b version-1.0

# Commit changes to version 1.0 branch
git add docs/version-1.0/
git commit -m "Update documentation for version 1.0"

# Switch to version 1.1 branch
git checkout version-1.1

# Merge changes from version 1.0 to version 1.1 if needed
git merge version-1.0
These commands help manage and merge documentation changes across different versions.
3. Maintain Consistent Documentation Across Versions
Consistency in documentation is essential for user understanding. Ensure that similar content is structured similarly across versions. This consistency helps users find information quickly, regardless of the version they are using.
Example: API Documentation
# Version 1.0 - API Reference

## `get_user()`
Retrieves user information based on the user ID.

- **Parameters**:
  - `user_id` (int): The ID of the user.
- **Returns**:
  - `User`: An object containing user details.
Ensure that the structure of API documentation remains consistent across versions.
4. Provide Access to Documentation for All Versions
Users should be able to access documentation for all versions easily. This can be achieved through a version selector on your documentation site or by linking to version-specific documentation.
Example of a Version Selector in HTML:
<nav>
  <ul>
    <li><a href="/docs/version-1.0/index.html">Version 1.0</a></li>
    <li><a href="/docs/version-1.1/index.html">Version 1.1</a></li>
    <li><a href="/docs/version-2.0/index.html">Version 2.0</a></li>
  </ul>
</nav>
This HTML code creates a simple navigation menu for different versions of your documentation.
Example: Maintaining Documentation for a Python Project with Multiple Versions
Let’s consider a Python project with multiple versions. We need to manage documentation for each version efficiently. Here’s how you can set up and maintain this documentation:
1. Project Setup
Create a directory structure for the documentation as shown earlier. Each version of the documentation will be stored in its own folder.
mkdir -p docs/version-1.0 docs/version-1.1 docs/version-2.0
This command sets up directories for three different versions.
2. Writing and Updating Documentation
Write documentation specific to each version in its respective folder. For example, add API references, user guides, and other relevant documents.
Version 1.0 – API Reference Example:
# API Reference - Version 1.0

## `add_numbers(a, b)`
Adds two numbers and returns the result.

- **Parameters**:
  - `a` (int): The first number.
  - `b` (int): The second number.
- **Returns**:
  - `int`: The sum of `a` and `b`.
Update the documentation as needed for each version.
3. Using Git for Version Control
Initialize a Git repository if you haven’t already and commit your version-specific documentation.
git init
git add docs/
git commit -m "Initial commit with versioned documentation"
This command initializes Git and commits the documentation.
4. Setting Up a Documentation Site
Use tools like Sphinx or MkDocs to generate a documentation site that allows users to select the version they need.
Sphinx Configuration Example:
# conf.py (Sphinx configuration file)
version = '1.0'
release = '1.0.0'
This snippet configures Sphinx to use the correct version for the documentation.
5. Publishing Documentation
Once your documentation is ready, publish it on a website or documentation platform where users can easily navigate to different versions.
GitHub Pages Example:
- Push your documentation to a GitHub repository.
- Enable GitHub Pages in the repository settings.
- Your documentation will be available at
https://username.github.io/repository/.
GitHub Pages provides a simple way to host your documentation online.
Best Practices for Python Documentation
Creating effective documentation is a key part of any Python project. It helps users and developers understand and use your code more effectively. Let’s explore some best practices to ensure your documentation is helpful, clear, and easy to maintain.
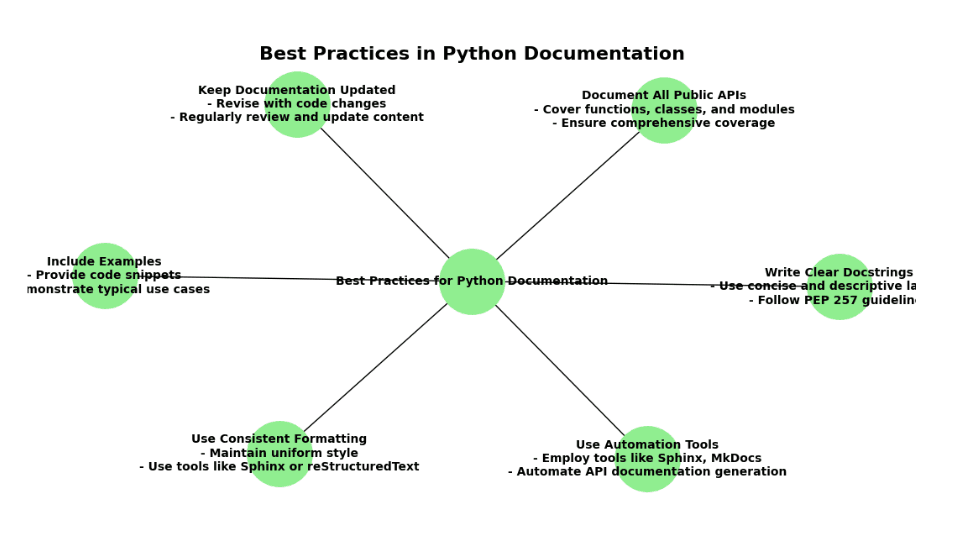
Consistency Across Documentation
Consistency is crucial in documentation. It ensures that users can easily navigate and understand your content without confusion. Here’s how to achieve consistency:
- Style and Format: Use a consistent style and format throughout your documentation. This includes using the same terminology, writing style, and formatting conventions.
- Docstring Formats: Adhere to a standard format for docstrings. For instance, follow PEP 257 conventions to keep your docstrings uniform. This helps maintain clarity and makes it easier for others to read and use your documentation.
- Documentation Structure: Maintain a consistent structure across different parts of your documentation. This includes using a similar layout for function descriptions, parameters, and return values.
Writing for Your Audience
Understanding your audience is essential for creating effective documentation. Tailoring your content to different user groups will make your documentation more valuable.
- Documentation for Beginners: When writing for beginners, use simple language and provide clear explanations. Include basic concepts and avoid jargon. For example, when documenting a function, explain what it does in easy terms and provide simple examples.
def add_numbers(a, b):
    """
    Add two numbers together.

    Parameters:
    a (int): The first number.
    b (int): The second number.

    Returns:
    int: The sum of the two numbers.

    Example:
    >>> add_numbers(2, 3)
    5
    """
    return a + b
Documentation for Advanced Users: For advanced users, you can assume a higher level of knowledge. Focus on providing in-depth explanations and technical details. Highlight complex features and provide advanced use cases.
def process_data(data, filter_function):
    """
    Apply a filtering function to the given data.

    Parameters:
    data (list): The data to be processed.
    filter_function (callable): A function used to filter the data.

    Returns:
    list: A list containing filtered data.

    Example:
    >>> process_data([1, 2, 3, 4], lambda x: x > 2)
    [3, 4]
    """
    return [item for item in data if filter_function(item)]
Keeping Documentation Up-to-Date
Documentation should reflect the current state of your code. Keeping it up-to-date is essential to ensure accuracy and relevance.
- Regular Reviews: Periodically review and update your documentation to match changes in your code. This prevents outdated information from confusing users.
- Version Control: Use version control systems like Git to track changes in both your code and documentation. This makes it easier to maintain documentation for different versions of your project.
Structuring Your Documentation
A well-structured documentation layout improves readability and usability. Here are key components to include:
- Table of Contents: A table of contents (TOC) provides an overview of your documentation and helps users find information quickly. It should be organized by sections and sub-sections.
# Table of Contents
- [Introduction](#introduction)
- [Usage](#usage)
- [API Reference](#api-reference)
- [Examples](#examples)
- [FAQ](#faq)
- Search Functionality: Implementing search functionality allows users to quickly locate specific information within your documentation. Many documentation tools like Sphinx and MkDocs offer built-in search features.
Example: Structuring Documentation for a Python Project
Let’s look at how to structure documentation for a Python project effectively.
Project Name Documentation
- Introduction
- Overview of the project
- Installation instructions
- Usage
- Basic usage examples
- Advanced usage
- API Reference
- Detailed function and class descriptions
- Parameters, return values, and examples
- Examples
- Practical examples of how to use the project
- FAQ
- Common questions and troubleshooting tips
Sample Documentation Structure
# My Python Project

## Introduction
Welcome to My Python Project! This documentation will guide you through the installation, usage, and advanced features of the project.

## Installation
To install My Python Project, use the following command:
```bash
pip install my-python-project
Usage
Here’s how to get started with My Python Project:
import my_project

result = my_project.some_function()
print(result)
API Reference
some_function()
Description: This function does something useful.
Parameters:
param1: Description of param1
Returns:
- Description of the return value
Example:
result = my_project.some_function(param1)
print(result)
Examples
Find detailed examples and use cases here.
FAQ
Q: How do I handle errors? A: Refer to the Error Handling section for guidance.
By following these best practices, your Python documentation will be clear, consistent, and user-friendly, making it a valuable resource for both new and experienced users.
Conclusion
In Part 2 of our Python documentation guide, we explored advanced techniques for documenting your projects. We emphasized the importance of API documentation, showing how to use docstrings effectively and automate documentation with tools like Sphinx and pdoc.
We also covered best practices for maintaining high-quality documentation, focusing on consistency, writing for your audience, and keeping content up-to-date. Effective structuring ensures users can navigate and understand your documentation easily.
Automation was a key topic, with guidance on using tools like Travis CI, GitHub Actions, and Read the Docs to streamline documentation builds. Practical examples, such as setting up automated Sphinx documentation, were provided.
Additionally, we discussed enhancing your documentation with clear examples and tutorials, including step-by-step guides and video tutorials. We also tackled versioning and managing documentation across multiple project versions.
With these insights, you’re ready to improve your documentation practices, automate processes, and create valuable resources for your Python projects, benefiting both users and your development workflow.
External Resources
Python’s API Documentation Guidelines
- Python API Documentation Guidelines
- Overview: This guide explains how to document Python APIs, providing best practices and examples directly from Python’s standard library.
Travis CI Documentation
- Travis CI Documentation
- Overview: Travis CI is a continuous integration service that can be used to automatically build and test code. This official documentation includes how to automate documentation builds.
FAQs
API documentation provides developers with the necessary information to use your code’s functionalities correctly. It acts as a reference guide, reducing confusion and errors when your API is integrated into other projects.
You can automate API documentation by using tools like Sphinx, pdoc, and GitHub Actions. These tools can automatically generate and deploy documentation based on your docstrings, reducing the manual effort required to keep documentation up-to-date.
Best practices include maintaining consistency across your documentation, writing content tailored to your audience (whether beginners or advanced users), keeping your documentation up-to-date, and structuring it in a way that makes it easy to navigate, such as using a clear table of contents and search functionality.
To set up automated builds with GitHub Actions, you need to create a workflow file in your repository that triggers on specific events, such as pushes to the main branch. This file will define the steps to install dependencies, generate documentation using tools like Sphinx, and deploy the generated docs to a hosting platform like GitHub Pages or Read the Docs.






Leave a Reply